To improve self-service capabilities and reduce support dependency, Microsoft has made the Remove-DkimSigningConfig cmdlet available to tenant administrators. This cmdlet enables admins to remove obsolete DomainKeys Identified Mail (DKIM) signing configurations directly from Exchange Online PowerShell, helping clean up configurations when domains are removed from a tenant.
When this will happen This feature is already enabled worldwide, including in special clouds.
How this affects your organization
Who is affected:Tenant administrators managing DKIM configurations in Exchange Onlinewith either the Transport Hygiene management role or the Security Administrator role in Entra ID.
What will happen:
Admins can now run Remove-DkimSigningConfig directly using Exchange Online PowerShell (requires ExO v3.7 module).
No escalation to Microsoft support is needed for DKIM cleanup.
Obsolete DKIM configurations for removed domains can be self-managed.
The cmdlet is available by default for eligible roles.
This cmdlet does not replace any existing tools or processes; it introduces a new capability for tenant admins to manage DKIM cleanup independently.
What you can do to prepare
Ensure you have the required role (Transport Hygiene or Security Administrator).
Upgrade to Exchange Online PowerShell module v3.7.
Use Connect-ExchangeOnline and run Remove-DkimSigningConfig as needed.
Update internal documentation for DKIM management procedures.
When you apply your company brand to customize the look of your organization’s email messages, you can also specify an expiration for these email messages. With Microsoft Purview Advanced Message Encryption, you can create multiple templates for encrypted emails that originate from your organization. Using a template, you can control how long recipients have access to mail sent by your users.
When an end user receives mail that has an expiration date set, the user sees the expiration date in the wrapper email. If a user tries to open an expired mail, an error appears in the OME portal.
You can only set expiration dates for emails to external recipients.
With Microsoft Purview Advanced Message Encryption, anytime you apply custom branding, Microsoft 365 applies the wrapper to email that fits the mail flow rule to which you apply the template. You can only use expiration if you use custom branding.
Microsoft 365 E5 subscription
Compliance Administrator Permissions
How to create a custom branding template to force mail expiration by using PowerShell
Using a work or school account that has sufficient permissions in your organization, such as Compliance Administrator, start a Windows PowerShell session and connect to Exchange Online. For instructions, see Connect to Exchange Online PowerShell.
Run the New-OMEConfiguration cmdlet
Where:
Identity is the name of the custom template.
ExternalMailExpiryInDays identifies the number of days that recipients can keep mail before it expires. You can use any value between 1–730 days.
More information about Microsoft Purview Advanced Message Encryption
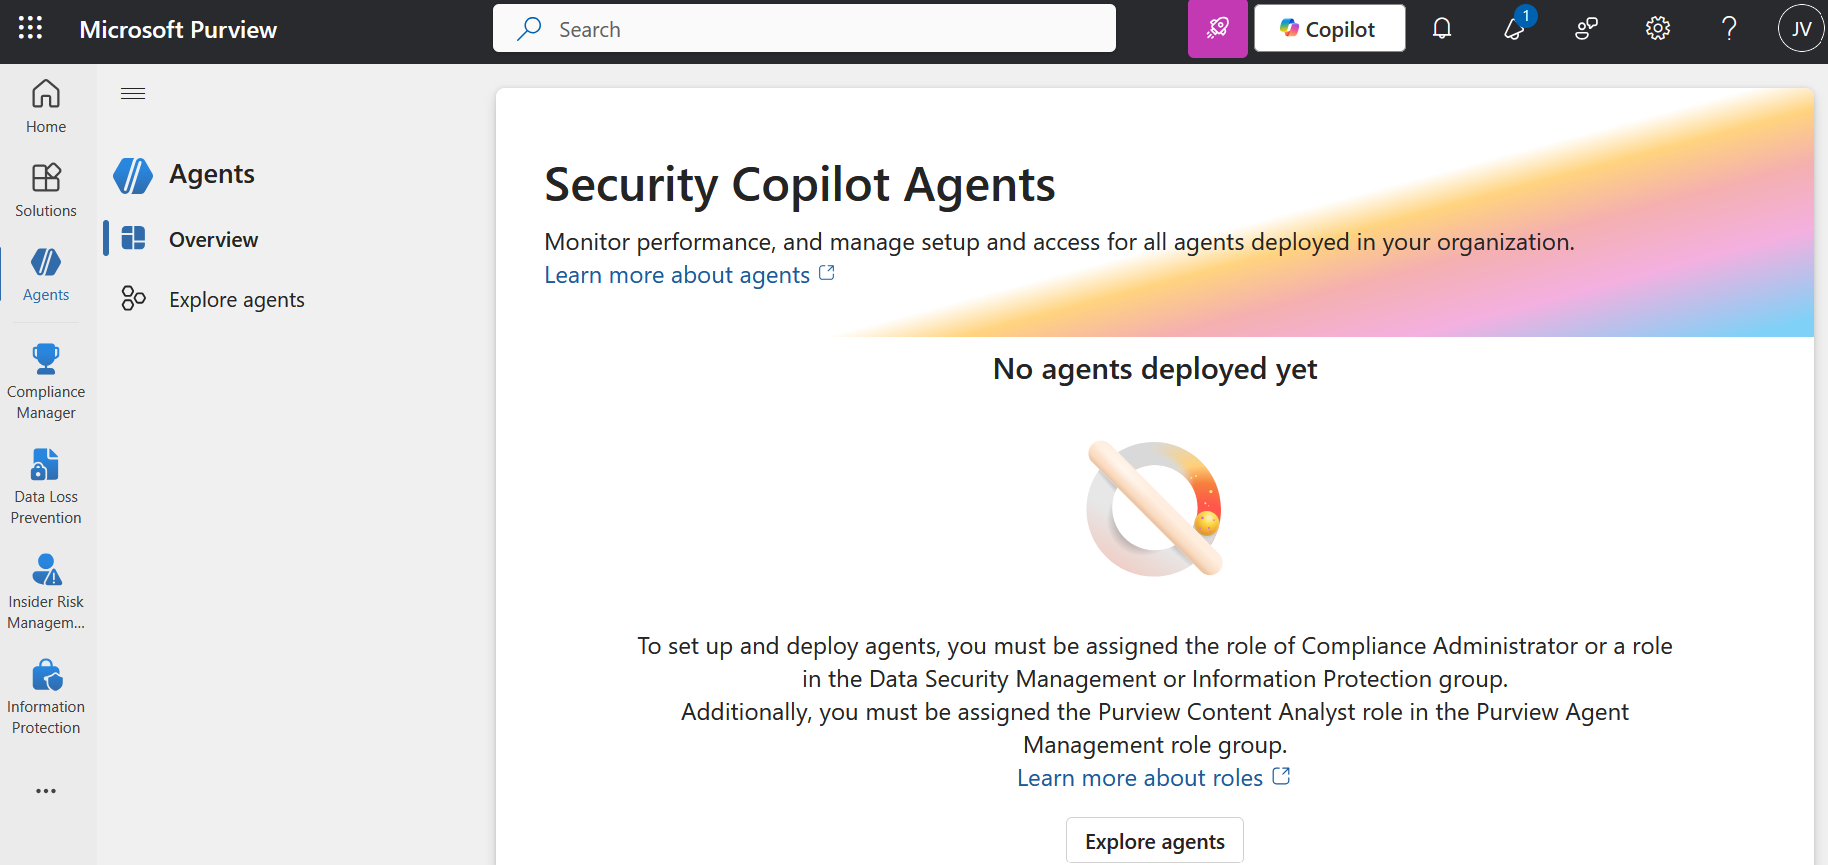
Microsoft has introduced Security Copilot agents in Microsoft Purview (preview) to assist organizations automate and scale triage across Data Loss Prevention (DLP) and Insider Risk Management (IRM). These AI-powered agents are built on the Microsoft Security Copilot platform and leverage Security Compute Units (SCUs) to reason over alerts, analyze content, and priorities risk—at scale.
The Microsoft Purview Triage Agents run on Security Compute Units (SCU). Your organization must have SCUs provisioned for the agents to run SKU/subscriptions licensing.
When you deploy an agent, and when you edit triggers, you can select whether the agent will run automatically based on a set schedule or Agent will run manually on one alert at a time . If you select Run automatically based on a set schedule, the agent will triage the alerts that are included in the Select Alert timeframe setting.
Microsoft Defender is updating the Export-QuarantineMessage cmdlet to include a new -PasswordV2parameter for plain text passwords, replacing the old -Password parameter. Microsoft offer the -PasswordV2 parameter as a new experience that allows admins and users to pass plain text for their passwords when exporting Quarantine items in PowerShell cmdlet. Admins and users should use the -PasswordV2parameter, because using the previous -Password parameter may cause errors and –Password won’t be available in the longer term.
For files that were quarantined by Safe Attachments for SharePoint, OneDrive, and Microsoft Teams, the files are exported in Base64 format.
Export-QuarantineMessage cmdlet functionality before this rollout:
Export-QuarantineMessage cmdlet functionality after this rollout:
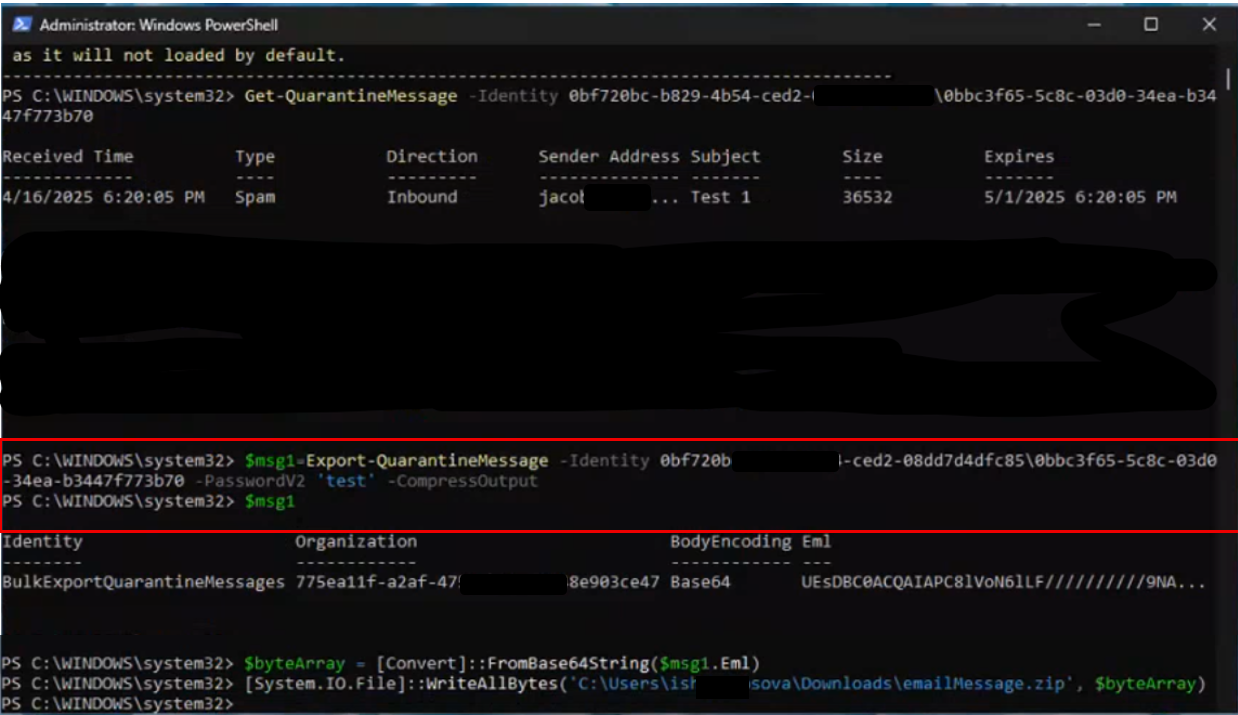
Use the Export-QuarantineMessage cmdlet to export quarantined messages and files from your cloud-based organization. Messages are exported to .eml message files so you can open them in Outlook.
This example exports the specified message with attachments that was quarantined as malware:
The first command exports the quarantined message and attachments to the variable $f. The message and attachments are stored in the Eml property (the $f.eml value) as Base64 (based on the $f.BodyEncoding value).
The second command converts the Eml property from Base64 to bytes and stores the result in the variable $bytes.
The third command writes the quarantined message and attachments to the specified .eml file.
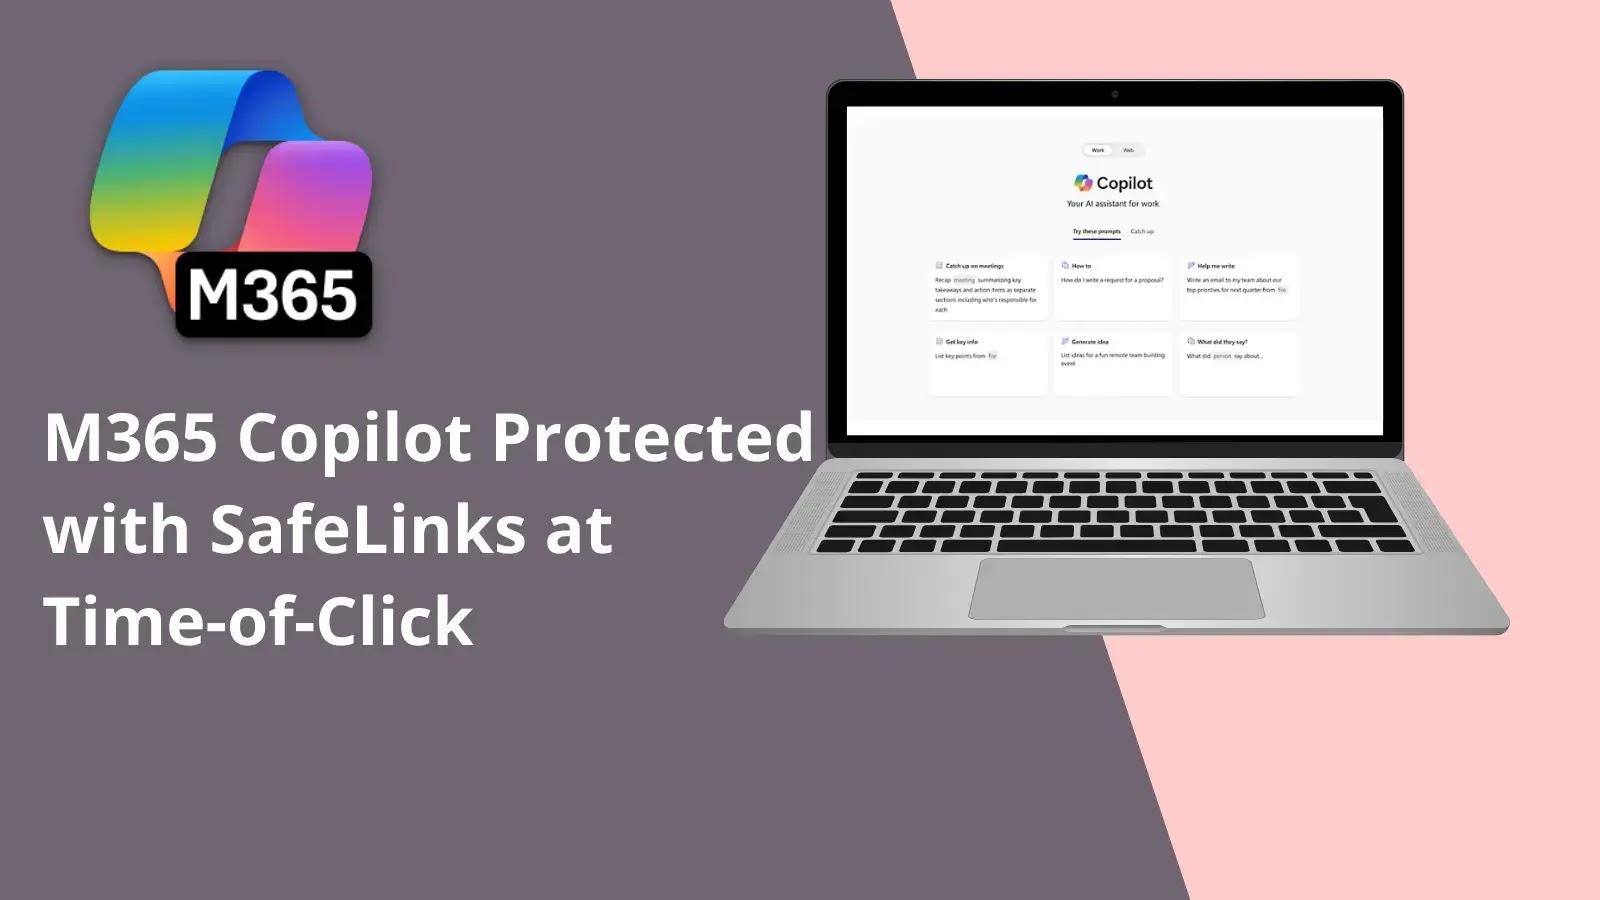
Microsoft announce some important updates to M365 Copilot Chat that will enhance security and user experience, following:
Integration with SafeLinks:
M365 Copilot Chat will integrate with SafeLinks in Defender for Office 365 to provide time-of-click URL protection for the hyperlinks included in its chat responses.
This change applies to users with Microsoft Defender for Office 365 Plan 1 or Plan 2 service plans. No policy configuration is needed within the SafeLinks policy.
Within Microsoft Defender for Office 365 Security Center, URL protection report will show the relevant summary and trend views for threats detected and actions taken on URL clicks.
Native Time-of-Click URL Reputation Check:
For users without SafeLinks protection (which is available as part of Microsoft Defender for Office 365), M365 Copilot Chat will natively enable time-of-click URL reputation check for the hyperlinks returned in its chat responses.
Hyperlink Redaction Changes:
M365 Copilot Chat will no longer redact hyperlinks in its chat responses if they are found in the grounding data used to generate the responses.
When this will happen:
General Availability (Worldwide): We will begin rolling out in late March 2025 and expect to complete by late May 2025.
Rollout will start on desktop and web and will complete with mobile versions. We plan to extend these updates to Copilot Chat experiences in Office apps in the future.
How this will affect your organization:
These updates are designed to enhance the security of the links included in M365 Copilot Chat response, ensuring that users are protected from malicious URLs.
What you need to do to prepare:
You may consider updating your training and documentation as appropriate to ensure users are aware of the change in behavior with hyperlinks in M365 Copilot Chat.
In 2018, Microsoft announced that they’ll no longer making feature updates to Exchange Web Services (EWS) in Exchange Online, and advised developers to move to Microsoft Graph.
In 2023, Microsoft announced that on October 1, 2026, they will start blocking EWS requests to Exchange Online.
Today, in Microsoft ongoing commitment to enhance the security and control mechanisms of Exchange Web Services (EWS), Microsoft announcing a significant change in the behavior of the EWSEnabled tenant-wide switch in Exchange Online. This modification provides a more robust framework for managing EWS access within organizations, ensuring both flexibility and security, and is necessary as they continue to work in there plan to disable EWS starting October 2026.
Current Behavior
The EWSEnabled flag can be set at both the tenant (organization) level and the user (mailbox) level. Currently, when the flag is set to true at the user level, it takes precedence over the organization-level setting. If the setting is Null, it means the setting is not enforced at that level. If Org and user-level are both Null, the default behavior is to allow. This hierarchical structure means that if the organization-level flag is set to false, but the user-level flag is set to true, EWS requests from that user are still allowed. In other words:
Organization Level
User Level
EWS Requests
True or <null>
True or <null>
Allowed
True or <null>
False
Not Allowed
False
True
Allowed
False
False or <null>
Not Allowed
This approach has led to inconsistencies and security concerns. It can be challenging for administrators to ensure uniform policy enforcement across their organization, particularly in large and complex environments.
New Behavior
To address these issues, we are altering the behavior so that EWS will only be allowed if both the organization-level and user-level EWSEnabled flags are true. Here’s a simplified view of the new logic:
Organization Level
User Level
EWS Requests
True or <null>
True or <null>
Allowed
True or <null>
False
Not Allowed
False
True or <null>
Not Allowed
False
False
Not Allowed
In short, EWS will be permitted only if both the organization and user-level allow it. This change ensures that administrators have better control over EWS access and can enforce policies more consistently across their entire organization.
This change will rollout worldwide starting April 2025.
Tenant-level setting
The first thing to check is your tenant setting. To do this, simply run this command in Exchange Online PowerShell
If the EWSEnabled flag is empty (the default), or set to True – this change won’t affect you, but we still advise you read the per-user settings information below to make sure it matches your expected settings.
If your EWSEnabled flag is set to False, you might see some impact when we enforce this new logic change on your tenant unless you take action now. We encourage you to review the section below to ensure your per-user settings reflect your desired state for who can and cannot use EWS, and then proactively change the tenant wide switch to True to ensure uninterrupted access for users and apps.
User-level setting
As discussed earlier, even if your tenant-wide EWSEnabled switch has been set to False, it’s currently still possible to use EWS, if the per-user setting is set to True (default setting for every mailbox).
To check if EWS is Enabled or Disabled for a specific mailbox, you can run:
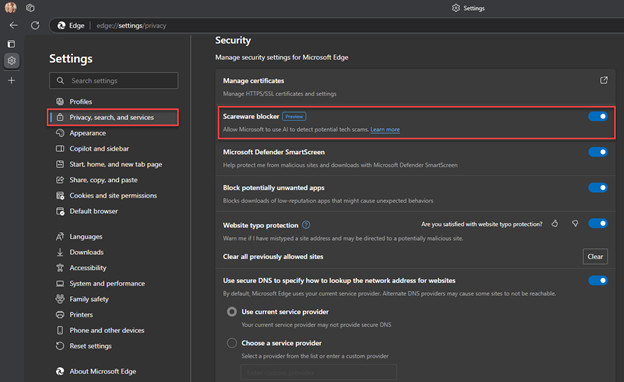
The Scareware Blocker is a New feature in Microsoft Edge designed to protect users from tech support scams, often referred to as scareware. These scams use aggressive web pages to trick users into thinking their system is infected with malware, pressuring them to call fake tech support numbers. Scareware blockers use a machine learning model to recognize the tell-tale signs of scareware scams and put users back in control of their computer.
Here’s how it works:
Machine Learning: It uses a machine learning model to detect and block scareware sites.
User Control: When a suspicious site is detected, Edge blocks it and shows a warning message, giving users the option to close the page or proceed if they believe it’s safe
“Scareware” scams are a particularly convincing type of tech support scam. They use aggressive web pages to convince victims into thinking their system is infected with malware, pressure them to call a fake tech support number, and try to gain access to the computer. Last year, Hollywood even made a blockbuster action movie with scareware scammers as the villains.
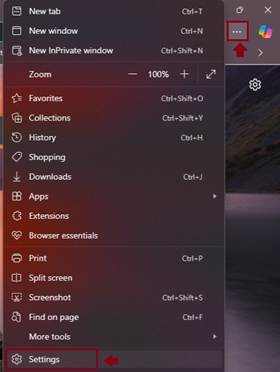
To enable Scareware Blocker in Microsoft Edge:
Open Edge and click on the three-dot menu in the toolbar.
Select Settings.
Navigate to Privacy, search, and services.
Find the Scareware Blocker option and toggle it on
When scareware blocker suspects a page is a scam, Edge will put users back in control by exiting full screen mode, stopping aggressive audio playback, warning the user, and showing a thumbnail of the page they were just viewing:
Scareware blocker fights tech scams – Video Tutorial
Microsoft 365 Copilot is a sophisticated processing and orchestration engine that provides AI-powered productivity capabilities by coordinating the following components:
Large language models (LLMs)
Content in Microsoft Graph, such as emails, chats, and documents that you have permission to access.
The Microsoft 365 productivity apps that you use every day, such as Word and PowerPoint.
How does Microsoft 365 Copilot use your proprietary organizational data?
Microsoft 365 Copilot provides value by connecting LLMs to your organizational data. Microsoft 365 Copilot accesses content and context through Microsoft Graph. It can generate responses anchored in your organizational data, such as user documents, emails, calendar, chats, meetings, and contacts. Microsoft 365 Copilot combines this content with the user’s working context, such as the meeting a user is in now, the email exchanges the user had on a topic, or the chat conversations the user had last week. Microsoft 365 Copilot uses this combination of content and context to help provide accurate, relevant, and contextual responses.
Microsoft 365 Copilot only surfaces organizational data to which individual users have at least view permissions. It’s important that you’re using the permission models available in Microsoft 365 services, such as SharePoint, to help ensure the right users or groups have the right access to the right content within your organization. This includes permissions you give to users outside your organization through inter-tenant collaboration solutions, such as shared channels in Microsoft Teams.
When you enter prompts using Microsoft 365 Copilot, the information contained within your prompts, the data they retrieve, and the generated responses remain within the Microsoft 365 service boundary, in keeping with our current privacy, security, and compliance commitments. Microsoft 365 Copilot uses Azure OpenAI services for processing, not OpenAI’s publicly available services. Azure OpenAI doesn’t cache customer content and Copilot modified prompts for Microsoft 365 Copilot.
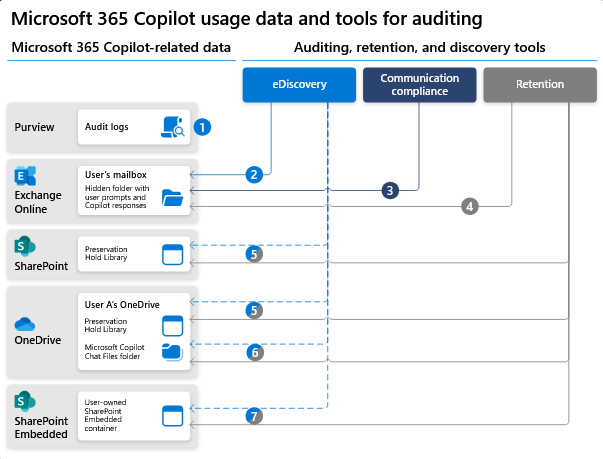
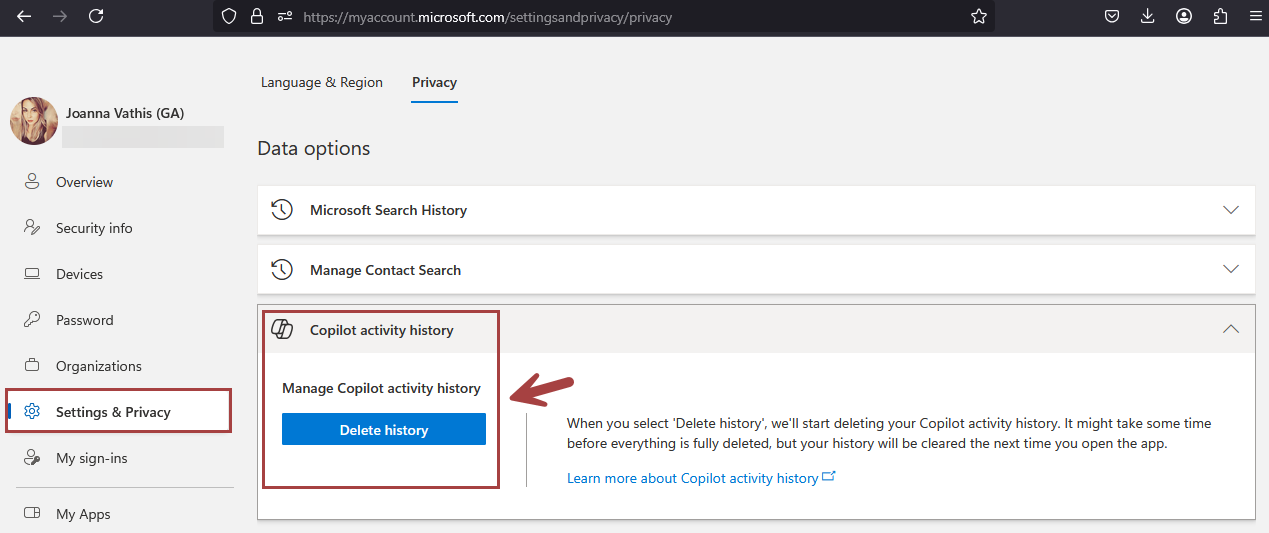
Data stored about user interactions with Microsoft 365 Copilot
When a user interacts with Microsoft 365 Copilot (using apps such as Word, PowerPoint, Excel, OneNote, Loop, or Whiteboard), we store data about these interactions. The stored data includes the user’s prompt and Copilot’s response, including citations to any information used to ground Copilot’s response. We refer to the user’s prompt and Copilot’s response to that prompt as the “content of interactions” and the record of those interactions is the user’s Copilot activity history. For example, this stored data provides users with Copilot activity history in Microsoft 365 Copilot Chat (previously named Business Chat) and meetings in Microsoft Teams. This data is processed and stored in alignment with contractual commitments with your organization’s other content in Microsoft 365. The data is encrypted while it’s stored and isn’t used to train foundation LLMs, including those used by Microsoft 365 Copilot.
To view and manage this stored data, admins can use Content search or Microsoft Purview. Admins can also use Microsoft Purview to set retention policies for the data related to chat interactions with Copilot. For Microsoft Teams chats with Copilot, admins can also use Microsoft Teams Export APIs to view the stored data.
Deleting the history of user interactions with Microsoft 365 Copilot
Microsoft 365 Copilot calls to the LLM are routed to the closest data centers in the region, but also can call into other regions where capacity is available during high utilization periods.
For European Union (EU) users, we have additional safeguards to comply with the EU Data Boundary. EU traffic stays within the EU Data Boundary while worldwide traffic can be sent to the EU and other countries or regions for LLM processing. The EU Data Boundary is a geographically defined boundary within which Microsoft has committed to store and process Customer Data and personal data for our Microsoft enterprise online services, including Azure, Dynamics 365, Power Platform, and Microsoft 365, subject to limited circumstances where Customer Data and personal data will continue to be transferred outside the EU Data Boundary.
How does Microsoft 365 Copilot protect organizational data?
The permissions model within your Microsoft 365 tenant can help ensure that data won’t unintentionally leak between users, groups, and tenants. Microsoft 365 Copilot presents only data that each individual can access using the same underlying controls for data access used in other Microsoft 365 services. Semantic Index honors the user identity-based access boundary so that the grounding process only accesses content that the current user is authorized to access.
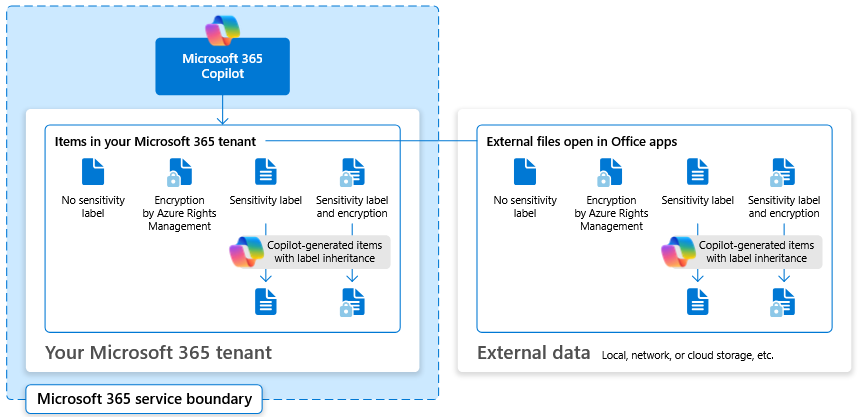
Copilot works together with your Microsoft Purviewsensitivity labels and encryption to provide an extra layer of protection. The following diagram provides a visual representation of how Copilot honors your information protection controls using sensitivity labels and encryption.
Copilot will only work with your M365 tenant data and won’t be able to access other companies’ data. Plus, your data doesn’t train the AI for other companies to leverage..
Migrating from Google Workspace to Microsoft 365 can be a daunting task, especially when dealing with mailboxes over 100 GB. This guide provides an in-depth look at the challenges and solutions for a successful migration, catering to both normal and large mailboxes.
Assessment and Planning
Before initiating the migration, it’s crucial to carry out a thorough assessment of your current Google Workspace environment. Identify the number of users, mailbox sizes, and any potential issues that might arise. Planning should include:
Identifying key stakeholders
Defining the migration timeline
Determining the migration method
Allocating resources and roles
You can migrate the following functionalities from Google Workspace to Microsoft 365 or Office 365:
Mail & Rules Calendar Contacts
You can migrate batches of users from Google Workspace to Microsoft 365 or Office 365, allowing a migration project to be done in stages. This migration requires that you provision all of your users who will be migrated as mail-enabled users outside of the migration process. You must specify a list of users to migrate for each batch.
All procedures in this article assume that your Microsoft 365 or Office 365 domain is verified and that your TXT records have been set up. For more information, see Set up your domain (host-specific instructions).
Select your method of migration
You can migrate from Google Workspace using any of the following methods:
Automated – through the Exchange admin center
Manual – through the Exchange admin center
PowerShell
Migration limitations
Important Microsoft’s data migration tool is currently unaware of tools enforcing messaging records management (MRM) or archival policies. Because of this, any messages that are deleted or moved to archive by these policies will result in the migration process flagging these items as “missing”. The result is perceived data loss rather than actual data loss, which makes it much harder to identify actual data loss during any content verification checks. Therefore, Microsoft strongly recommends disabling all MRM and archival policies before attempting any data migration to mailboxes.
Note The largest single email message that can be migrated is based on the transport configuration for your configuration. The default limit is 35 MB. To increase this limit, see Office 365 now supports larger email messages.
Throughput limitations for contacts and calendars completely depend on the quota restrictions for your tenant’s service account on the Google Workspace side.
Other migration limitations are described in the following table:
Data type
Limitations
Mail
Vacation settings, Automatic reply settings
Meeting rooms
Room bookings won’t be migrated
Calendar
Shared calendars and event colors won’t be migrated
Contacts
A maximum of three email addresses per contact are migrated over
Contacts
Gmail tags, contact URLs, and custom tags won’t be migrated
Google Workspace migration prerequisites in Exchange Online
The following procedures must be performed (in the order mentioned) before you start the process of Google Workspace migration:
Create a subdomain for mail routing to Microsoft 365 or Office 365
Create a subdomain for mail routing to your Google Workspace domain
Provision users in Microsoft 365 or Office 365
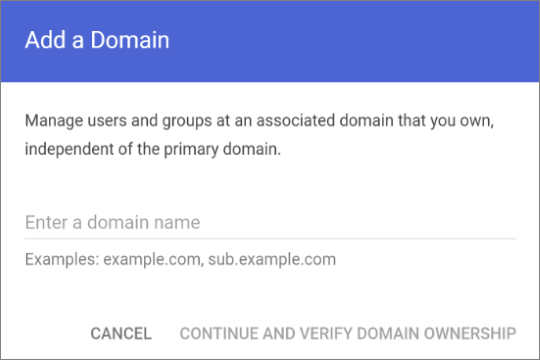
Create a subdomain for mail routing to Microsoft 365
Note The option Add a domain won’t be available if using the legacy free edition of G Suite.
Enter the domain that you’ll use for routing mails to Microsoft 365 or Office 365, select User alias domain, and then select ADD DOMAIN & START VERIFICATION. A subdomain of your primary domain is recommended (for example, “m365mail.domain.com”, when “domain.com” is your primary domain) so that it will be automatically verified. If another domain (such as “domain.onmicrosoft.com”) is set, Google will send emails to each individual address with a link to verify the permission to route mail. Migration won’t complete until the verification is completed.
Note If you see an error GmailForwardingAddressRequiresVerificationException has occurred during the batch, skip this step of creating a subdomain for forwarding emails from the gmail side.
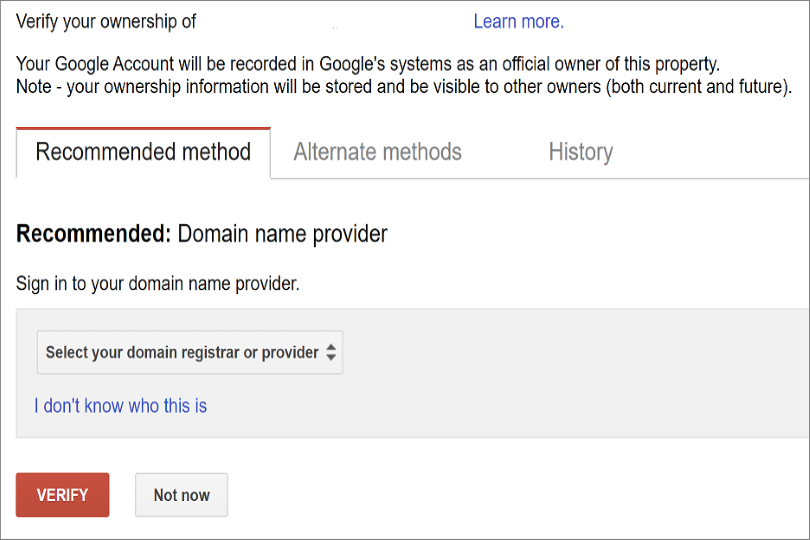
Follow any subsequent steps that are then required to verify your domain till the status is shown as Active. If you chose a subdomain of your primary domain (created in step 3), your new domain may have been verified automatically.
Sign in to your DNS provider and update your DNS records so that you have an MX record at the domain you created (in step 3), pointing to Microsoft 365 or Office 365. Ensure that this domain (created in step 3) is an accepted domain in Microsoft 365 or Office 365. Follow the instructions in Add a domain to Microsoft 365 to add the Microsoft 365 or Office 365 routing domain (“m365mail.domain.com”) to your organization and to configure DNS to route mail to Microsoft 365 or Office 365.
Note The migration process won’t be able to complete if an unverified routing domain is used. Choosing the built-in “tenantname.onmicrosoft.com” domain for routing mail to Office 365 instead of a subdomain of the primary Google Workspace domain occasionally causes issues that Microsoft is not able to assist with, besides causing Microsoft to recommend that the user manually verify the forwarding address or contact Google support.
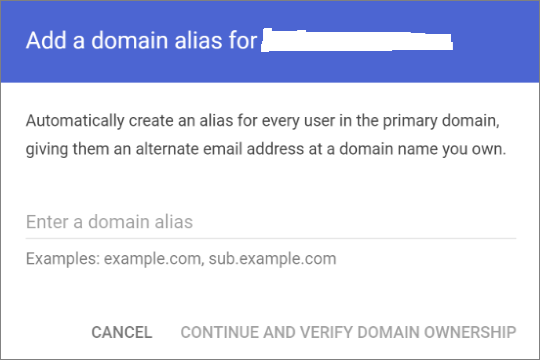
Create a subdomain for mail routing to your Google Workspace domain
Enter the domain that you’ll use for routing mails to Google Workspace, select User alias domain, and then select ADD DOMAIN & START VERIFICATION. A subdomain of your primary domain is recommended (for example, “gsuite.domain.com”, when “domain.com” is your primary domain) so that it will be automatically verified.
Follow any subsequent steps that are then required to verify your domain till your domain’s status is shown as Active. If you chose a subdomain of your primary domain (created in step 3), your new domain may have been verified automatically.
Note It may take up to 24 hours for Google to propagate this setting to all the users in your organization.
Important If you are using non-default Transport settings in your Microsoft 365 or Office 365 organization, you should check whether the mail flow will work from Office 365 to Google Workspace. Ensure that either your default Remote Domain (“*”) has Automatic Forwarding enabled, or that there is a new Remote Domain for your Google Workspace routing domain (for example, “gsuite.domain.com“) that has Automatic Forwarding enabled.
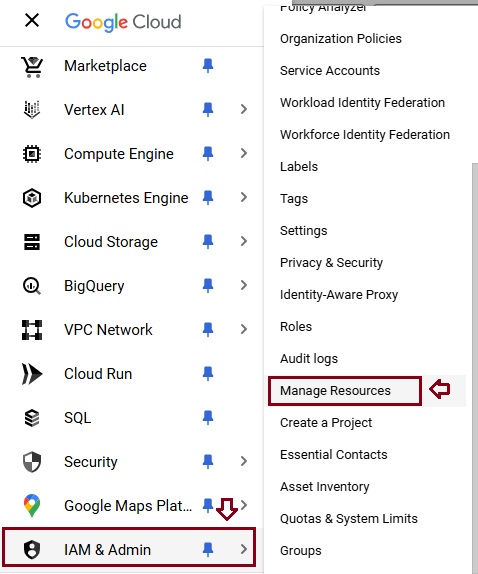
Check Google Cloud platform permissions
An automated scenario requires the Google Migration administrator to be able to perform the following steps in the Google admin console:
Create a Google Workspace project.
Create a Google Workspace service account in the project.
Create a service key.
Enable all APIs – Gmail, Calendar, and Contacts.
The Google Migration administrator needs the following permissions to complete these steps:
resourcemanager.projects.create
iam.ServiceAccounts.create
The most secure way to achieve completion of these four steps is to assign the following roles to the Google Migration administrator:
Select the appropriate resource and in the right-hand pane under the Permissions tab, select Add Principal.
Enter your Google Migration administrator credentials, enter Project Creator in the filter, and select Project Creator. Select Add Another Role, enter Create Service Accounts in the filter, and select Create Service Accounts. Select Save.
Note It might take up to 15 minutes to propagate role assignment changes across the globe.
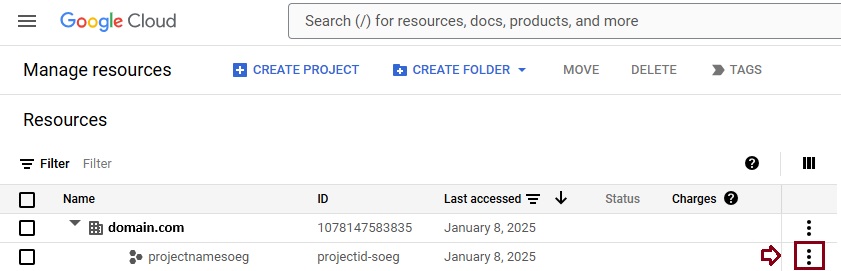
Provision users in Microsoft 365. Once your Google Workspace environment has been properly configured, you can complete your migration in the Exchange admin center or through the Exchange Online PowerShell. Before proceeding with either method, ensure that Mail Users have been provisioned for every user in the organization who will be migrated (either now or eventually). If any users aren’t provisioned, provision them using the instructions in Manage mail users.
Very Important Note Microsoft recommend that the Default MRM Policy and Archive policies be disabled for these users until their migration has been completed. When such features remain enabled during migration, there is a chance that some messages will end up being considered “missing” during the content verification process.
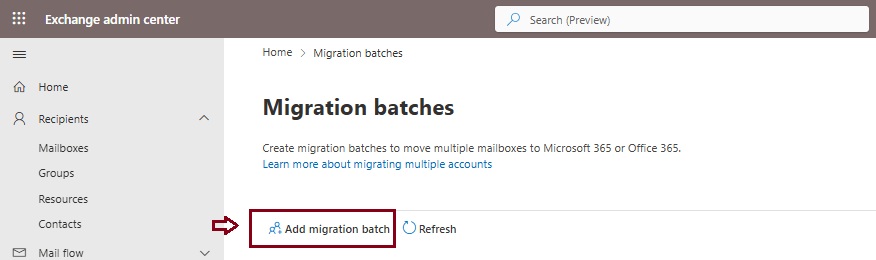
Start an automated Google Workspace migration batch in EAC
Give migration batch a unique name: Enter a unique name.
Select the mailbox migration path: Verify that Migration to Exchange Online is selected.
When you’re finished, click Next.
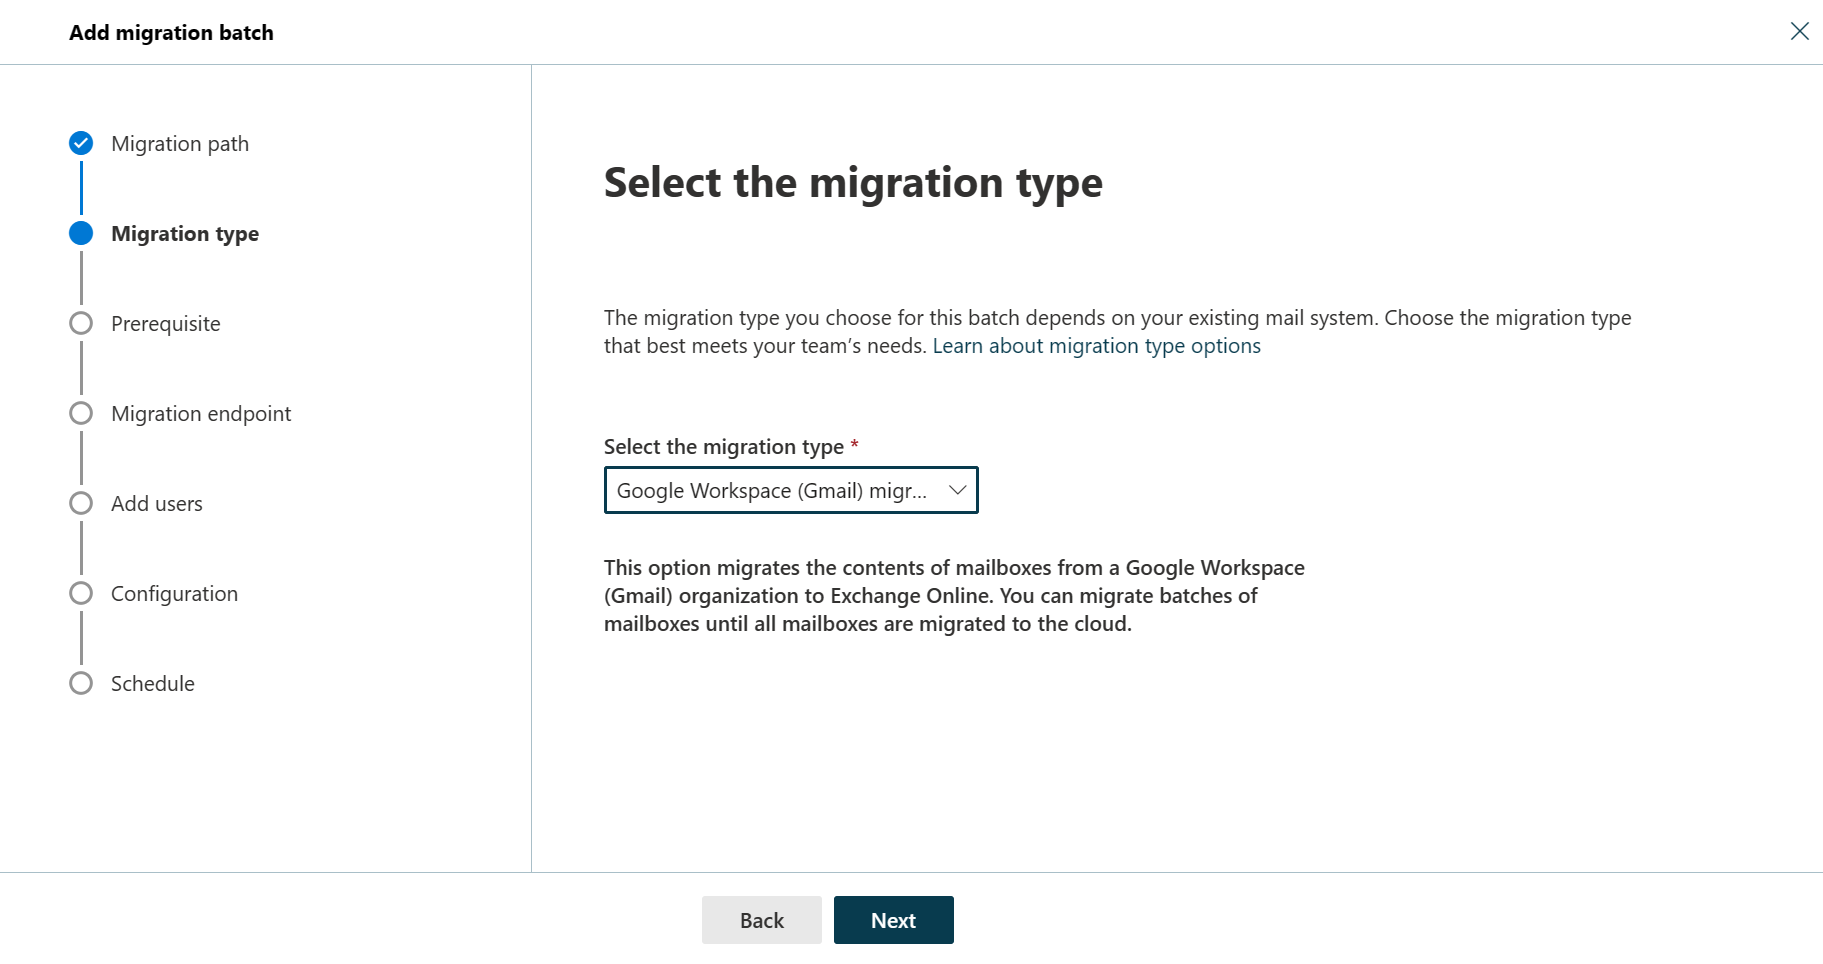
On the Select the migration type page, select Google Workspace (Gmail) migration as migration type, and click Next.
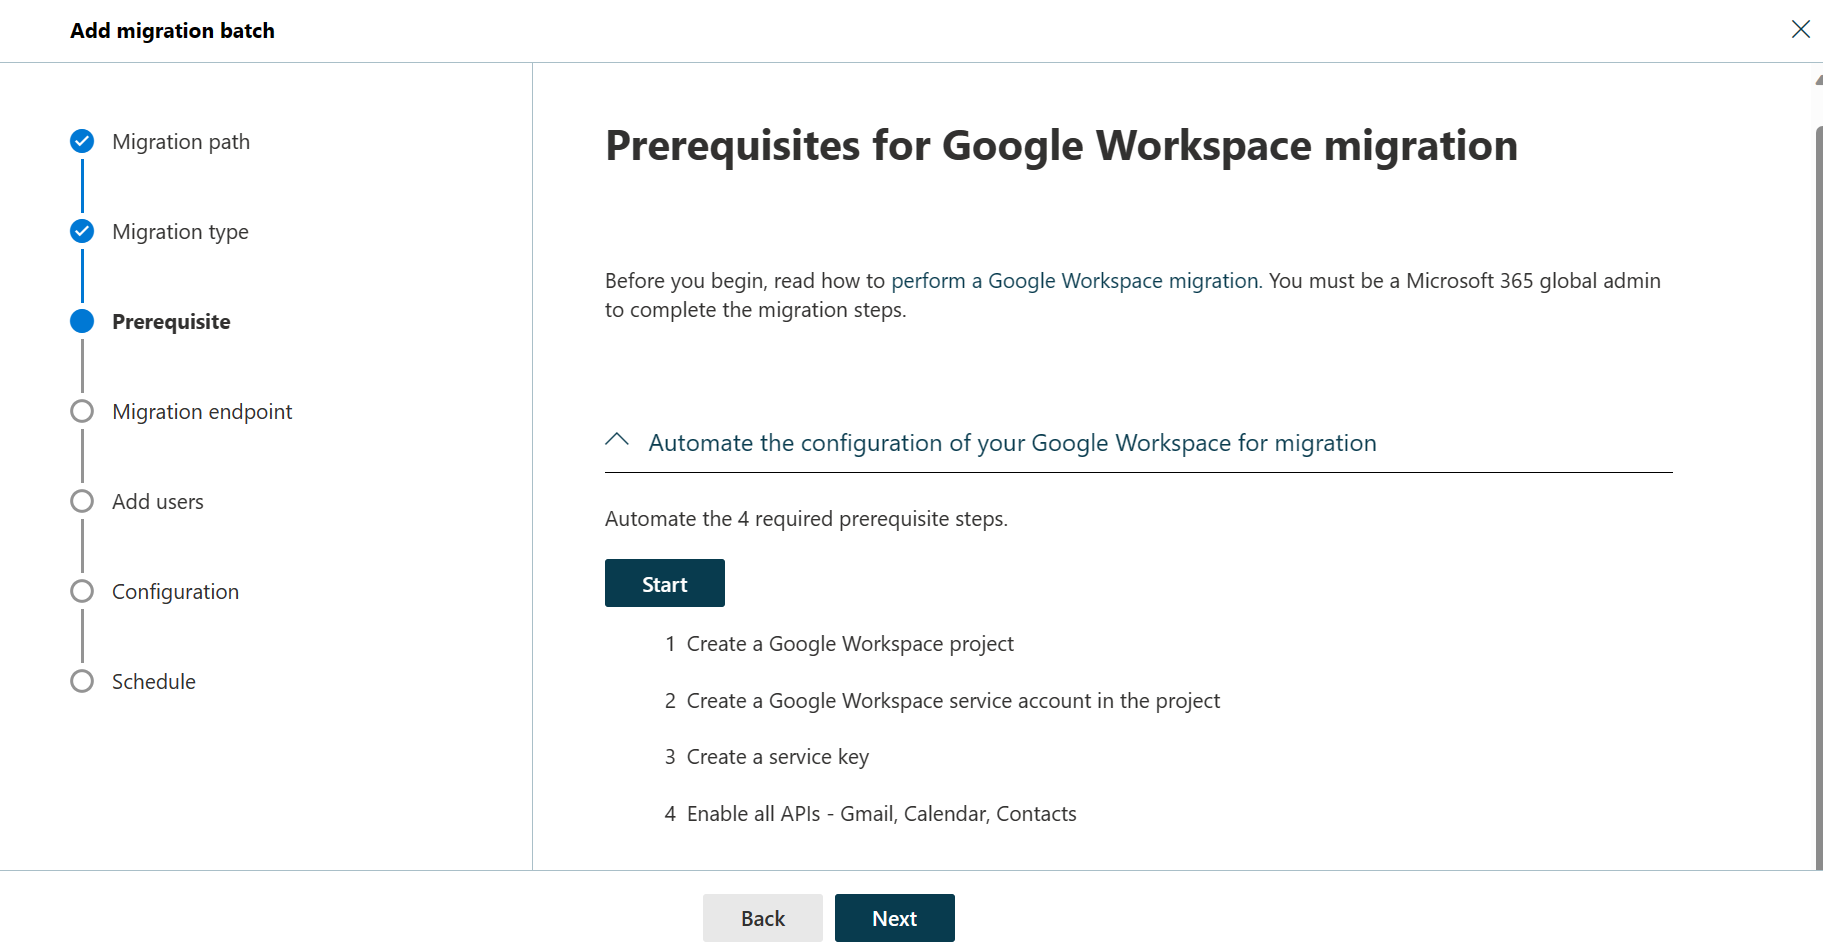
The Prerequisites for Google Workspace migration page appears.
Verify that the Automate the configuration of your Google Workspace for migration section is expanded, and then select Start in that section to automate the four required prerequisite steps.
In the Google sign-in page that appears, sign in to your Google account to validate your APIs.
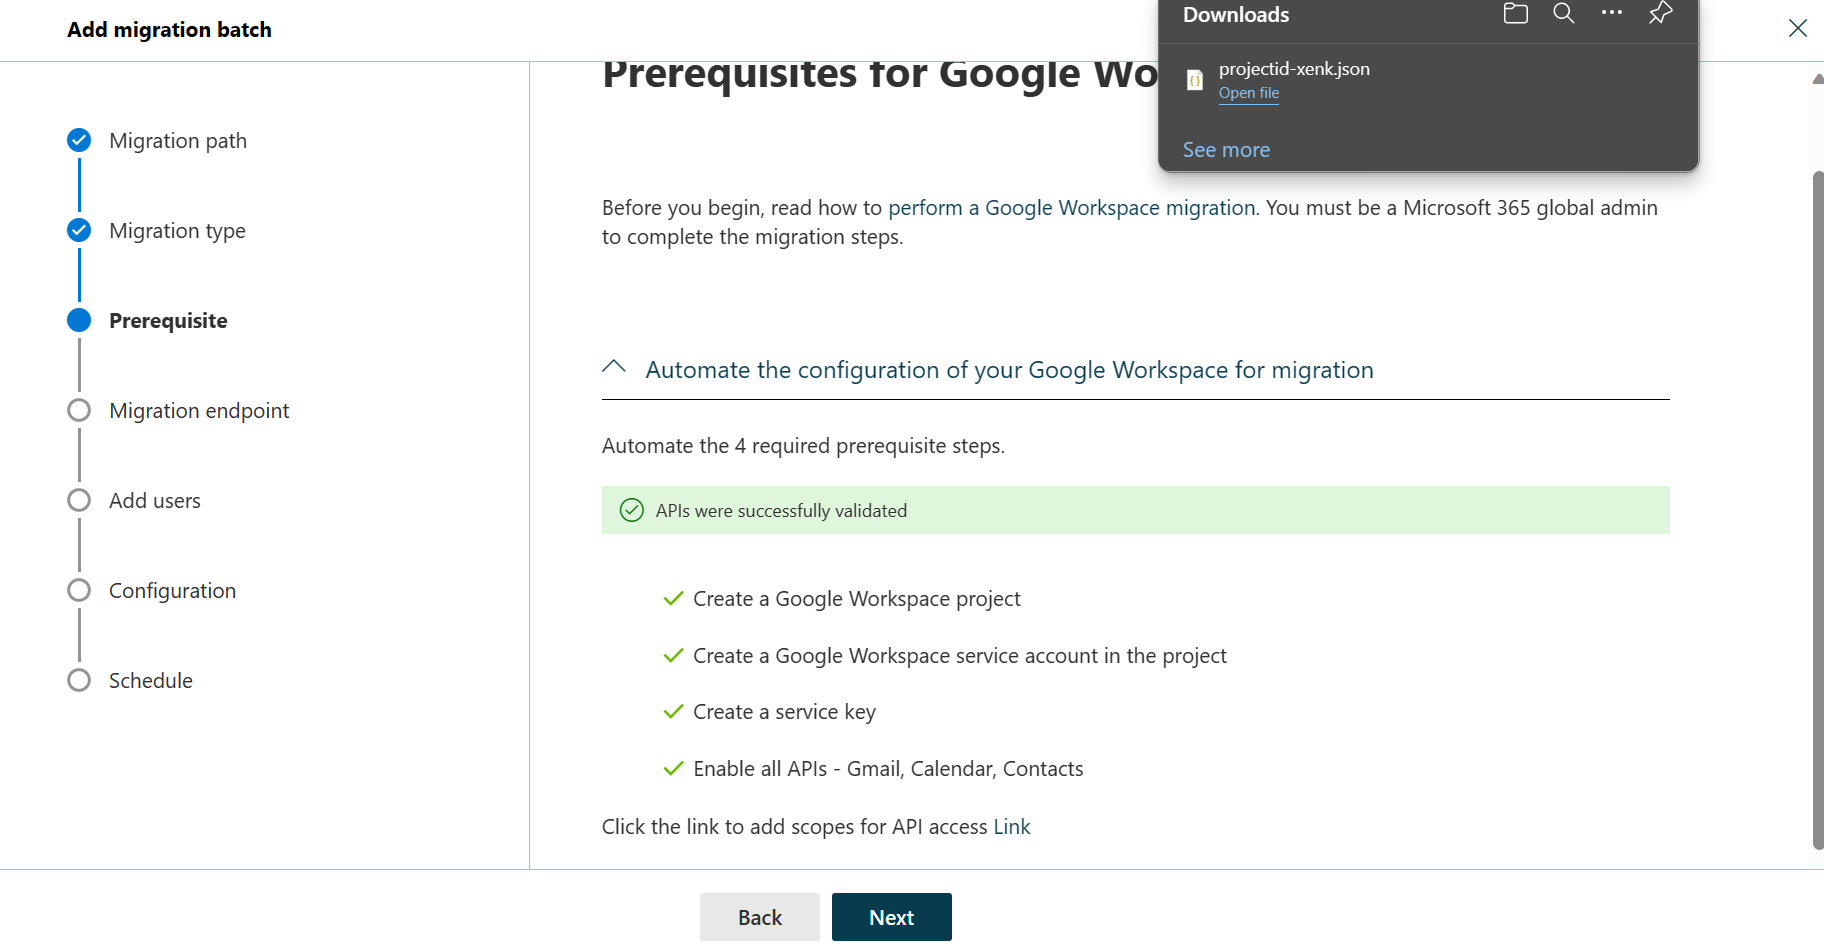
Once the APIs are successfully validated, the following things happen:
A JSON file (projectid-*.json) is downloaded to your local system.
The link to add the ClientID and the Scope is provided. The ClientID and Scope are also listed for your reference.
Select the API access link. You’ll be redirected to Google Admin API Controls page.
Select Add new. Copy the ClientID and Scope from the EAC, paste it here, and then select Authorize.
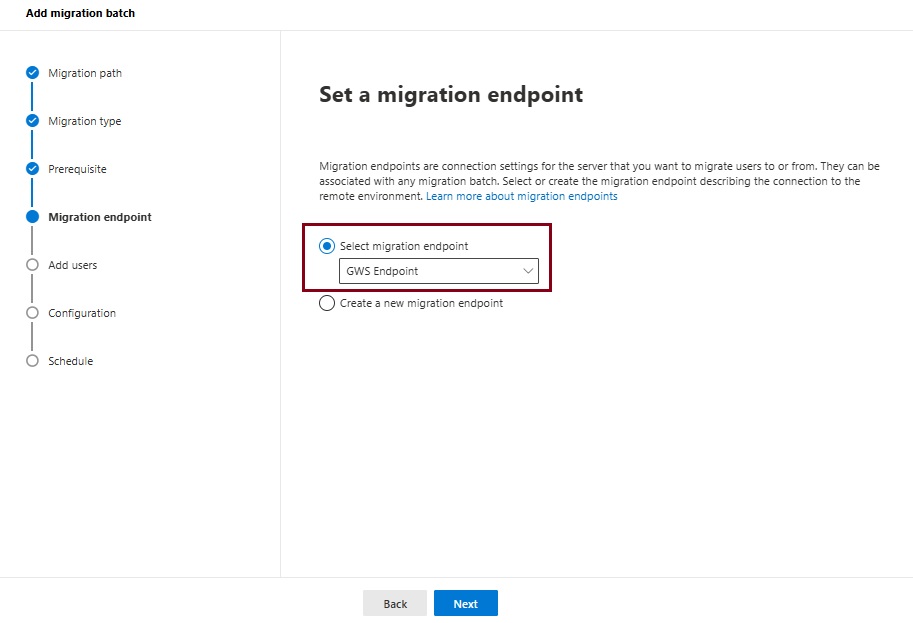
Once the four prerequisites-related steps are completed, select Next. The Set a migration endpoint page appears.
Select one of the following options:
Select the migration endpoint: Select an existing migration endpoint from the drop-down list.
Create a new migration endpoint: Select this option if you’re a first-time user.
Note To migrate Gmail mailboxes successfully, Microsoft 365 or Office 365 needs to connect and communicate with Gmail. To do this connection-communication, Microsoft 365 or Office 365 uses a migration endpoint. Migration endpoint is a technical term that describes the settings that are used to create the connection so you can migrate the mailboxes.
If you’ve selected Create a new migration endpoint, do the following steps:
On the General Information page, configure the following settings:
Migration Endpoint Name: Enter a value.
Maximum concurrent migrations: Leave the default value 20 or change the value as required.
Maximum concurrent incremental syncs: Leave the default value 10 or change the value as required. When you’re finished, select Next.
On the Gmail migration configuration page, configure the following settings:
Email address: Enter the email address that you use to sign in to the Google Workspace.
JSON key: Select Import JSON. In the dialog box that appears, find and select the downloaded JSON file, and then select Open. Once the endpoint is successfully created, it will be listed in the Select migration endpoint drop-down list.
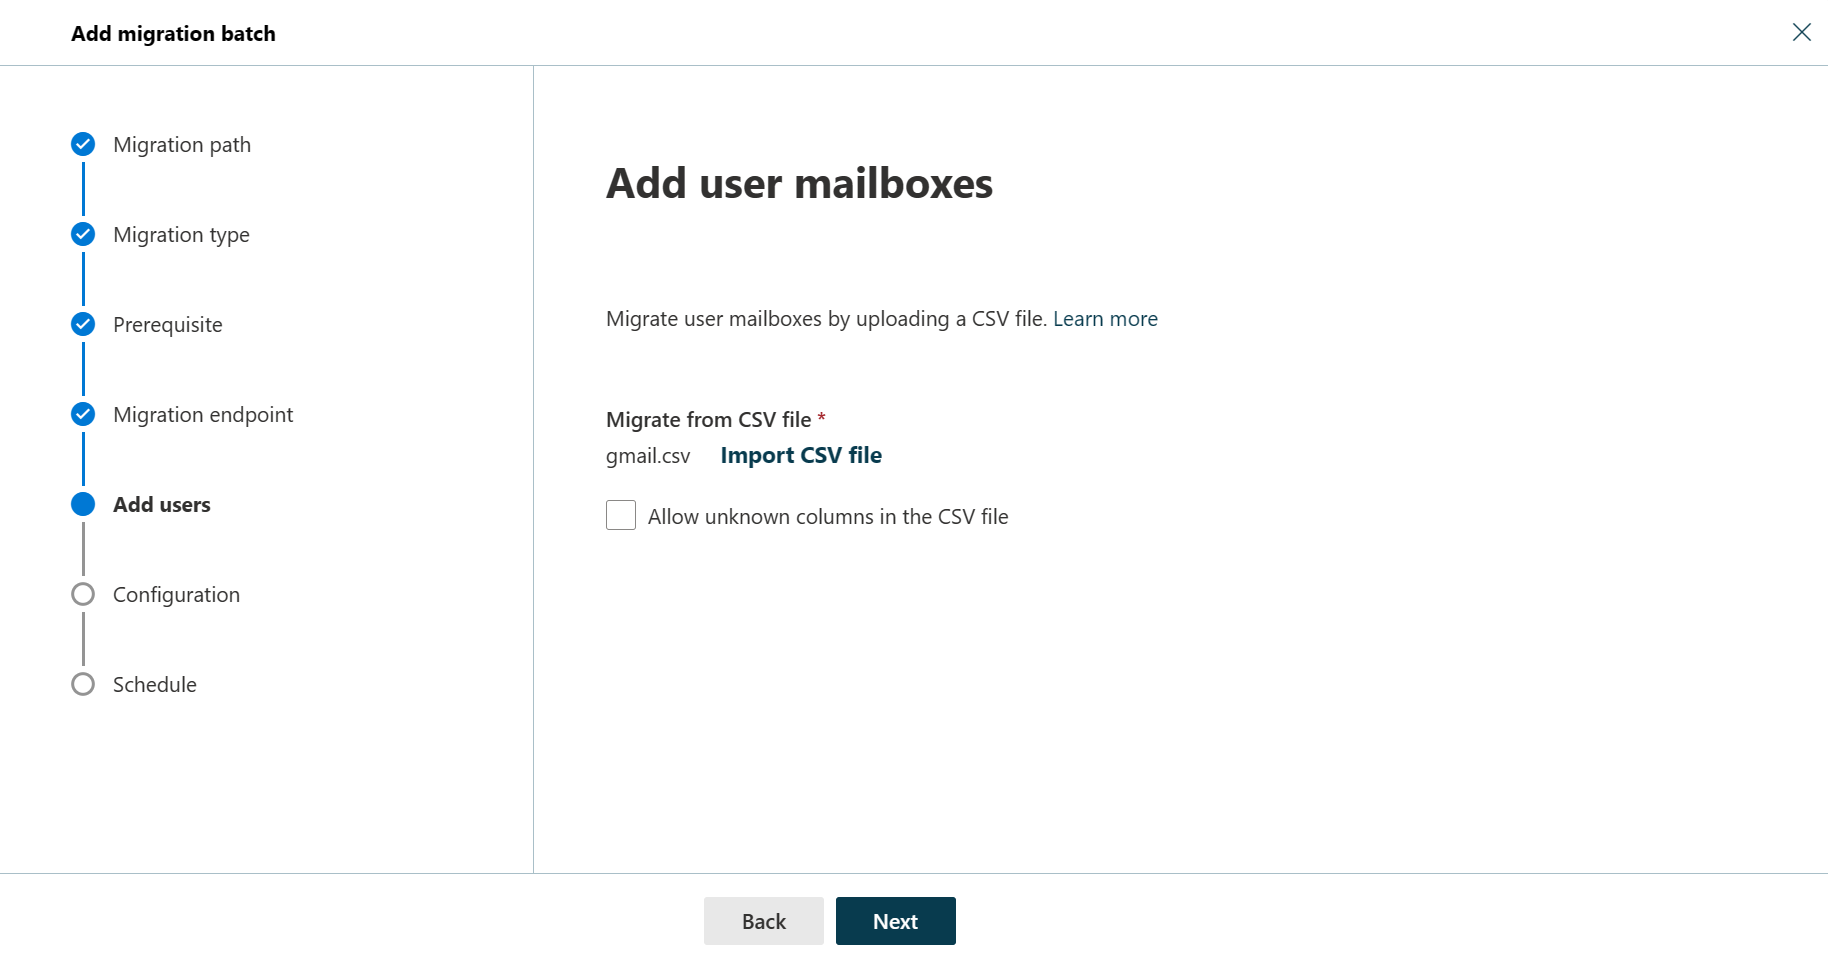
Select the endpoint from the drop-down list, and select Next. The Add user mailboxes page appears.
Select Import CSV file and navigate to the folder where you’ve saved the CSV file.
If you haven’t already saved or created the CSV file, create a CSV file containing the set of names of the users you want to migrate. You’ll need its filename below. The allowed headers are:
EmailAddress (required): Contains the primary email address for an existing Microsoft 365 or Office 365 mailbox.
Username (optional). Contains the Gmail primary email address, if it differs from EmailAddress.
CSV Format
EmailAddress will@domain.com user123@domain.com
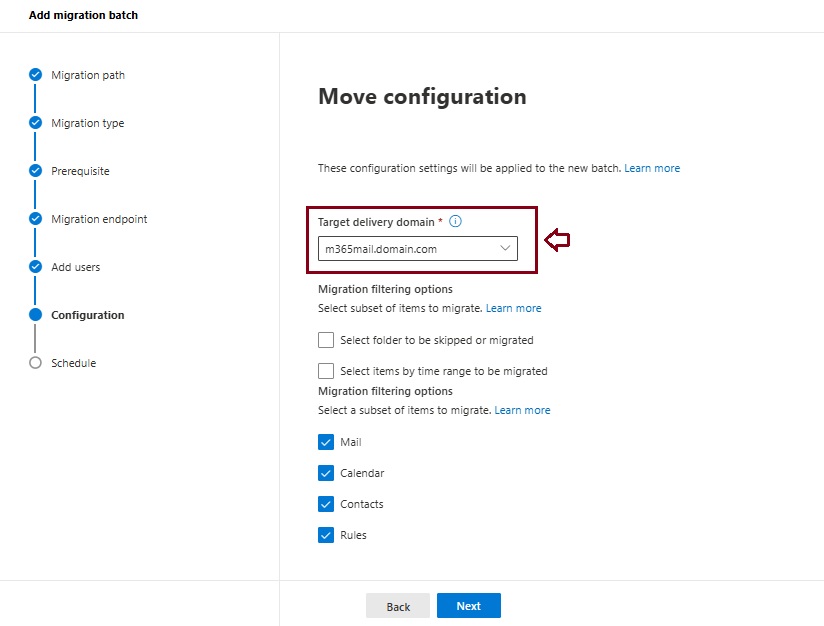
When you’re finished, click Next. The Move configuration page appears.
From the Target delivery domain drop-down list, select the target delivery domain (the subdomain) that was created as part of fulfilling the Google Workspace migration prerequisites in Exchange Online, and click Next.
Note The target delivery domain (the subdomain) you select in this step can be either an existing one or the one that you’ve created in Google Workspace migration prerequisites in Exchange Online (eg. M365mail.domain.com).
If you don’t see the target delivery domain that you want to select in the Target delivery domain drop-down list, you can manually enter the name of the target delivery domain in the text box.
The text box in which you manually enter the name of the target delivery domain is Target delivery domain. That is, the text box is effectively the Target delivery domain drop-down list, which is taking the role of a text box when you manually enter text into it.
Filtering options have been introduced for the migration of Google Workspace to Microsoft 365 or Office 365. For more information on these filtering options.
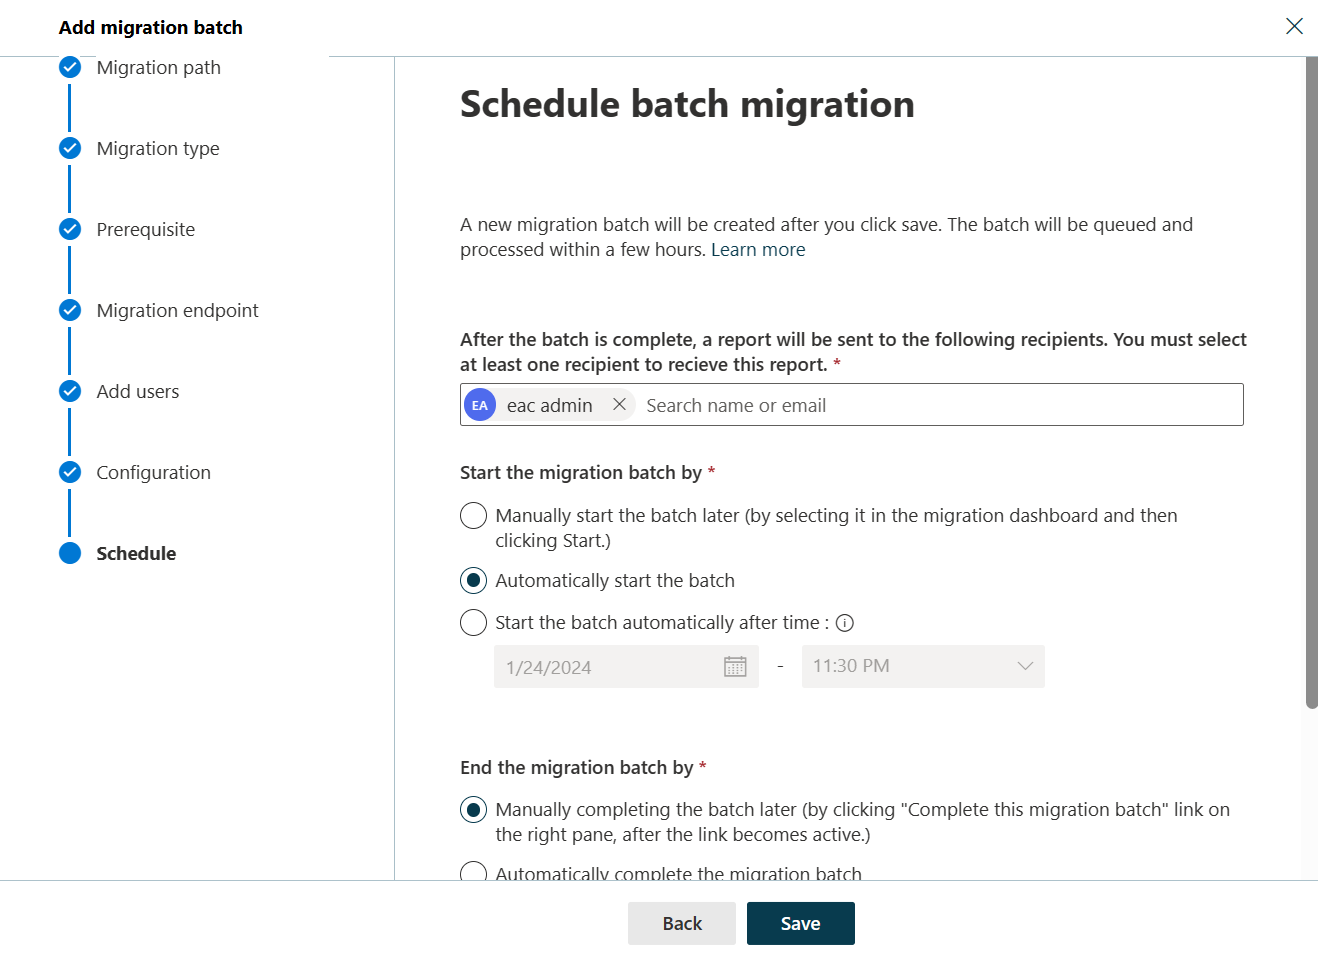
On the Schedule batch migration page, verify all the details, click Save, and then click Done.
Once the batch status changes from Syncing to Synced, you need to complete the batch.
In Part II we will describe how to handle the large mailboxes (>100 GB) and the challenges we will face. Stay tuned 😊
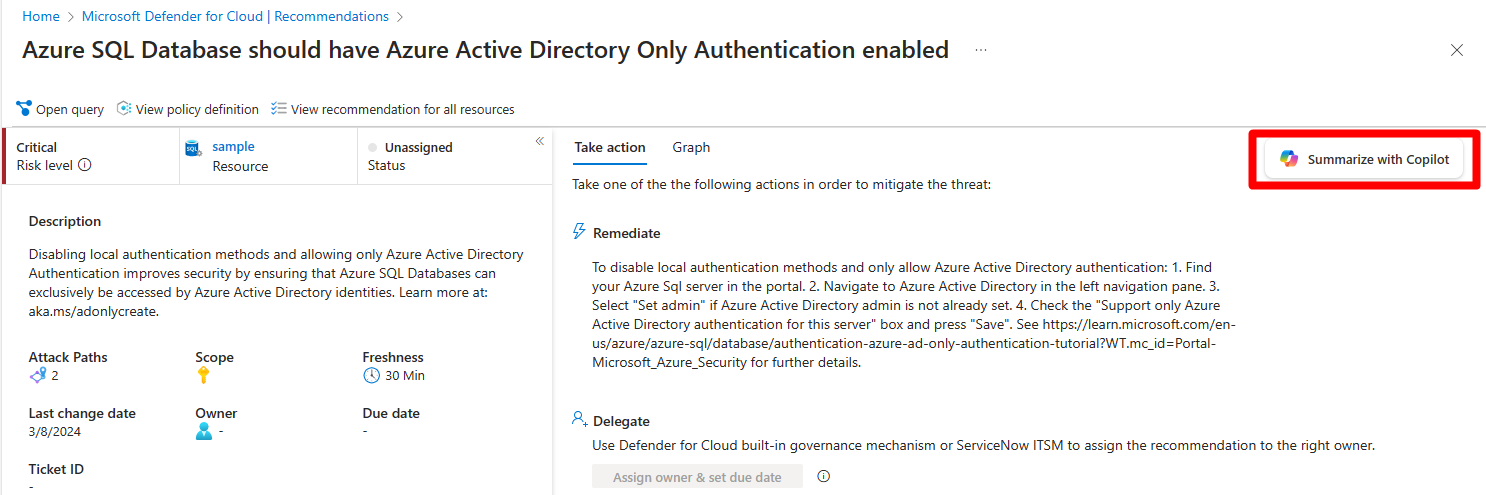
Microsoft Defender for Cloud integrates both Microsoft Copilot for Security and Microsoft Copilot for Azure into its experience. With these integrations, you can ask security-related questions, receive responses, and automatically trigger the necessary skills needed to analyze, summarize, remediate, and delegate recommendations using natural language prompts.
Both Copilot for Security and Copilot for Azure are cloud-based AI platforms that provide a natural language copilot experience. They assist security professionals in understanding the context and effect of recommendations, remediating or delegating tasks, and addressing misconfiguration in code.
How Copilot works in Defender for Cloud
Defender for Cloud integrates Copilot directly in to the Defender for Cloud experience. This integration allows you to analyze, summarize, remediate, and delegate your recommendations with natural language prompts.
When you open Copilot, you can use natural language prompts to ask questions about the recommendations. Copilot provides you with a response in natural language that helps you understand the context of the recommendation. It also explains the effect of implementing the recommendation and provides steps to take for implementation.
Some sample prompts include:
Show critical risks for publicly exposed resources
Show critical risks to sensitive data
Show resources with high severity vulnerabilities
Copilot can assist with refining recommendations, providing summaries, remediation steps, and delegation. It enhances your ability to analyze and act on recommendations.
Step-by-Step: Protect Your Usage of Copilot for M365 Using Microsoft Defender for Cloud Apps