Migrating large mailboxes from Google Workspace to Microsoft 365 in Exchange Online involves several steps. In this article provides comprehensive guidance for tenant administrators on migrating emails from IMAP sources, including Gmail, to Microsoft 365 Primary and Archive mailboxes concurrently, known as Large Archive Onboarding (LAO), this solution empowers tenant admins to seamlessly migrate mailboxes exceeding 100 GB from any mail sources by harnessing the auto-expanding archives feature within Microsoft 365.
Challenges
Large mailboxes pose unique challenges, including prolonged migration times, increased risk of data corruption, and bandwidth constraints.
Currently, LAO is available only through PowerShell cmdlets.
Important
Microsoft 365 offers a resultant cumulative mailbox size of up to 1.6 TB. This includes 100 GB of Primary Mailbox, and 1.5 TB of Archives (including 100 GB Main Archive).
You require at least “Recipient Management” role to execute this. Read through the documentation, especially the linked documents to help kickstart migrations for large mailboxes.
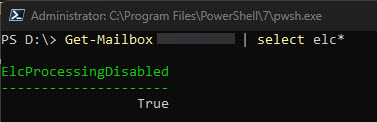
Run the cmdlet to disable ELCProcessing before creating LAO migration batch. If it’s not disabled, the folders might be moved by ELC during LAO, and the LAO migration might be blocked. Set-Mailbox <m365 mailbox> -ELCProcessingDisabled:$true
Methods to migrate large mailboxes to Microsoft 365 Exchange
Exporting emails from Google Workspace using Google Takeout
Using Third-Party Tools
Using Google Workspace Sync for Microsoft Outlook (GWSMO)
PowerShell: For large mailboxes, you can use PowerShell cmdlets to create a Large Archive Onboarding (LAO) migration batch. This method allows you to migrate mailboxes exceeding 100 GB by utilizing auto-expanding archives. – This is the method that we will describe
What do we need to know before we begin the Large Archive Onboarding (LAO)?
Before creating the migration, we need to know:
The list of users with large mailboxes (>100 GB) on the source side.
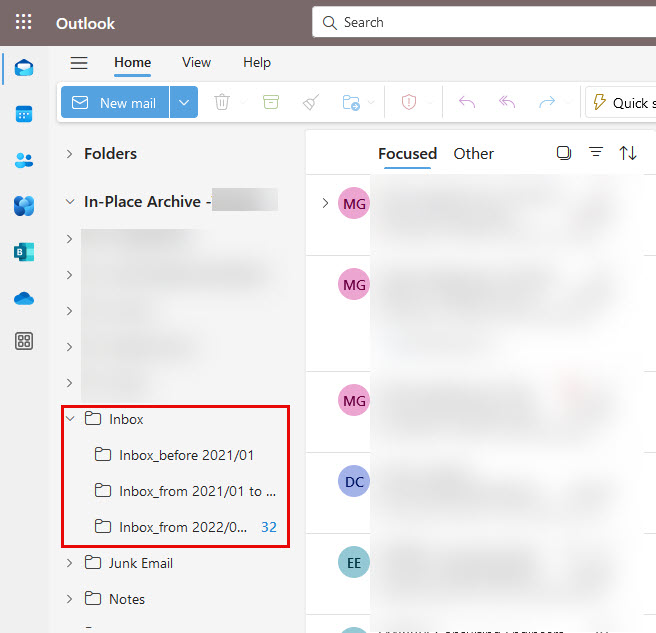
If you have a large mailbox, the content (time, type) that you intend to migrate and to where (primary, main archive, auxiliary archives).
For each user, the content can be selected based on time range or folder.
Examples
Time-range-based mapping:
Time range
Target Mailbox
After 2023/01/01
Primary
From 2022/01/01 to 2023/01/01
Archive mailbox 1
From 2021/01/01 to 2022/01/01
Archive mailbox 2
Before 2021/01/01
Archive mailbox 3
Folder-based mapping:
Folder Name
Target Mailbox
Inbox
Primary
SentItems
Primary
DeletedItems
Archive mailbox 1
Important Well-Known Folders: The folders that come under this categorization include but are not limited to Inbox, Deleted Items, Sent Items, and Drafts. Full list here.Except Deleted Items, all these well-known folders and customer created labels/folders can be migrated to either primary or any archive mailboxes (both Main Archive and Auxiliary Archives). However, Deleted Items of a user can be migrated only to the Primary or Main Archive, and not Auxiliary Archive.
Prepare XML file
To migrate large mailboxes automatically, you need to prepare an XML file that advises the system on the content-to-mailbox mapping. Download a sample XML file here Download a copy of the large mailbox migration XML mapping file and take a quick look before you proceed.
Time-range-based mapping
In the XML file, you need to specify the time range in ContentFilter. Unlike Filterable properties for the -ContentFilter parameter, only Received property is supported, which means that the filtering is based on the “Received” parameters and not the “Sent” parameters in the mail item metadata. For example, filtering is executed on the Received TimeStamp (time when the mail landed in the user’s mailbox) vs the Sent TimeStamp (time when the sender of the mail sent it to the user) of a mail, which the users received in their mailbox.
Four operators are supported:
gt: greater than
ge: greater than or equal to
lt: less than
le: less than or equal to
The value of EmailAddress should be the SMTP address of EXO user (eg. user@domain.com).
The value of Target can be the following four types:
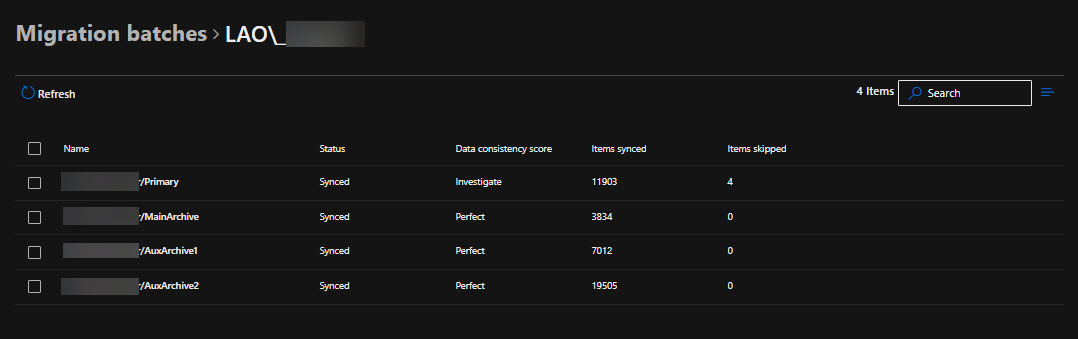
I wanted to take a moment to explain the concept of Archive mailbox 1 (AuxArchive1), Archive mailbox 2 (AuxArchive2), Archive mailbox 3 (AuxArchive3), etc., and how they relate to our migration process. As you can see below in the XML I created, I have designated “MainArchive” as the Target and (AuxArchive1). By doing this, I am instructing the system on how and where I want the migration to be divided, as well as the specific time range for archiving. In our example, the system is creating folders within the Archiving mailbox Inbox based on the range provided in the XML file. This approach ensures that the migration is efficiently split and organized, enabling easier access and management of archived data.
Following is the XML file for time range based mapping for the example shown in table 1.
Important
If the time range in the XML file is changed during the migration process, there may be duplicated items. We recommend tenant admin have clear communication with end users before starting the migration.
When you create time ranges, ensure that you use continuous time ranges. If it’s not continuous, there will be missing items that the migration process can’t detect.
To create a large mailbox migration batch, you need to use New-MigrationBatch with -XMLData parameter.
Verify Data: After migration, verify that all emails, contacts, and calendar data have been successfully migrated.
User Training: Provide training to users on how to access their new mailboxes and use Microsoft 365 features.
By following these steps, you can ensure a smooth transition from Google Workspace to Microsoft 365, even for large mailboxes.
Conclusion
Migrating from Google Workspace to Microsoft 365 involves careful planning and execution, especially when dealing with large mailboxes. By following the steps outlined in this guide, you can ensure a smooth and efficient transition. Remember to communicate with your users, use the right tools, and monitor the process closely to address any issues promptly. With proper planning and execution, the migration can be a seamless experience that enhances your organization’s productivity and collaboration. I wanted to share this article that I recently came across and found quite insightful. I believe it could be very useful for you as well. Please take a moment to read through it, and let me know what you think.
Migrating from Google Workspace to Microsoft 365 can be a daunting task, especially when dealing with mailboxes over 100 GB. This guide provides an in-depth look at the challenges and solutions for a successful migration, catering to both normal and large mailboxes.
Assessment and Planning
Before initiating the migration, it’s crucial to carry out a thorough assessment of your current Google Workspace environment. Identify the number of users, mailbox sizes, and any potential issues that might arise. Planning should include:
Identifying key stakeholders
Defining the migration timeline
Determining the migration method
Allocating resources and roles
You can migrate the following functionalities from Google Workspace to Microsoft 365 or Office 365:
Mail & Rules Calendar Contacts
You can migrate batches of users from Google Workspace to Microsoft 365 or Office 365, allowing a migration project to be done in stages. This migration requires that you provision all of your users who will be migrated as mail-enabled users outside of the migration process. You must specify a list of users to migrate for each batch.
All procedures in this article assume that your Microsoft 365 or Office 365 domain is verified and that your TXT records have been set up. For more information, see Set up your domain (host-specific instructions).
Select your method of migration
You can migrate from Google Workspace using any of the following methods:
Automated – through the Exchange admin center
Manual – through the Exchange admin center
PowerShell
Migration limitations
Important Microsoft’s data migration tool is currently unaware of tools enforcing messaging records management (MRM) or archival policies. Because of this, any messages that are deleted or moved to archive by these policies will result in the migration process flagging these items as “missing”. The result is perceived data loss rather than actual data loss, which makes it much harder to identify actual data loss during any content verification checks. Therefore, Microsoft strongly recommends disabling all MRM and archival policies before attempting any data migration to mailboxes.
Note The largest single email message that can be migrated is based on the transport configuration for your configuration. The default limit is 35 MB. To increase this limit, see Office 365 now supports larger email messages.
Throughput limitations for contacts and calendars completely depend on the quota restrictions for your tenant’s service account on the Google Workspace side.
Other migration limitations are described in the following table:
Data type
Limitations
Mail
Vacation settings, Automatic reply settings
Meeting rooms
Room bookings won’t be migrated
Calendar
Shared calendars and event colors won’t be migrated
Contacts
A maximum of three email addresses per contact are migrated over
Contacts
Gmail tags, contact URLs, and custom tags won’t be migrated
Google Workspace migration prerequisites in Exchange Online
The following procedures must be performed (in the order mentioned) before you start the process of Google Workspace migration:
Create a subdomain for mail routing to Microsoft 365 or Office 365
Create a subdomain for mail routing to your Google Workspace domain
Provision users in Microsoft 365 or Office 365
Create a subdomain for mail routing to Microsoft 365
Note The option Add a domain won’t be available if using the legacy free edition of G Suite.
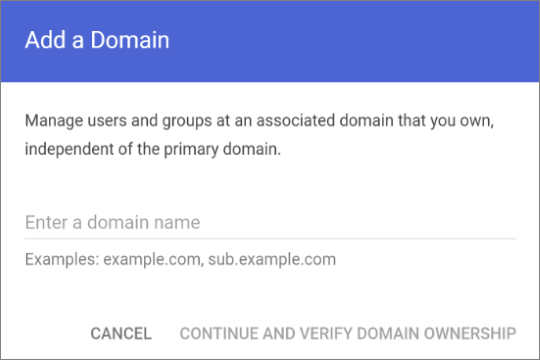
Enter the domain that you’ll use for routing mails to Microsoft 365 or Office 365, select User alias domain, and then select ADD DOMAIN & START VERIFICATION. A subdomain of your primary domain is recommended (for example, “m365mail.domain.com”, when “domain.com” is your primary domain) so that it will be automatically verified. If another domain (such as “domain.onmicrosoft.com”) is set, Google will send emails to each individual address with a link to verify the permission to route mail. Migration won’t complete until the verification is completed.
Note If you see an error GmailForwardingAddressRequiresVerificationException has occurred during the batch, skip this step of creating a subdomain for forwarding emails from the gmail side.
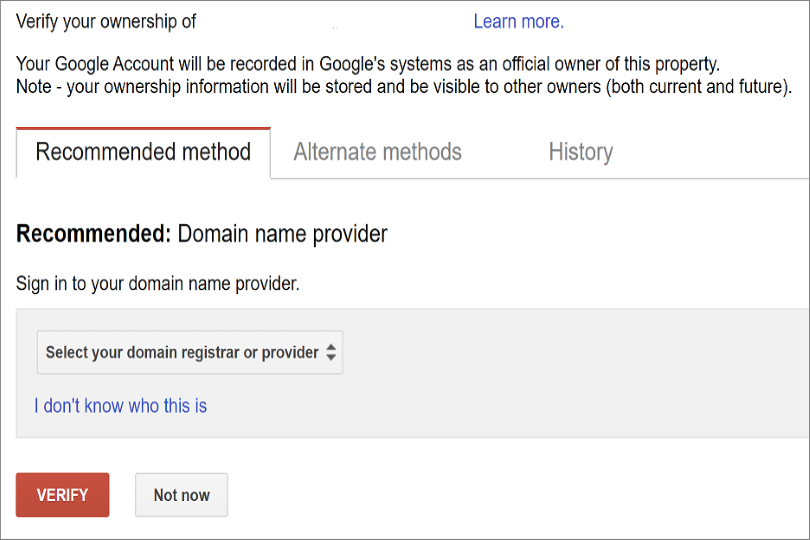
Follow any subsequent steps that are then required to verify your domain till the status is shown as Active. If you chose a subdomain of your primary domain (created in step 3), your new domain may have been verified automatically.
Sign in to your DNS provider and update your DNS records so that you have an MX record at the domain you created (in step 3), pointing to Microsoft 365 or Office 365. Ensure that this domain (created in step 3) is an accepted domain in Microsoft 365 or Office 365. Follow the instructions in Add a domain to Microsoft 365 to add the Microsoft 365 or Office 365 routing domain (“m365mail.domain.com”) to your organization and to configure DNS to route mail to Microsoft 365 or Office 365.
Note The migration process won’t be able to complete if an unverified routing domain is used. Choosing the built-in “tenantname.onmicrosoft.com” domain for routing mail to Office 365 instead of a subdomain of the primary Google Workspace domain occasionally causes issues that Microsoft is not able to assist with, besides causing Microsoft to recommend that the user manually verify the forwarding address or contact Google support.
Create a subdomain for mail routing to your Google Workspace domain
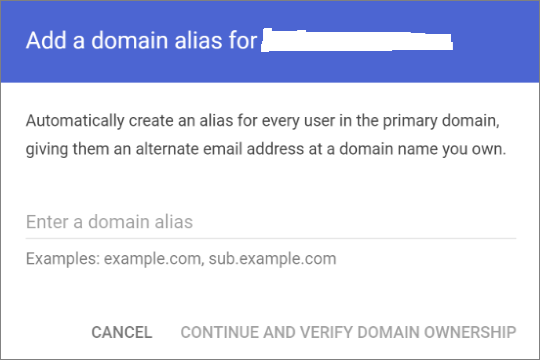
Enter the domain that you’ll use for routing mails to Google Workspace, select User alias domain, and then select ADD DOMAIN & START VERIFICATION. A subdomain of your primary domain is recommended (for example, “gsuite.domain.com”, when “domain.com” is your primary domain) so that it will be automatically verified.
Follow any subsequent steps that are then required to verify your domain till your domain’s status is shown as Active. If you chose a subdomain of your primary domain (created in step 3), your new domain may have been verified automatically.
Note It may take up to 24 hours for Google to propagate this setting to all the users in your organization.
Important If you are using non-default Transport settings in your Microsoft 365 or Office 365 organization, you should check whether the mail flow will work from Office 365 to Google Workspace. Ensure that either your default Remote Domain (“*”) has Automatic Forwarding enabled, or that there is a new Remote Domain for your Google Workspace routing domain (for example, “gsuite.domain.com“) that has Automatic Forwarding enabled.
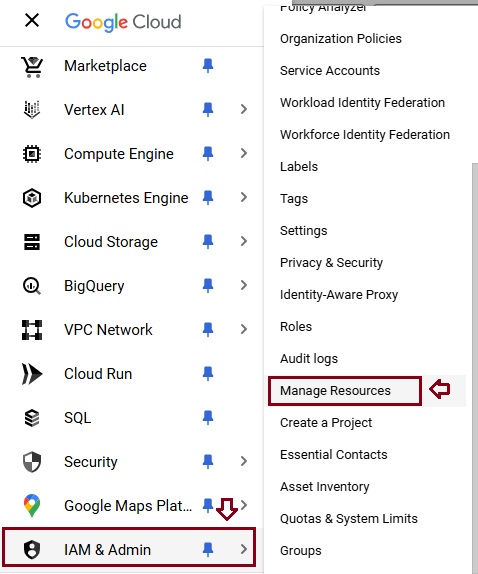
Check Google Cloud platform permissions
An automated scenario requires the Google Migration administrator to be able to perform the following steps in the Google admin console:
Create a Google Workspace project.
Create a Google Workspace service account in the project.
Create a service key.
Enable all APIs – Gmail, Calendar, and Contacts.
The Google Migration administrator needs the following permissions to complete these steps:
resourcemanager.projects.create
iam.ServiceAccounts.create
The most secure way to achieve completion of these four steps is to assign the following roles to the Google Migration administrator:
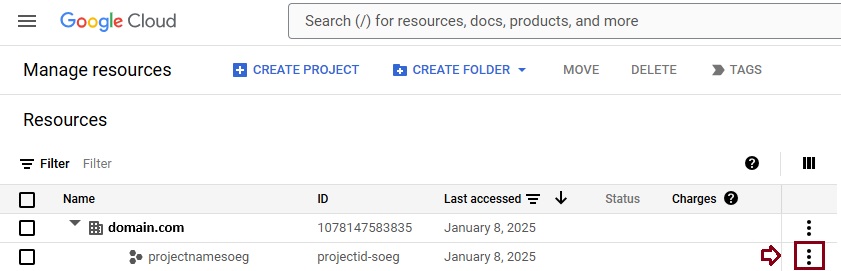
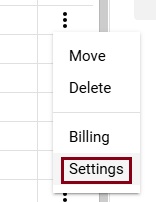
Select the appropriate resource and in the right-hand pane under the Permissions tab, select Add Principal.
Enter your Google Migration administrator credentials, enter Project Creator in the filter, and select Project Creator. Select Add Another Role, enter Create Service Accounts in the filter, and select Create Service Accounts. Select Save.
Note It might take up to 15 minutes to propagate role assignment changes across the globe.
Provision users in Microsoft 365. Once your Google Workspace environment has been properly configured, you can complete your migration in the Exchange admin center or through the Exchange Online PowerShell. Before proceeding with either method, ensure that Mail Users have been provisioned for every user in the organization who will be migrated (either now or eventually). If any users aren’t provisioned, provision them using the instructions in Manage mail users.
Very Important Note Microsoft recommend that the Default MRM Policy and Archive policies be disabled for these users until their migration has been completed. When such features remain enabled during migration, there is a chance that some messages will end up being considered “missing” during the content verification process.
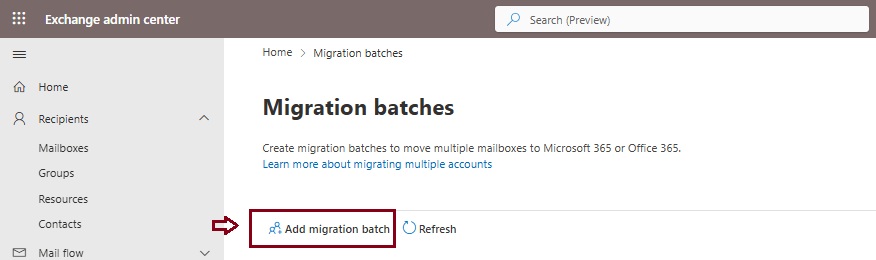
Start an automated Google Workspace migration batch in EAC
Give migration batch a unique name: Enter a unique name.
Select the mailbox migration path: Verify that Migration to Exchange Online is selected.
When you’re finished, click Next.
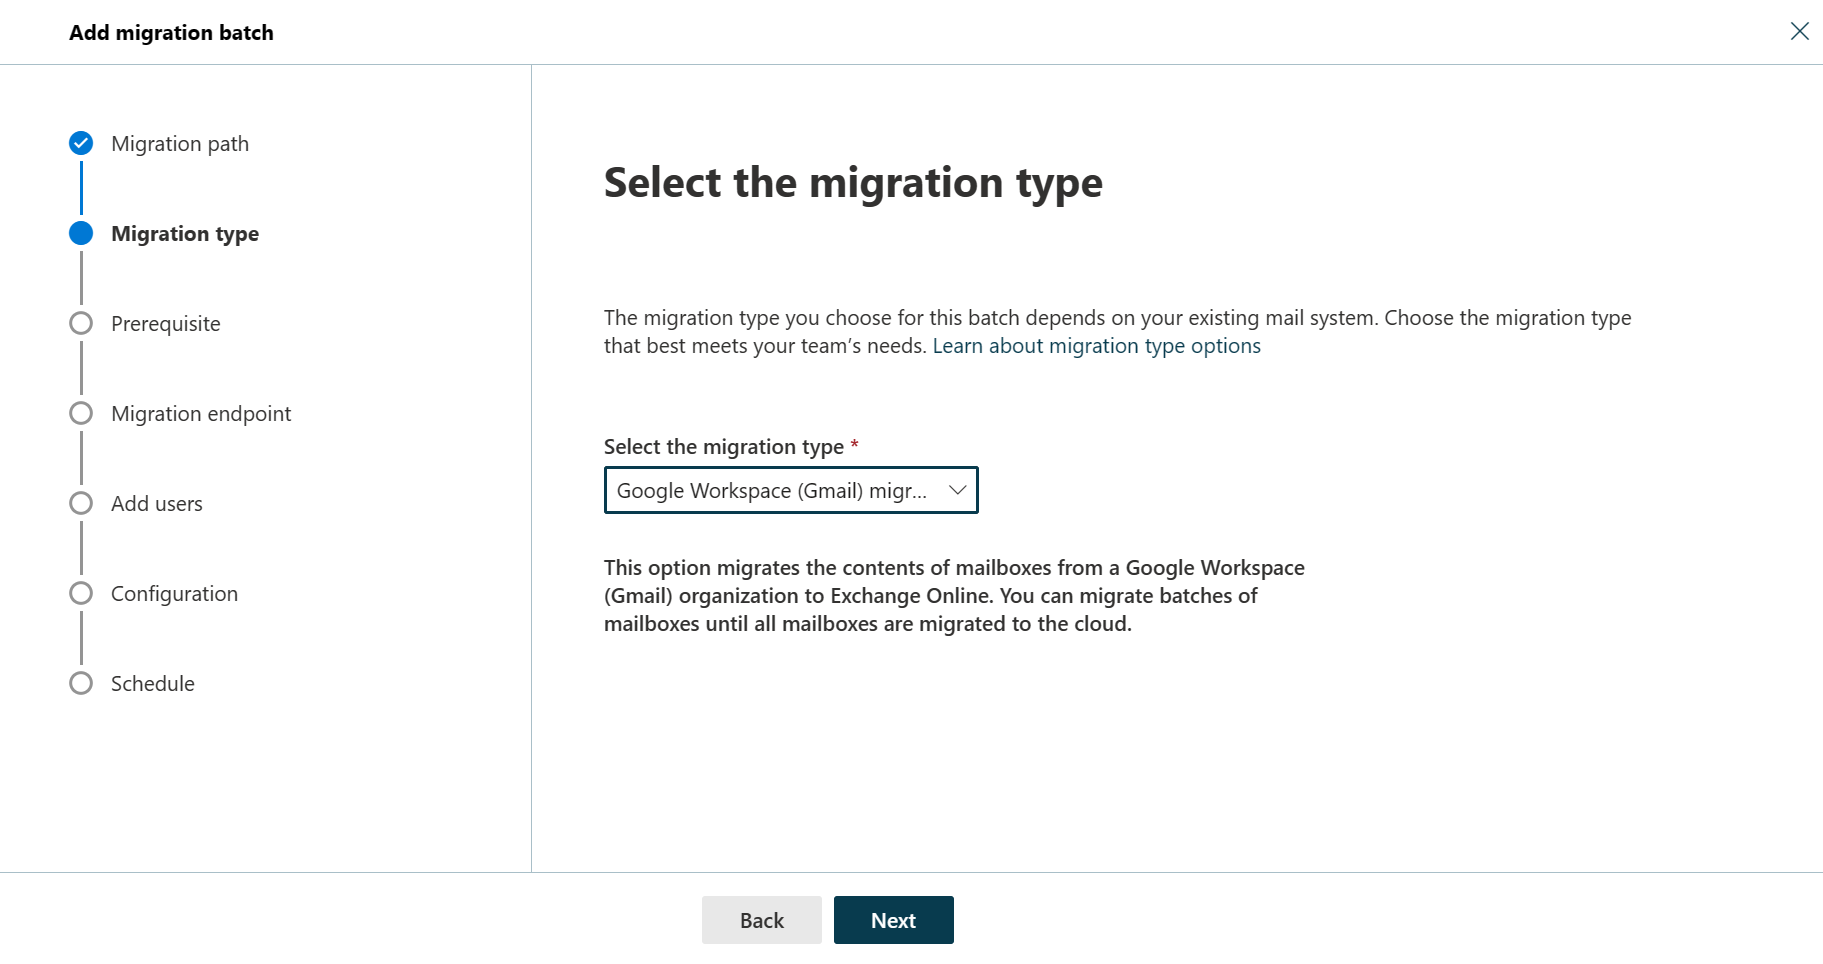
On the Select the migration type page, select Google Workspace (Gmail) migration as migration type, and click Next.
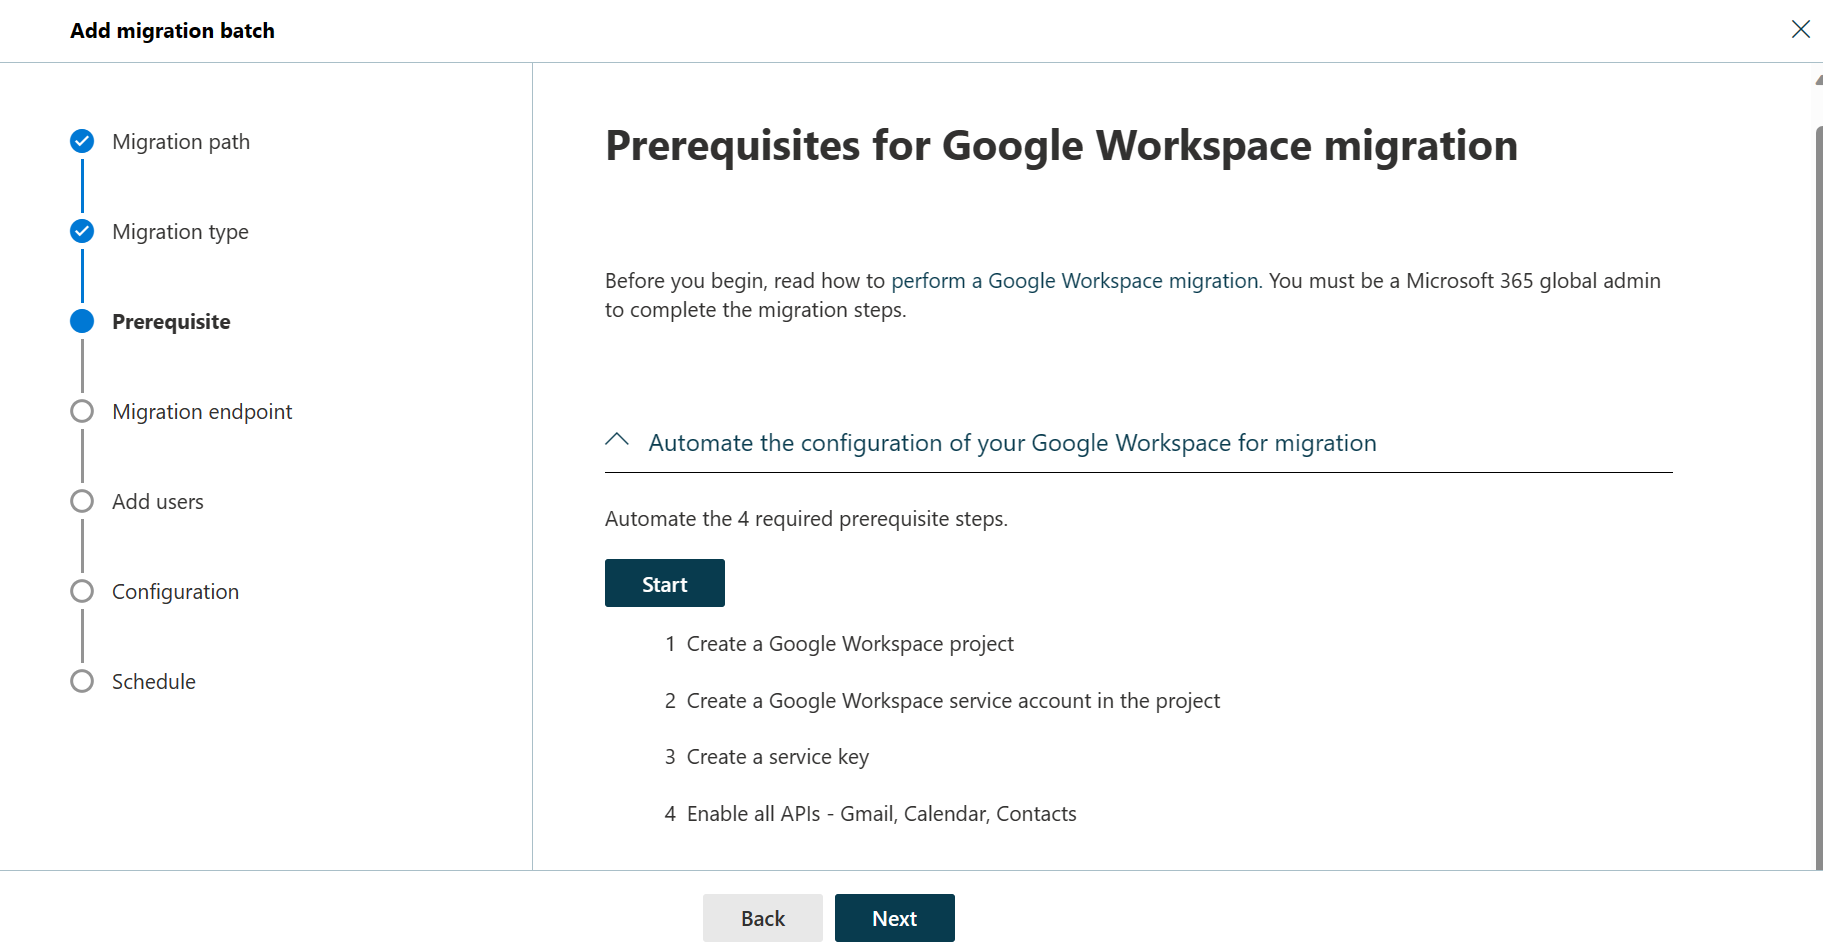
The Prerequisites for Google Workspace migration page appears.
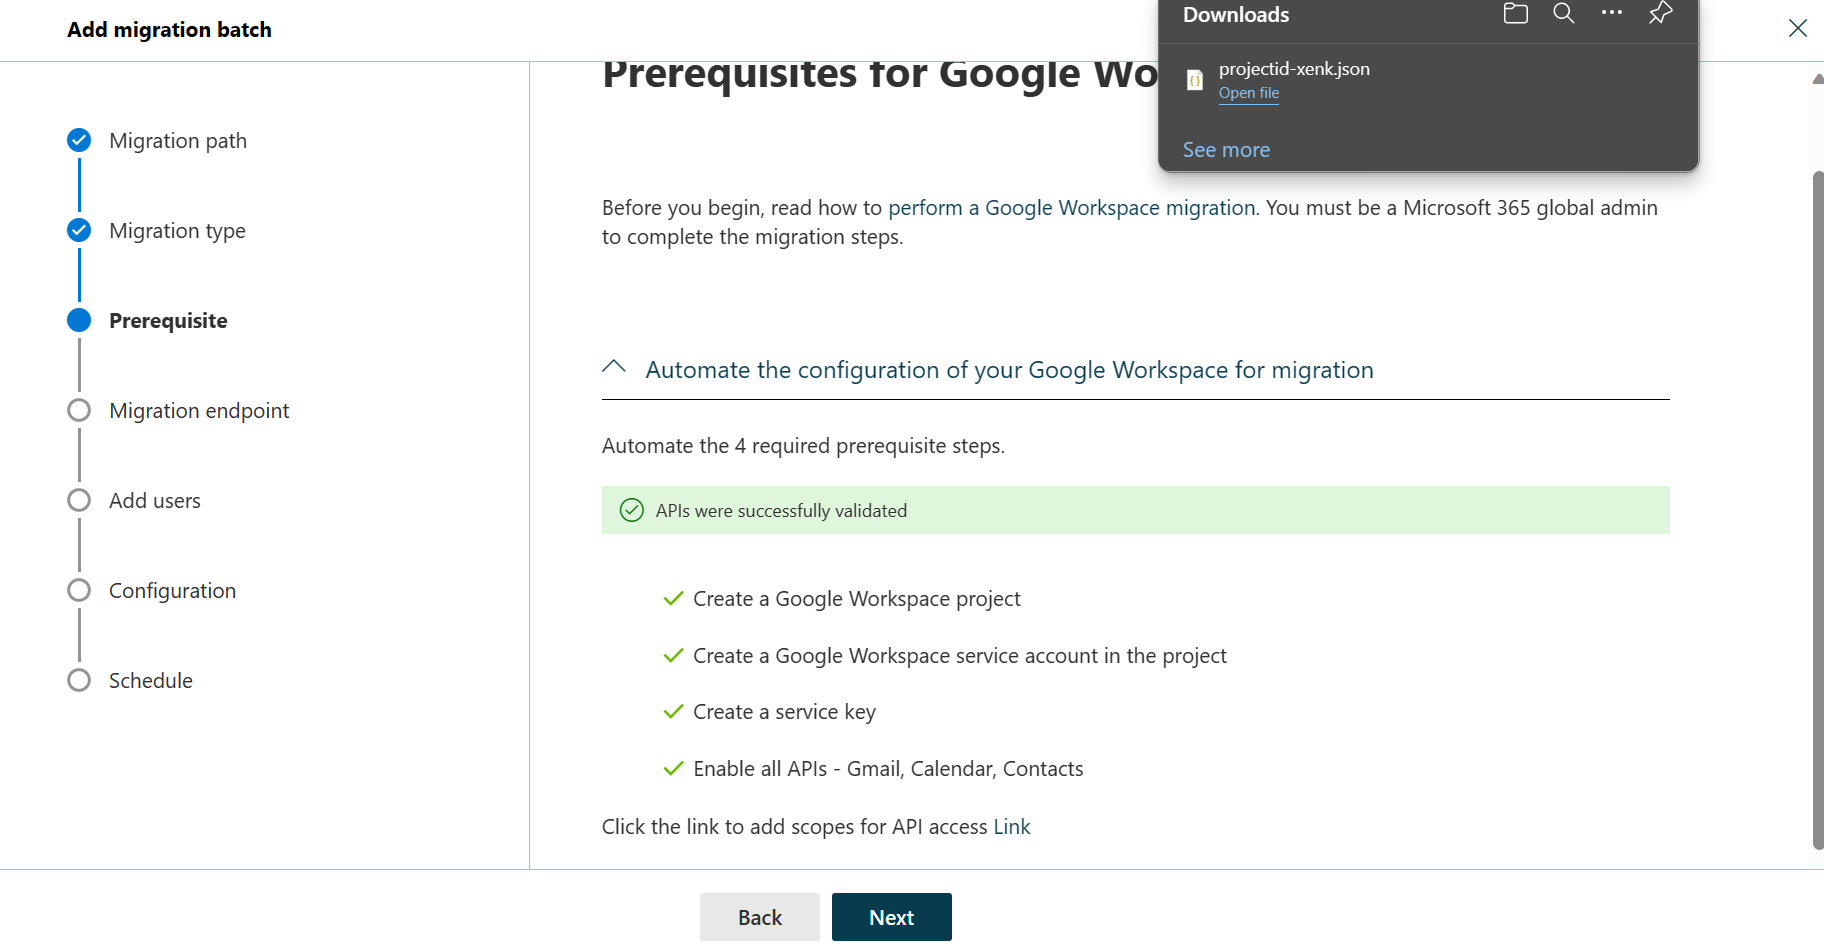
Verify that the Automate the configuration of your Google Workspace for migration section is expanded, and then select Start in that section to automate the four required prerequisite steps.
In the Google sign-in page that appears, sign in to your Google account to validate your APIs.
Once the APIs are successfully validated, the following things happen:
A JSON file (projectid-*.json) is downloaded to your local system.
The link to add the ClientID and the Scope is provided. The ClientID and Scope are also listed for your reference.
Select the API access link. You’ll be redirected to Google Admin API Controls page.
Select Add new. Copy the ClientID and Scope from the EAC, paste it here, and then select Authorize.
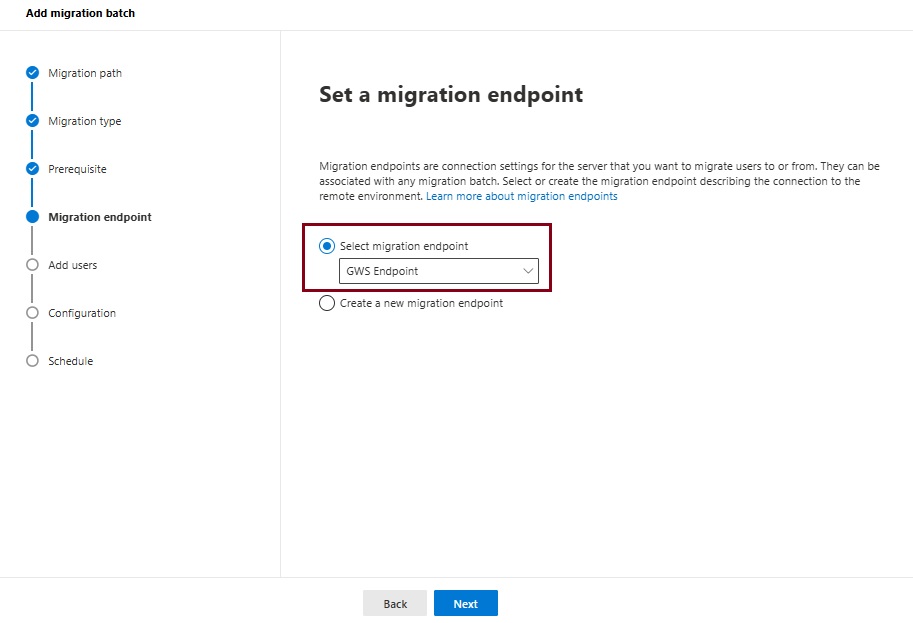
Once the four prerequisites-related steps are completed, select Next. The Set a migration endpoint page appears.
Select one of the following options:
Select the migration endpoint: Select an existing migration endpoint from the drop-down list.
Create a new migration endpoint: Select this option if you’re a first-time user.
Note To migrate Gmail mailboxes successfully, Microsoft 365 or Office 365 needs to connect and communicate with Gmail. To do this connection-communication, Microsoft 365 or Office 365 uses a migration endpoint. Migration endpoint is a technical term that describes the settings that are used to create the connection so you can migrate the mailboxes.
If you’ve selected Create a new migration endpoint, do the following steps:
On the General Information page, configure the following settings:
Migration Endpoint Name: Enter a value.
Maximum concurrent migrations: Leave the default value 20 or change the value as required.
Maximum concurrent incremental syncs: Leave the default value 10 or change the value as required. When you’re finished, select Next.
On the Gmail migration configuration page, configure the following settings:
Email address: Enter the email address that you use to sign in to the Google Workspace.
JSON key: Select Import JSON. In the dialog box that appears, find and select the downloaded JSON file, and then select Open. Once the endpoint is successfully created, it will be listed in the Select migration endpoint drop-down list.
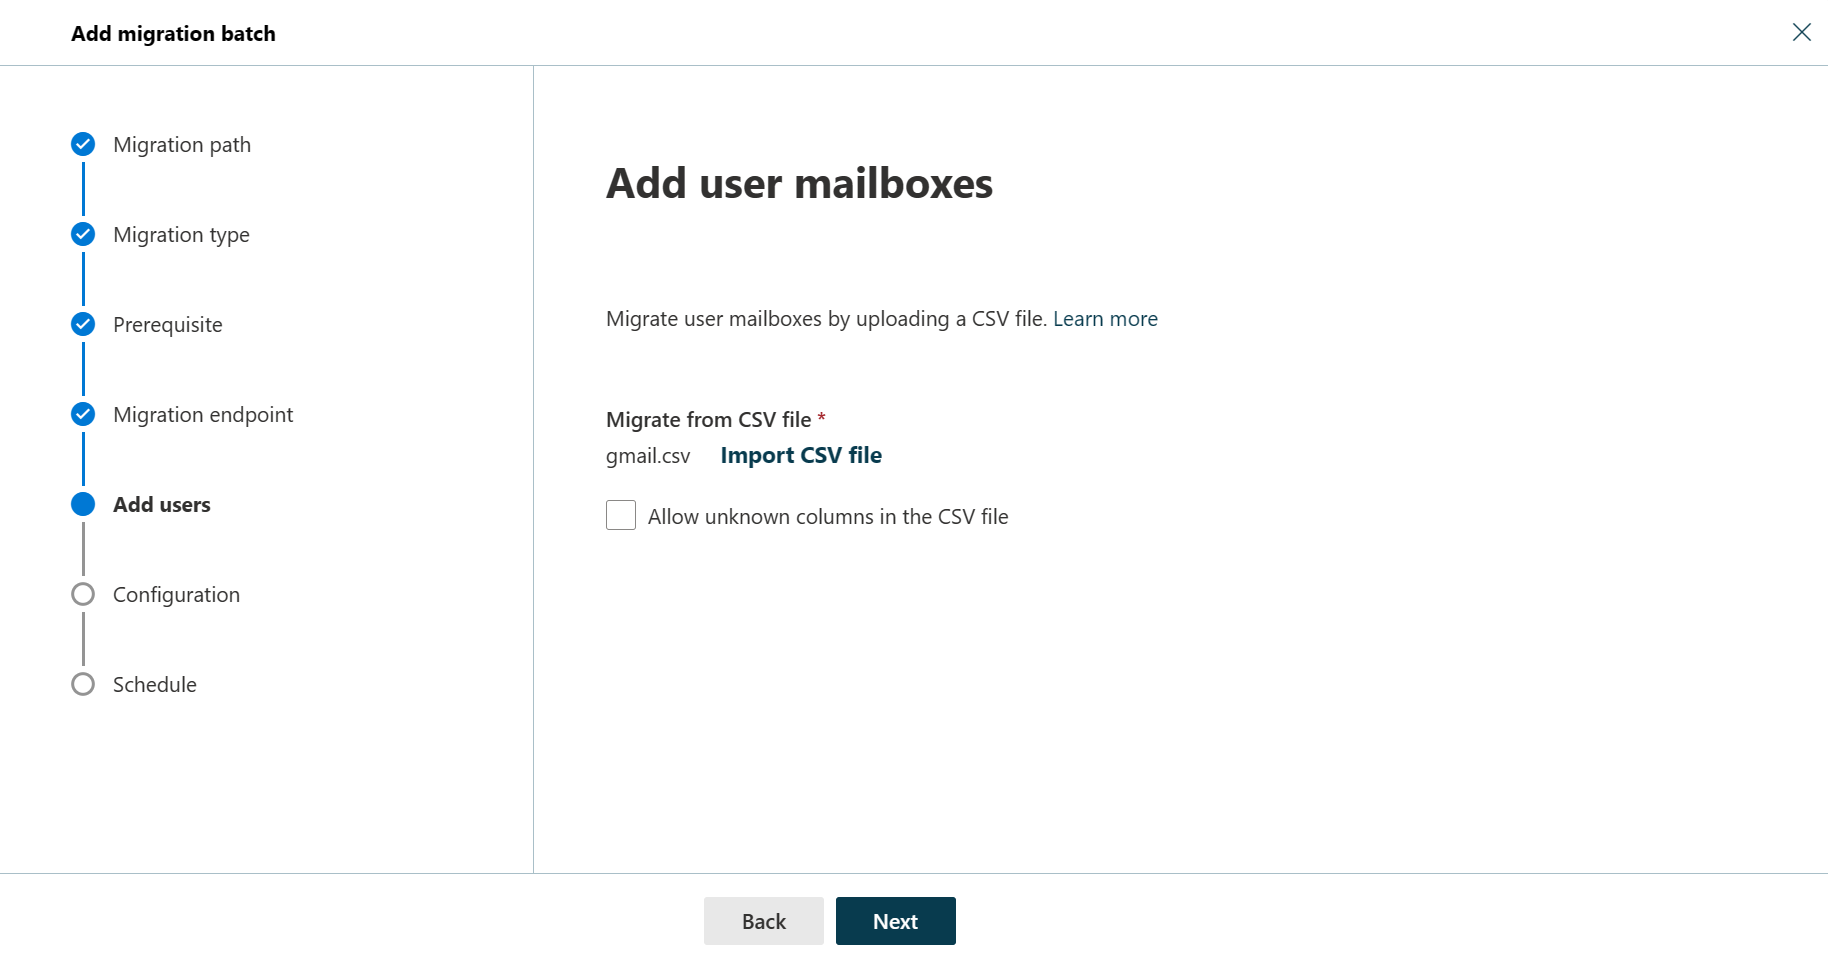
Select the endpoint from the drop-down list, and select Next. The Add user mailboxes page appears.
Select Import CSV file and navigate to the folder where you’ve saved the CSV file.
If you haven’t already saved or created the CSV file, create a CSV file containing the set of names of the users you want to migrate. You’ll need its filename below. The allowed headers are:
EmailAddress (required): Contains the primary email address for an existing Microsoft 365 or Office 365 mailbox.
Username (optional). Contains the Gmail primary email address, if it differs from EmailAddress.
CSV Format
EmailAddress will@domain.com user123@domain.com
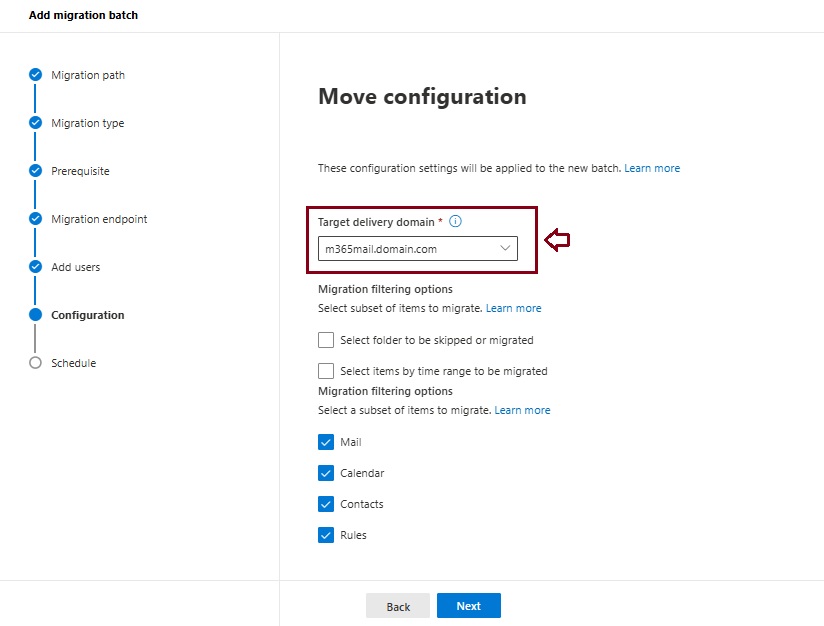
When you’re finished, click Next. The Move configuration page appears.
From the Target delivery domain drop-down list, select the target delivery domain (the subdomain) that was created as part of fulfilling the Google Workspace migration prerequisites in Exchange Online, and click Next.
Note The target delivery domain (the subdomain) you select in this step can be either an existing one or the one that you’ve created in Google Workspace migration prerequisites in Exchange Online (eg. M365mail.domain.com).
If you don’t see the target delivery domain that you want to select in the Target delivery domain drop-down list, you can manually enter the name of the target delivery domain in the text box.
The text box in which you manually enter the name of the target delivery domain is Target delivery domain. That is, the text box is effectively the Target delivery domain drop-down list, which is taking the role of a text box when you manually enter text into it.
Filtering options have been introduced for the migration of Google Workspace to Microsoft 365 or Office 365. For more information on these filtering options.
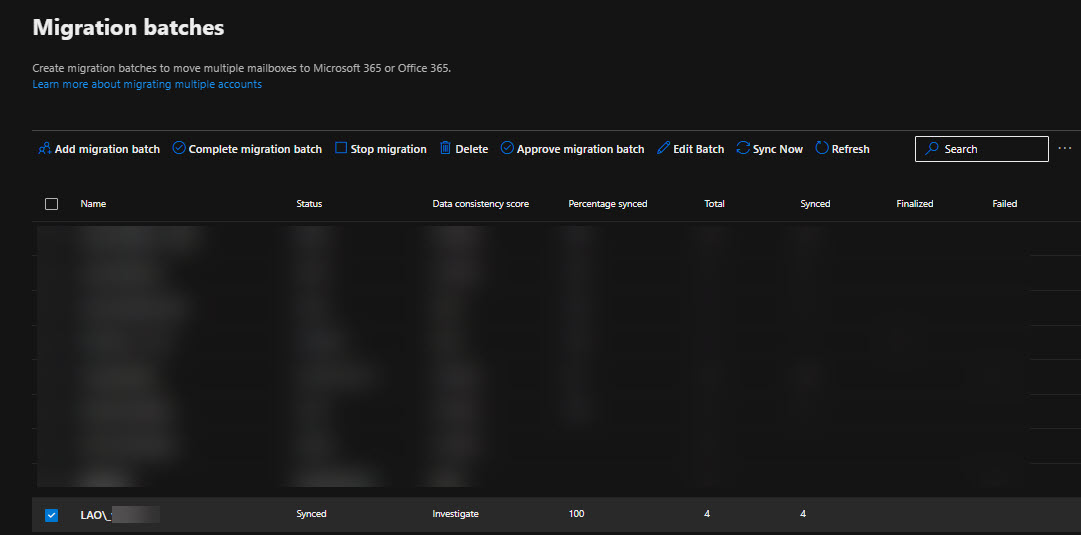
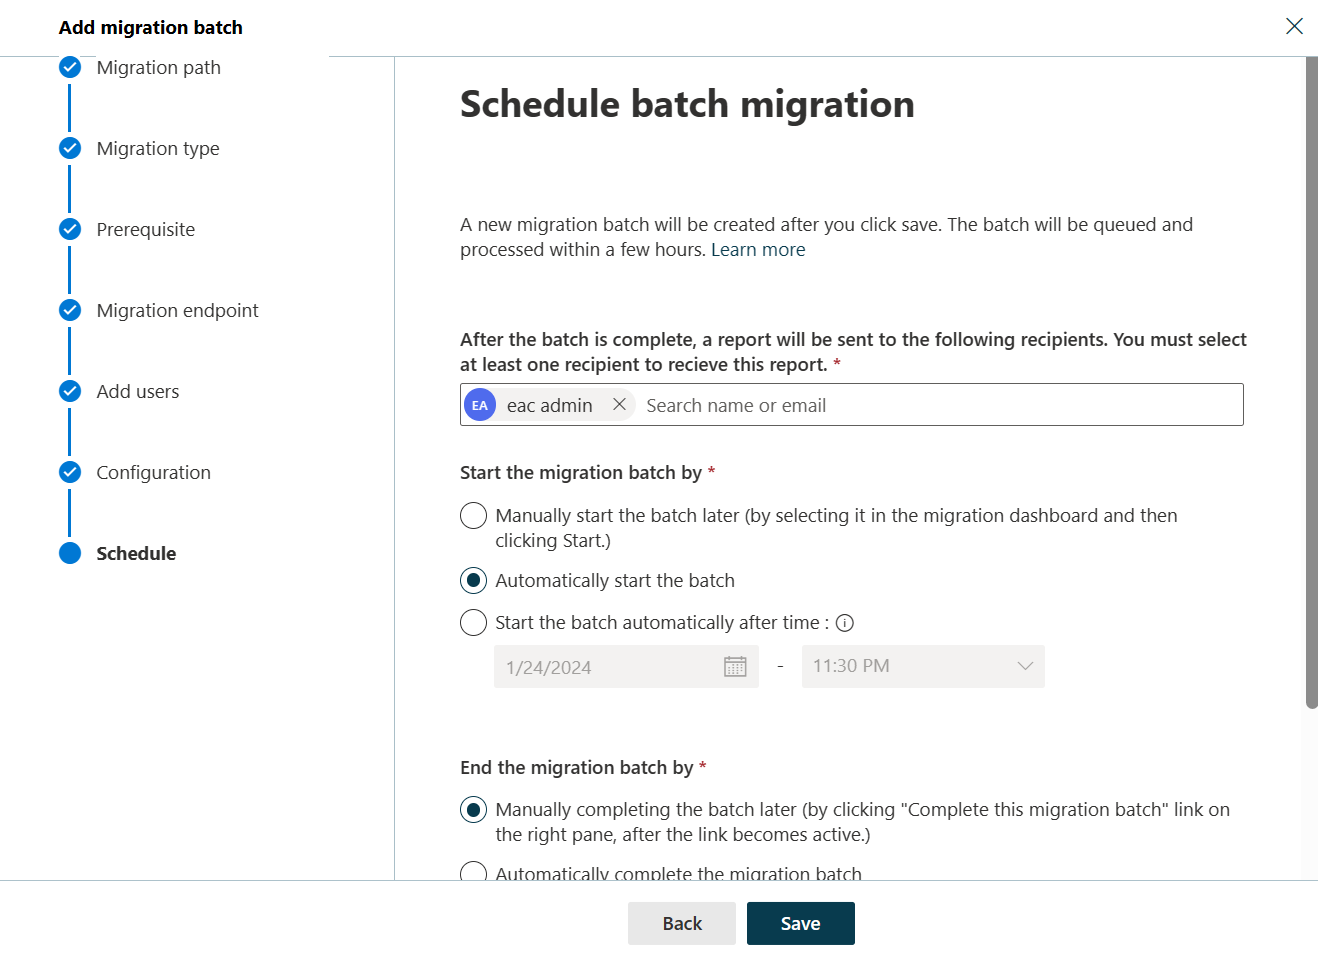
On the Schedule batch migration page, verify all the details, click Save, and then click Done.
Once the batch status changes from Syncing to Synced, you need to complete the batch.
In Part II we will describe how to handle the large mailboxes (>100 GB) and the challenges we will face. Stay tuned 😊
This month Microsoft rolled out support for an additional 12 languages in Microsoft 365 Copilot: Bulgarian, Croatian, Estonia, Greek, Indonesian, Latvian, Lithuanian, Romanian, Serbian (Latin), Slovak, Slovenian, and Vietnamese. Microsoft 365 Copilot now supports a total of 42 languages.
Finally, users working in Serbian language will see Teams meeting transcripts in Cyrillic, rather than Latin script. This is an issue Microsoft working to resolve. Microsoft will provide customers with updates on progress towards providing Teams meeting transcripts for Serbian language in Latin script on an as-appropriate basis. Learn more about supported languages for Microsoft Copilot here.
Microsoft are also continuing to expand the list of supported languages, with plans to offer support for even more languages in the coming months, stay tune!
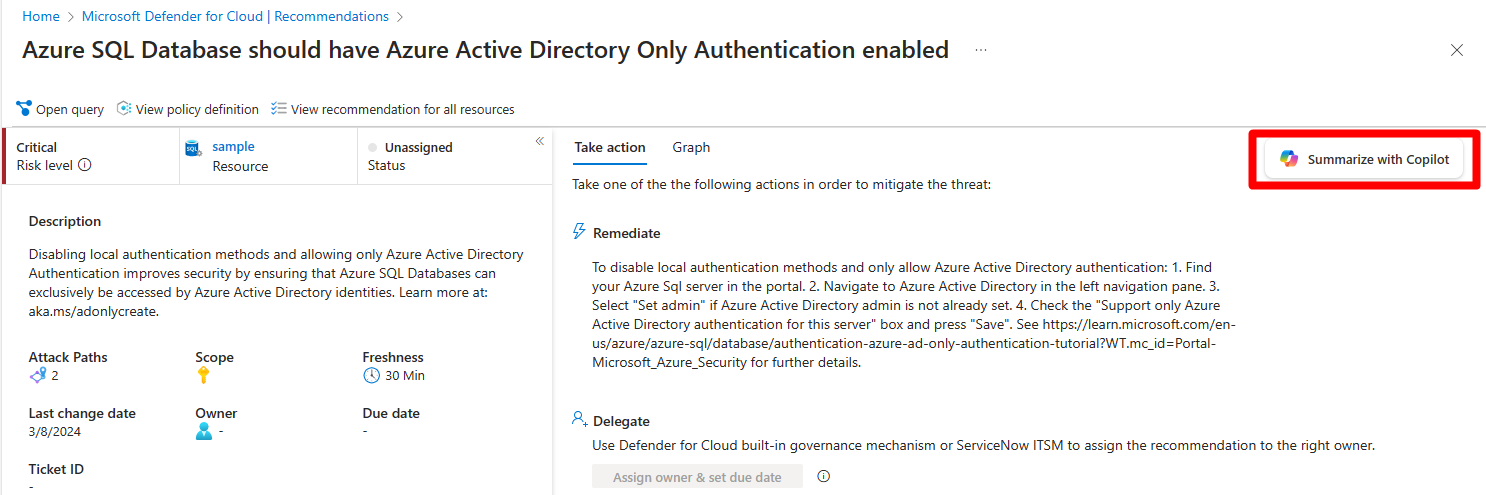
Microsoft Defender for Cloud integrates both Microsoft Copilot for Security and Microsoft Copilot for Azure into its experience. With these integrations, you can ask security-related questions, receive responses, and automatically trigger the necessary skills needed to analyze, summarize, remediate, and delegate recommendations using natural language prompts.
Both Copilot for Security and Copilot for Azure are cloud-based AI platforms that provide a natural language copilot experience. They assist security professionals in understanding the context and effect of recommendations, remediating or delegating tasks, and addressing misconfiguration in code.
How Copilot works in Defender for Cloud
Defender for Cloud integrates Copilot directly in to the Defender for Cloud experience. This integration allows you to analyze, summarize, remediate, and delegate your recommendations with natural language prompts.
When you open Copilot, you can use natural language prompts to ask questions about the recommendations. Copilot provides you with a response in natural language that helps you understand the context of the recommendation. It also explains the effect of implementing the recommendation and provides steps to take for implementation.
Some sample prompts include:
Show critical risks for publicly exposed resources
Show critical risks to sensitive data
Show resources with high severity vulnerabilities
Copilot can assist with refining recommendations, providing summaries, remediation steps, and delegation. It enhances your ability to analyze and act on recommendations.
Step-by-Step: Protect Your Usage of Copilot for M365 Using Microsoft Defender for Cloud Apps
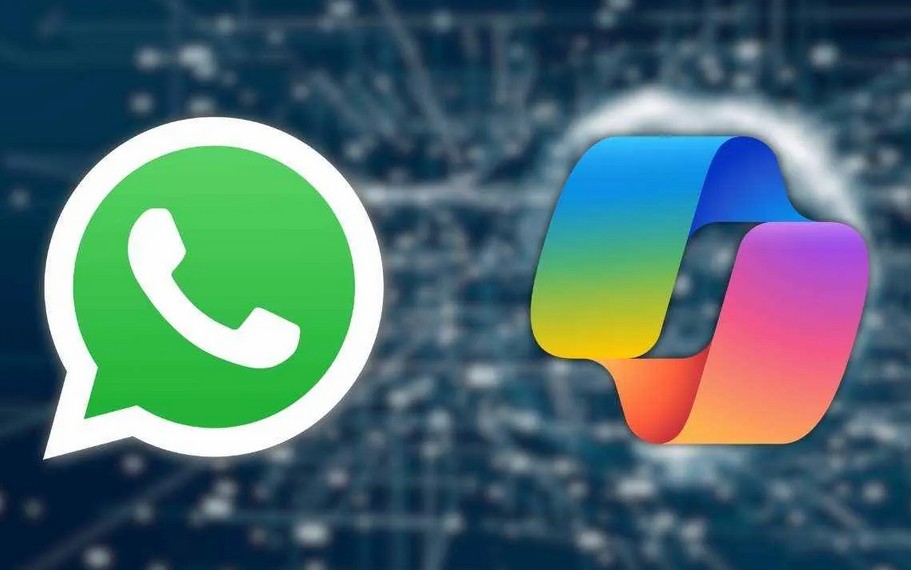
With Copilot now available on WhatsApp, you’re never alone. Get instant help, anytime. Microsoft has embedded its AI chatbot, Copilot, directly into WhatsApp, bringing artificial intelligence to over two billion users worldwide. With this move, AI capabilities like image generation and personalized recommendations are now available directly in the messaging app.
Copilot on WhatsApp offers a wide range of features:
Image Creation: Users can generate custom images directly in chat, expanding creative possibilities.
Text Summarization: Perfect for students and professionals, Copilot provides concise summaries of long documents, boosting productivity.
Personalized Recommendations: Copilot offers tailored suggestions, whether it’s for daily planning, vacation ideas, or task organization.
Recipe Suggestions: For cooking enthusiasts, Copilot can suggest recipes based on ingredients or dietary needs.
Writing Help: From grammar checks to idea generation, Copilot assists writers in refining and enhancing their content.
Current Limitations and Future Developments
While Copilot offers numerous features, some limitations remain. For instance, voice message support is currently unavailable, which is a popular feature for many WhatsApp users. However, with Microsoft’s rapid advancements in AI, future updates are likely to address such gaps, potentially adding voice message capabilities soon.
By integrating Copilot into a familiar platform like WhatsApp, Microsoft is making AI more accessible and transforming everyday communication. This step not only democratizes advanced tech but also sets the stage for new, intuitive human-AI interactions.
Talking with Copilot is an easy way to learn, grow, and gain confidence.
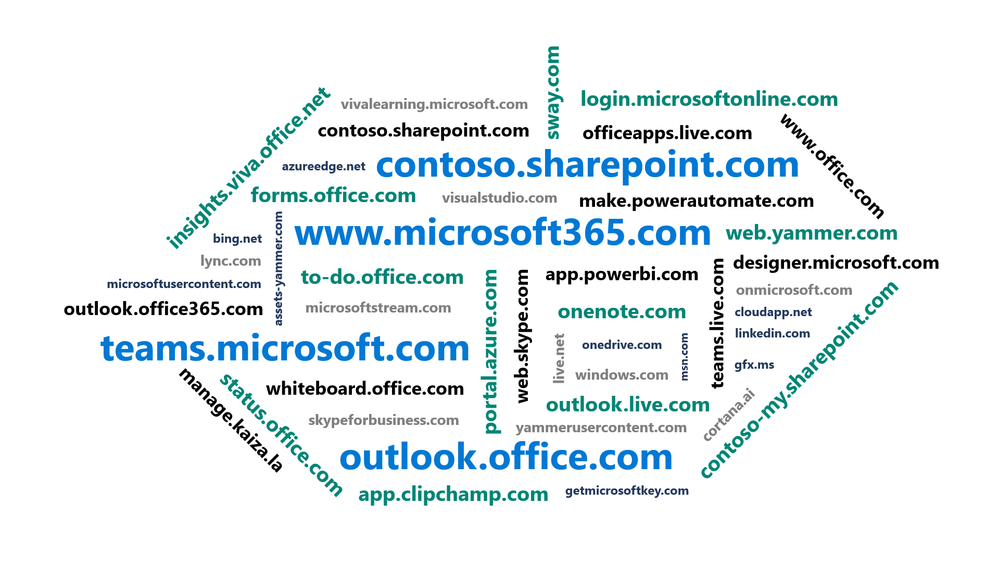
As Microsoft cloud services have grown over the years, the domain space they live on has grown as well – into the hundreds. Over time, this fragmentation has created increasing challenges for end user navigation, administrative simplicity, and the development of cross-app experiences. Microsoft’s announcement, “cloud.microsoft is the new unified domain for Microsoft 365 apps and services.” It promises greater security and unified experience.
Why cloud.microsoft?
‘Dot brand’ top-level domains like .microsoft are an established method for enhancing the security, trustworthiness, and integrity of an organization’s web offerings. Similar to how the US government has exclusive rights to the .gov top-level domain (TLD), Microsoft has exclusive rights to the .microsoft TLD. Exclusive ownership enables enhanced security protocols and governance controls, and the value of security investments done at the top-level domain seamlessly accrue to the apps. And all experiences hosted on the .microsoft domain can be assumed to be legitimate and authentic: anyone attempting domain spoofing would have to go through Microsoft itself, as we are both the registry operator and sole registrant for this exclusive, trusted namespace. A common term before the “dot” is also necessary in order to realize the full benefits of a unified domain. “Cloud” was selected as a durable, extensible, neutral term with a meaningful relationship to the wide range of services that will come under its umbrella, starting with Microsoft 365.
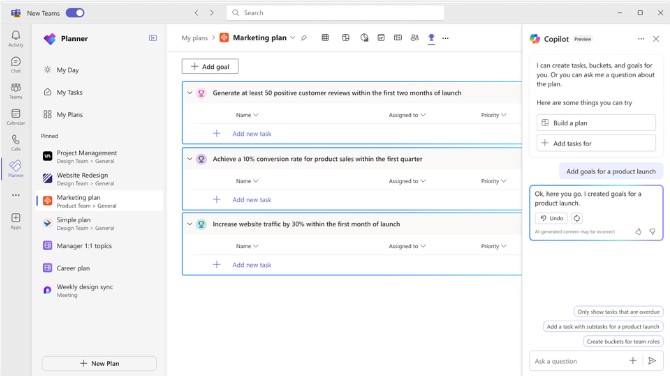
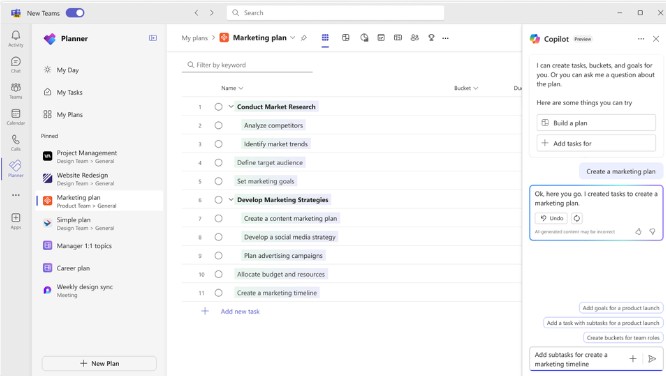
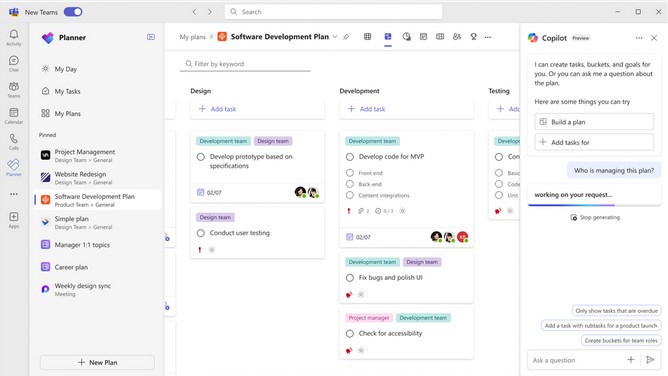
Microsoft announced that Copilot in Planner (preview) is now rolled out to 100% of users with a Project Plan 3 or Project Plan 5 license* in Microsoft Planner in Teams. With the power of generative AI, Copilot in Planner streamlines the planning, management, and execution of your work etc. If you already have a Project Plan 3 or Project Plan 5 license, you can preview Copilot in Planner capabilities*.
If you do not have a Project license, you can request a free 30-day trial. Simply click on the diamond icon within the Planner app in Teams where you can begin your free 30-day trial of advanced capabilities of Planner including Copilot in Planner or proceed with requesting a premium license.
Explore Copilot in Planner (preview) for planning, managing, and tracking projects:
• Planning: Copilot assists teams in setting goals, breaking down work, and generating tasks, goals, and buckets based on user prompts, facilitating the creation of a comprehensive project plan. • Effective Execution: Copilot helps streamline processes, identify next steps, and break down large tasks. It manages collaboration, tracks new goals, and identifies workload issues among team members. • Tracking Progress: Copilot aids in tracking complex plans by quickly surfacing necessary information about progress, priorities, and workload, ensuring teams stay informed and on track.
Planning
Managing. Effective execution is key to actually achieving your planned goals. With Copilot as your digital assistant, you can streamline this process and stay on track. Copilot can help you identify what to work on next or break up a large work item into actionable steps. It takes direction from users, seeking approval and feedback to manage how people and AI work together to achieve goals. When it’s time to triage an issue, expand scope, or make other changes to the plan, Copilot can help track a new goal, identify what tasks are behind, or which team members have the highest workload
Tracking
In general, Copilot supports the following languages for prompts: Chinese (Simplified), English, French, German, Italian, Japanese, Portuguese (Brazil), Spanish. We plan on to add more languages to Copilot and will update as additional languages are supported
Organizations using OneDrive for work or school are going to have to start paying more attention to their unlicensed accounts thanks to new policies starting January 27th next year. Any user account that stays unlicensed for longer than 90 days will be automatically archived by Microsoft, incurring a $0.05 per GB monthly storage fee. In this state, the data will be inaccessible to both admins and end users until the organization enables unlicensed account billing and pays a $0.60 per GB fee to reactivate it. If payments for the storage fees stop, the account will be deleted within a 93-day period.
Beginning January 27, 2025, any OneDrive user account that has been unlicensed for longer than 90 days becomes inaccessible to admins and end users. The unlicensed account is automatically archived, viewable via admin tools, but remains inaccessible until administrators take action on them.”
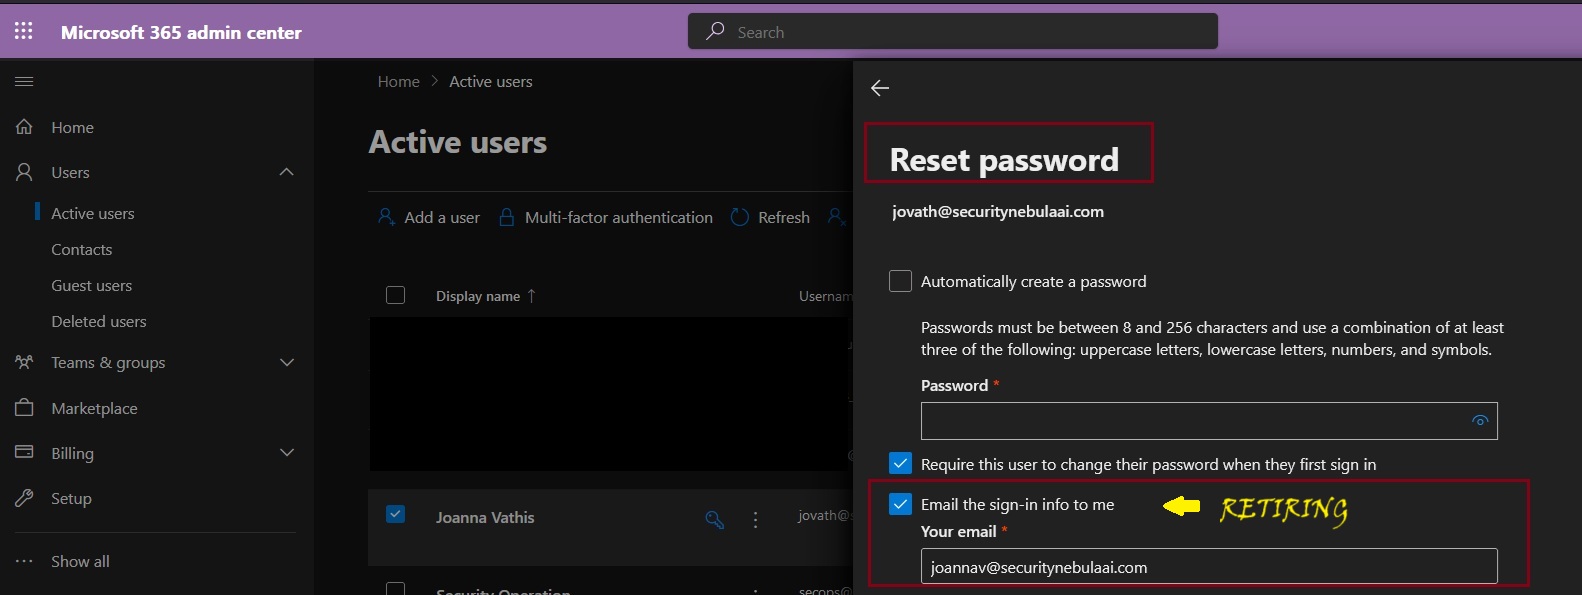
Microsoft will be retiring the Send password in email feature from Microsoft 365 admin center starting August 30, 2024. Instead, Microsoft recommend using the new Printoption in the Microsoft admin center to save the user account details and share them in a secure manner with your users.
Admins will no longer be able to receive usernames and passwords in email after this change is implemented. This change will happen automatically by the specified date. No admin action is required.