To improve self-service capabilities and reduce support dependency, Microsoft has made the Remove-DkimSigningConfig cmdlet available to tenant administrators. This cmdlet enables admins to remove obsolete DomainKeys Identified Mail (DKIM) signing configurations directly from Exchange Online PowerShell, helping clean up configurations when domains are removed from a tenant.
When this will happen This feature is already enabled worldwide, including in special clouds.
How this affects your organization
Who is affected:Tenant administrators managing DKIM configurations in Exchange Onlinewith either the Transport Hygiene management role or the Security Administrator role in Entra ID.
What will happen:
Admins can now run Remove-DkimSigningConfig directly using Exchange Online PowerShell (requires ExO v3.7 module).
No escalation to Microsoft support is needed for DKIM cleanup.
Obsolete DKIM configurations for removed domains can be self-managed.
The cmdlet is available by default for eligible roles.
This cmdlet does not replace any existing tools or processes; it introduces a new capability for tenant admins to manage DKIM cleanup independently.
What you can do to prepare
Ensure you have the required role (Transport Hygiene or Security Administrator).
Upgrade to Exchange Online PowerShell module v3.7.
Use Connect-ExchangeOnline and run Remove-DkimSigningConfig as needed.
Update internal documentation for DKIM management procedures.
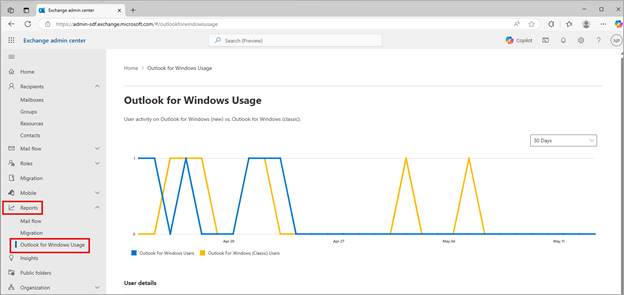
A new usage report for the new and classic Microsoft Outlook for Windows is being added to the Microsoft Exchange admin center.
This is the same data made available via the Microsoft 365 admin center usage report in March and is intended to make the data more easily accessible to Outlook admins who regularly use the Exchange admin center.
When this will happen:
General Availability (Worldwide): We began rolling out early May 2025 and expect to complete by late May 2025.
How this will affect your organization:
The new report Outlook for Windows Usage will be added to the Reports section in the EAC. This report will provide admins with detailed insights into user activity on the new Outlook for Windows versus the classic Outlook for Windows. The report includes a line chart showing the sum of users by endpoint over different time periods (days/weeks/months) and a data table with columns for email address, last activity date, and usage status for new and classic Outlook. You can export the data to csv and filter and search in the report.
The new report will be available by default in the Exchange admin center at Reports > Outlook for Windows Usage:
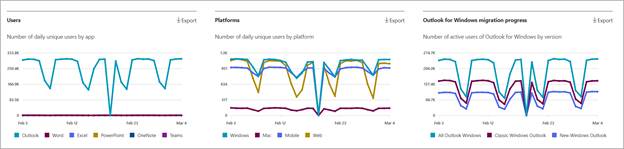
Examples of User details reports:
What you need to do to prepare:
This rollout is happening automatically by the specified dates with no admin action required before the rollout. Review your current configuration to assess the impact on your organization. You may want to update any relevant documentation.
Familiarize yourself with the new report and its features. Ensure that your organization’s admins have access to the EAC and are aware of the new reporting capabilities to support their new Outlook migration efforts.
Migrating large mailboxes from Google Workspace to Microsoft 365 in Exchange Online involves several steps. In this article provides comprehensive guidance for tenant administrators on migrating emails from IMAP sources, including Gmail, to Microsoft 365 Primary and Archive mailboxes concurrently, known as Large Archive Onboarding (LAO), this solution empowers tenant admins to seamlessly migrate mailboxes exceeding 100 GB from any mail sources by harnessing the auto-expanding archives feature within Microsoft 365.
Challenges
Large mailboxes pose unique challenges, including prolonged migration times, increased risk of data corruption, and bandwidth constraints.
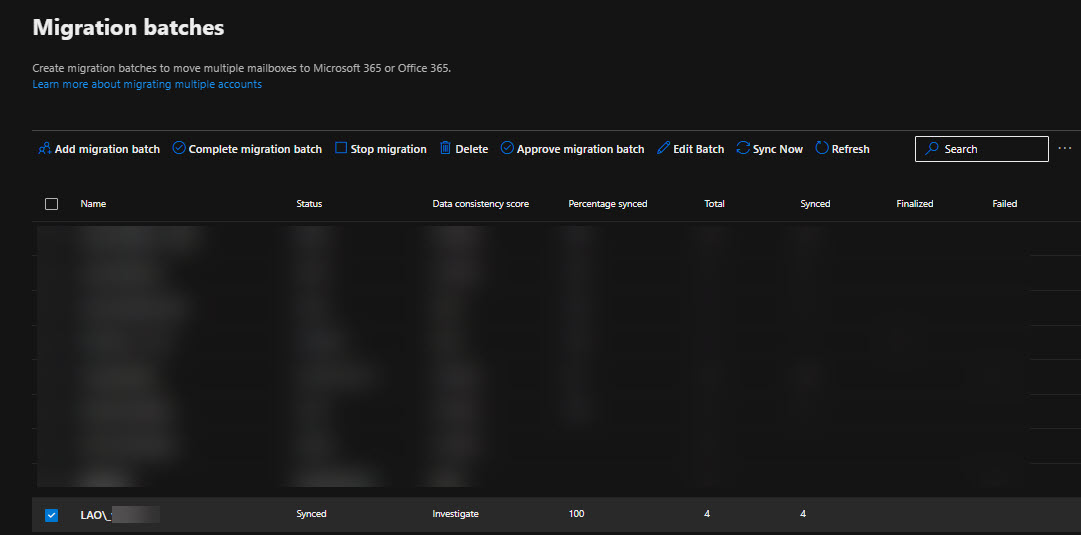
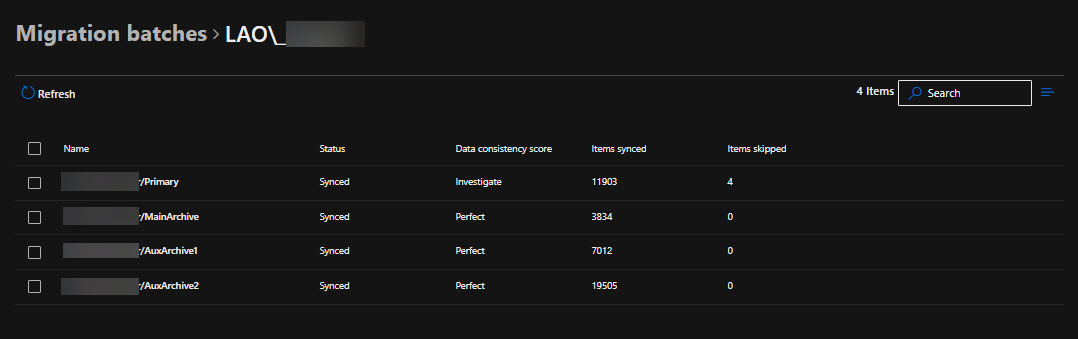
Currently, LAO is available only through PowerShell cmdlets.
Important
Microsoft 365 offers a resultant cumulative mailbox size of up to 1.6 TB. This includes 100 GB of Primary Mailbox, and 1.5 TB of Archives (including 100 GB Main Archive).
You require at least “Recipient Management” role to execute this. Read through the documentation, especially the linked documents to help kickstart migrations for large mailboxes.
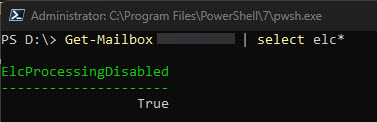
Run the cmdlet to disable ELCProcessing before creating LAO migration batch. If it’s not disabled, the folders might be moved by ELC during LAO, and the LAO migration might be blocked. Set-Mailbox <m365 mailbox> -ELCProcessingDisabled:$true
Methods to migrate large mailboxes to Microsoft 365 Exchange
Exporting emails from Google Workspace using Google Takeout
Using Third-Party Tools
Using Google Workspace Sync for Microsoft Outlook (GWSMO)
PowerShell: For large mailboxes, you can use PowerShell cmdlets to create a Large Archive Onboarding (LAO) migration batch. This method allows you to migrate mailboxes exceeding 100 GB by utilizing auto-expanding archives. – This is the method that we will describe
What do we need to know before we begin the Large Archive Onboarding (LAO)?
Before creating the migration, we need to know:
The list of users with large mailboxes (>100 GB) on the source side.
If you have a large mailbox, the content (time, type) that you intend to migrate and to where (primary, main archive, auxiliary archives).
For each user, the content can be selected based on time range or folder.
Examples
Time-range-based mapping:
Time range
Target Mailbox
After 2023/01/01
Primary
From 2022/01/01 to 2023/01/01
Archive mailbox 1
From 2021/01/01 to 2022/01/01
Archive mailbox 2
Before 2021/01/01
Archive mailbox 3
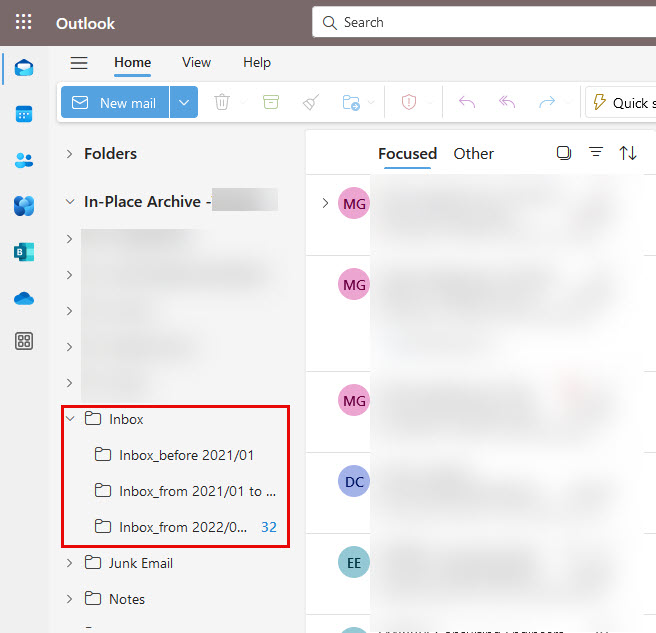
Folder-based mapping:
Folder Name
Target Mailbox
Inbox
Primary
SentItems
Primary
DeletedItems
Archive mailbox 1
Important Well-Known Folders: The folders that come under this categorization include but are not limited to Inbox, Deleted Items, Sent Items, and Drafts. Full list here.Except Deleted Items, all these well-known folders and customer created labels/folders can be migrated to either primary or any archive mailboxes (both Main Archive and Auxiliary Archives). However, Deleted Items of a user can be migrated only to the Primary or Main Archive, and not Auxiliary Archive.
Prepare XML file
To migrate large mailboxes automatically, you need to prepare an XML file that advises the system on the content-to-mailbox mapping. Download a sample XML file here Download a copy of the large mailbox migration XML mapping file and take a quick look before you proceed.
Time-range-based mapping
In the XML file, you need to specify the time range in ContentFilter. Unlike Filterable properties for the -ContentFilter parameter, only Received property is supported, which means that the filtering is based on the “Received” parameters and not the “Sent” parameters in the mail item metadata. For example, filtering is executed on the Received TimeStamp (time when the mail landed in the user’s mailbox) vs the Sent TimeStamp (time when the sender of the mail sent it to the user) of a mail, which the users received in their mailbox.
Four operators are supported:
gt: greater than
ge: greater than or equal to
lt: less than
le: less than or equal to
The value of EmailAddress should be the SMTP address of EXO user (eg. user@domain.com).
The value of Target can be the following four types:
I wanted to take a moment to explain the concept of Archive mailbox 1 (AuxArchive1), Archive mailbox 2 (AuxArchive2), Archive mailbox 3 (AuxArchive3), etc., and how they relate to our migration process. As you can see below in the XML I created, I have designated “MainArchive” as the Target and (AuxArchive1). By doing this, I am instructing the system on how and where I want the migration to be divided, as well as the specific time range for archiving. In our example, the system is creating folders within the Archiving mailbox Inbox based on the range provided in the XML file. This approach ensures that the migration is efficiently split and organized, enabling easier access and management of archived data.
Following is the XML file for time range based mapping for the example shown in table 1.
Important
If the time range in the XML file is changed during the migration process, there may be duplicated items. We recommend tenant admin have clear communication with end users before starting the migration.
When you create time ranges, ensure that you use continuous time ranges. If it’s not continuous, there will be missing items that the migration process can’t detect.
To create a large mailbox migration batch, you need to use New-MigrationBatch with -XMLData parameter.
Verify Data: After migration, verify that all emails, contacts, and calendar data have been successfully migrated.
User Training: Provide training to users on how to access their new mailboxes and use Microsoft 365 features.
By following these steps, you can ensure a smooth transition from Google Workspace to Microsoft 365, even for large mailboxes.
Conclusion
Migrating from Google Workspace to Microsoft 365 involves careful planning and execution, especially when dealing with large mailboxes. By following the steps outlined in this guide, you can ensure a smooth and efficient transition. Remember to communicate with your users, use the right tools, and monitor the process closely to address any issues promptly. With proper planning and execution, the migration can be a seamless experience that enhances your organization’s productivity and collaboration. I wanted to share this article that I recently came across and found quite insightful. I believe it could be very useful for you as well. Please take a moment to read through it, and let me know what you think.
Migrating from Google Workspace to Microsoft 365 can be a daunting task, especially when dealing with mailboxes over 100 GB. This guide provides an in-depth look at the challenges and solutions for a successful migration, catering to both normal and large mailboxes.
Assessment and Planning
Before initiating the migration, it’s crucial to carry out a thorough assessment of your current Google Workspace environment. Identify the number of users, mailbox sizes, and any potential issues that might arise. Planning should include:
Identifying key stakeholders
Defining the migration timeline
Determining the migration method
Allocating resources and roles
You can migrate the following functionalities from Google Workspace to Microsoft 365 or Office 365:
Mail & Rules Calendar Contacts
You can migrate batches of users from Google Workspace to Microsoft 365 or Office 365, allowing a migration project to be done in stages. This migration requires that you provision all of your users who will be migrated as mail-enabled users outside of the migration process. You must specify a list of users to migrate for each batch.
All procedures in this article assume that your Microsoft 365 or Office 365 domain is verified and that your TXT records have been set up. For more information, see Set up your domain (host-specific instructions).
Select your method of migration
You can migrate from Google Workspace using any of the following methods:
Automated – through the Exchange admin center
Manual – through the Exchange admin center
PowerShell
Migration limitations
Important Microsoft’s data migration tool is currently unaware of tools enforcing messaging records management (MRM) or archival policies. Because of this, any messages that are deleted or moved to archive by these policies will result in the migration process flagging these items as “missing”. The result is perceived data loss rather than actual data loss, which makes it much harder to identify actual data loss during any content verification checks. Therefore, Microsoft strongly recommends disabling all MRM and archival policies before attempting any data migration to mailboxes.
Note The largest single email message that can be migrated is based on the transport configuration for your configuration. The default limit is 35 MB. To increase this limit, see Office 365 now supports larger email messages.
Throughput limitations for contacts and calendars completely depend on the quota restrictions for your tenant’s service account on the Google Workspace side.
Other migration limitations are described in the following table:
Data type
Limitations
Mail
Vacation settings, Automatic reply settings
Meeting rooms
Room bookings won’t be migrated
Calendar
Shared calendars and event colors won’t be migrated
Contacts
A maximum of three email addresses per contact are migrated over
Contacts
Gmail tags, contact URLs, and custom tags won’t be migrated
Google Workspace migration prerequisites in Exchange Online
The following procedures must be performed (in the order mentioned) before you start the process of Google Workspace migration:
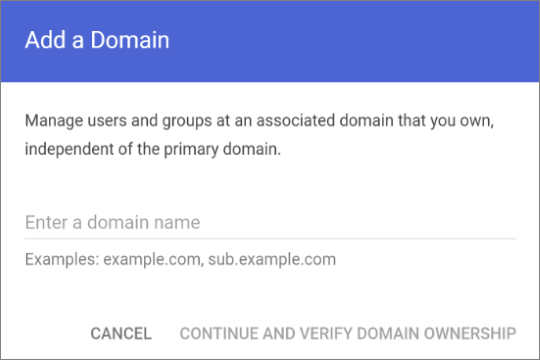
Create a subdomain for mail routing to Microsoft 365 or Office 365
Create a subdomain for mail routing to your Google Workspace domain
Provision users in Microsoft 365 or Office 365
Create a subdomain for mail routing to Microsoft 365
Note The option Add a domain won’t be available if using the legacy free edition of G Suite.
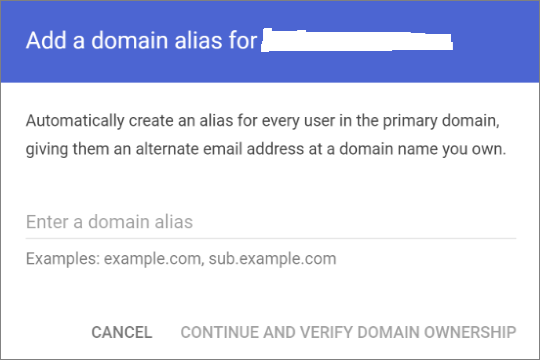
Enter the domain that you’ll use for routing mails to Microsoft 365 or Office 365, select User alias domain, and then select ADD DOMAIN & START VERIFICATION. A subdomain of your primary domain is recommended (for example, “m365mail.domain.com”, when “domain.com” is your primary domain) so that it will be automatically verified. If another domain (such as “domain.onmicrosoft.com”) is set, Google will send emails to each individual address with a link to verify the permission to route mail. Migration won’t complete until the verification is completed.
Note If you see an error GmailForwardingAddressRequiresVerificationException has occurred during the batch, skip this step of creating a subdomain for forwarding emails from the gmail side.
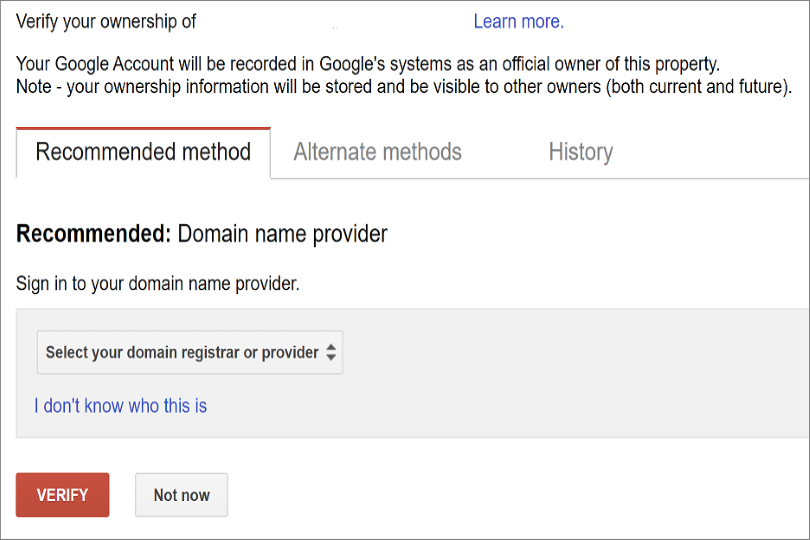
Follow any subsequent steps that are then required to verify your domain till the status is shown as Active. If you chose a subdomain of your primary domain (created in step 3), your new domain may have been verified automatically.
Sign in to your DNS provider and update your DNS records so that you have an MX record at the domain you created (in step 3), pointing to Microsoft 365 or Office 365. Ensure that this domain (created in step 3) is an accepted domain in Microsoft 365 or Office 365. Follow the instructions in Add a domain to Microsoft 365 to add the Microsoft 365 or Office 365 routing domain (“m365mail.domain.com”) to your organization and to configure DNS to route mail to Microsoft 365 or Office 365.
Note The migration process won’t be able to complete if an unverified routing domain is used. Choosing the built-in “tenantname.onmicrosoft.com” domain for routing mail to Office 365 instead of a subdomain of the primary Google Workspace domain occasionally causes issues that Microsoft is not able to assist with, besides causing Microsoft to recommend that the user manually verify the forwarding address or contact Google support.
Create a subdomain for mail routing to your Google Workspace domain
Enter the domain that you’ll use for routing mails to Google Workspace, select User alias domain, and then select ADD DOMAIN & START VERIFICATION. A subdomain of your primary domain is recommended (for example, “gsuite.domain.com”, when “domain.com” is your primary domain) so that it will be automatically verified.
Follow any subsequent steps that are then required to verify your domain till your domain’s status is shown as Active. If you chose a subdomain of your primary domain (created in step 3), your new domain may have been verified automatically.
Note It may take up to 24 hours for Google to propagate this setting to all the users in your organization.
Important If you are using non-default Transport settings in your Microsoft 365 or Office 365 organization, you should check whether the mail flow will work from Office 365 to Google Workspace. Ensure that either your default Remote Domain (“*”) has Automatic Forwarding enabled, or that there is a new Remote Domain for your Google Workspace routing domain (for example, “gsuite.domain.com“) that has Automatic Forwarding enabled.
Check Google Cloud platform permissions
An automated scenario requires the Google Migration administrator to be able to perform the following steps in the Google admin console:
Create a Google Workspace project.
Create a Google Workspace service account in the project.
Create a service key.
Enable all APIs – Gmail, Calendar, and Contacts.
The Google Migration administrator needs the following permissions to complete these steps:
resourcemanager.projects.create
iam.ServiceAccounts.create
The most secure way to achieve completion of these four steps is to assign the following roles to the Google Migration administrator:
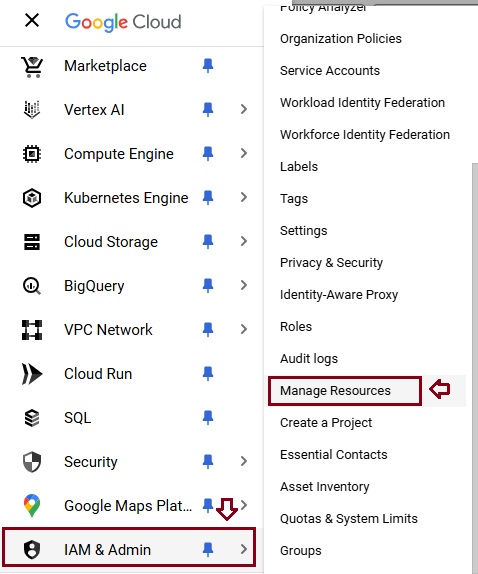
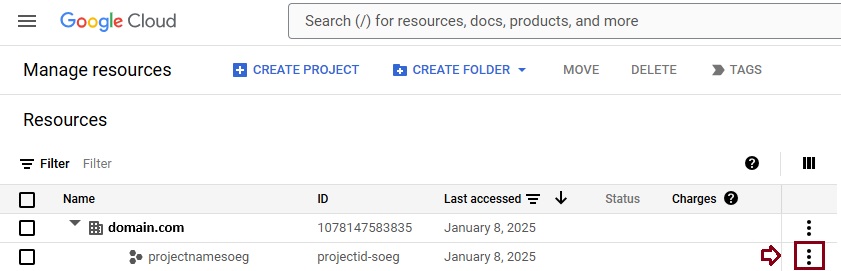
Select the appropriate resource and in the right-hand pane under the Permissions tab, select Add Principal.
Enter your Google Migration administrator credentials, enter Project Creator in the filter, and select Project Creator. Select Add Another Role, enter Create Service Accounts in the filter, and select Create Service Accounts. Select Save.
Note It might take up to 15 minutes to propagate role assignment changes across the globe.
Provision users in Microsoft 365. Once your Google Workspace environment has been properly configured, you can complete your migration in the Exchange admin center or through the Exchange Online PowerShell. Before proceeding with either method, ensure that Mail Users have been provisioned for every user in the organization who will be migrated (either now or eventually). If any users aren’t provisioned, provision them using the instructions in Manage mail users.
Very Important Note Microsoft recommend that the Default MRM Policy and Archive policies be disabled for these users until their migration has been completed. When such features remain enabled during migration, there is a chance that some messages will end up being considered “missing” during the content verification process.
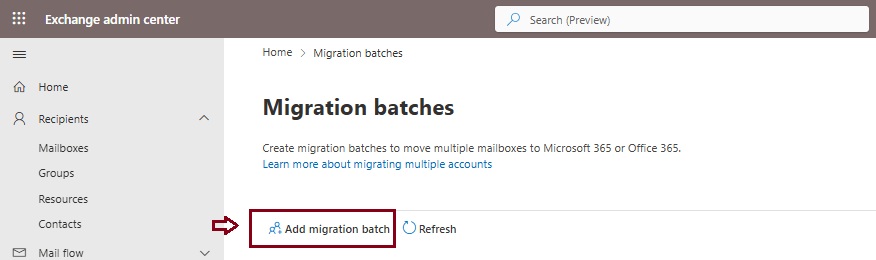
Start an automated Google Workspace migration batch in EAC
Give migration batch a unique name: Enter a unique name.
Select the mailbox migration path: Verify that Migration to Exchange Online is selected.
When you’re finished, click Next.
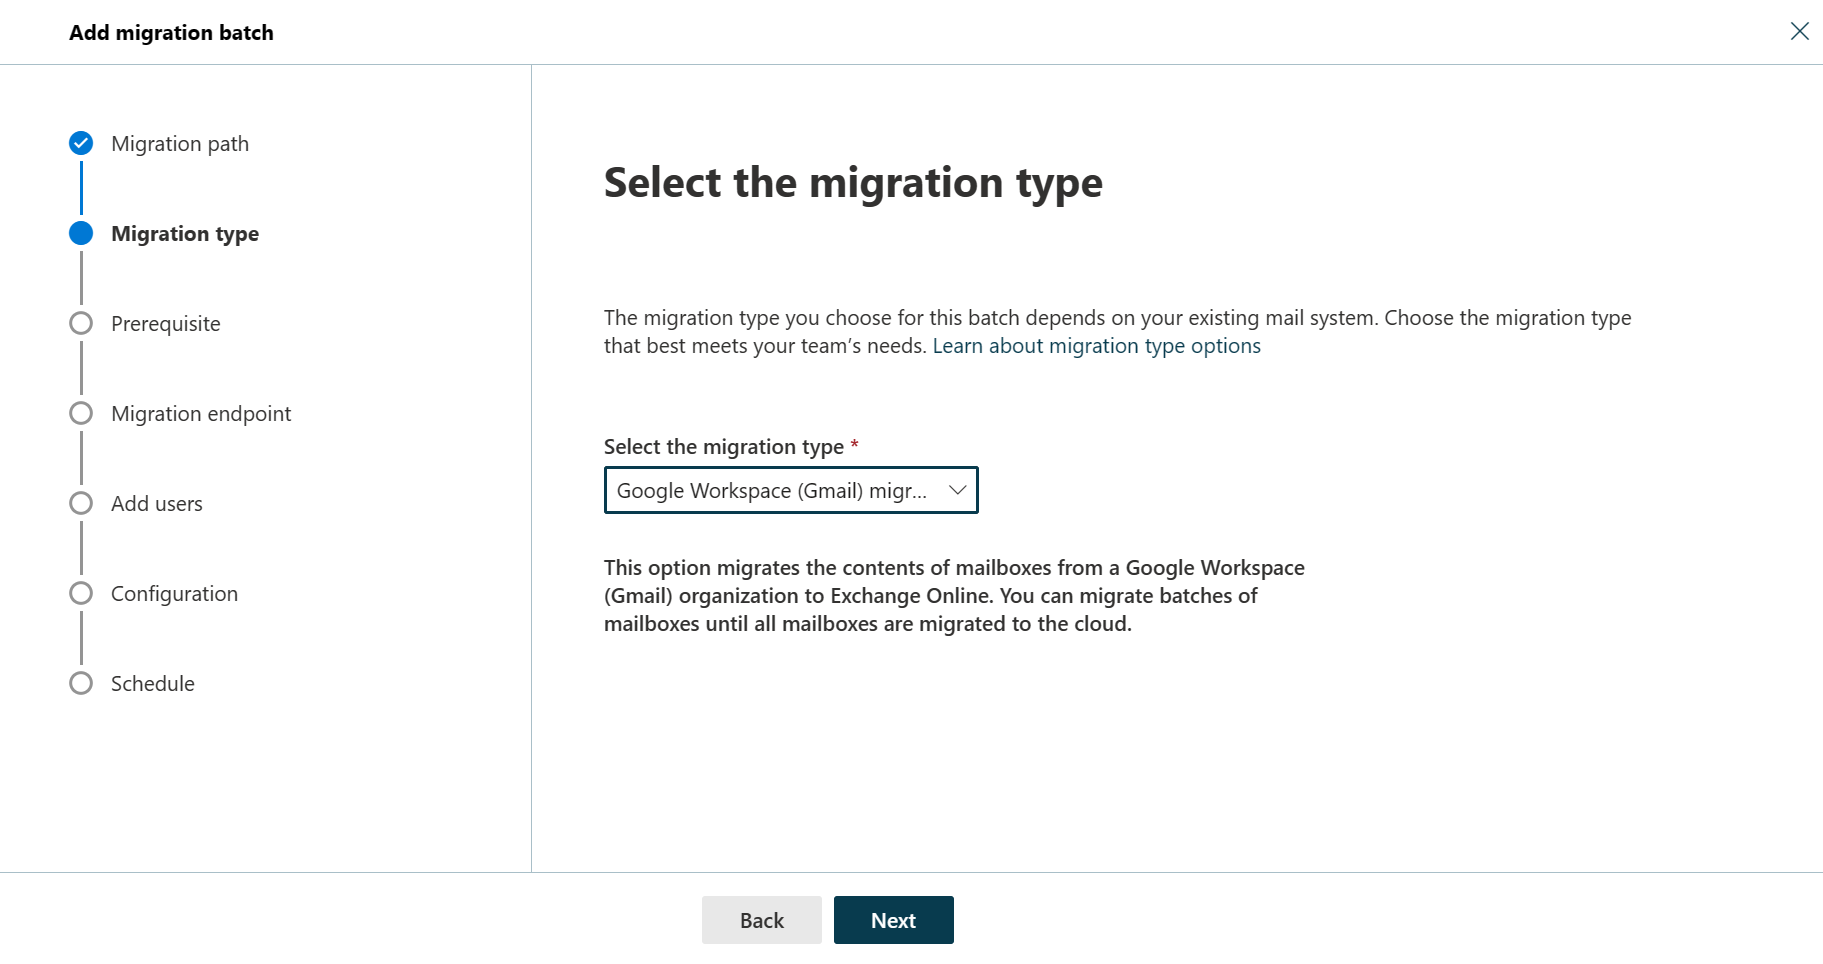
On the Select the migration type page, select Google Workspace (Gmail) migration as migration type, and click Next.
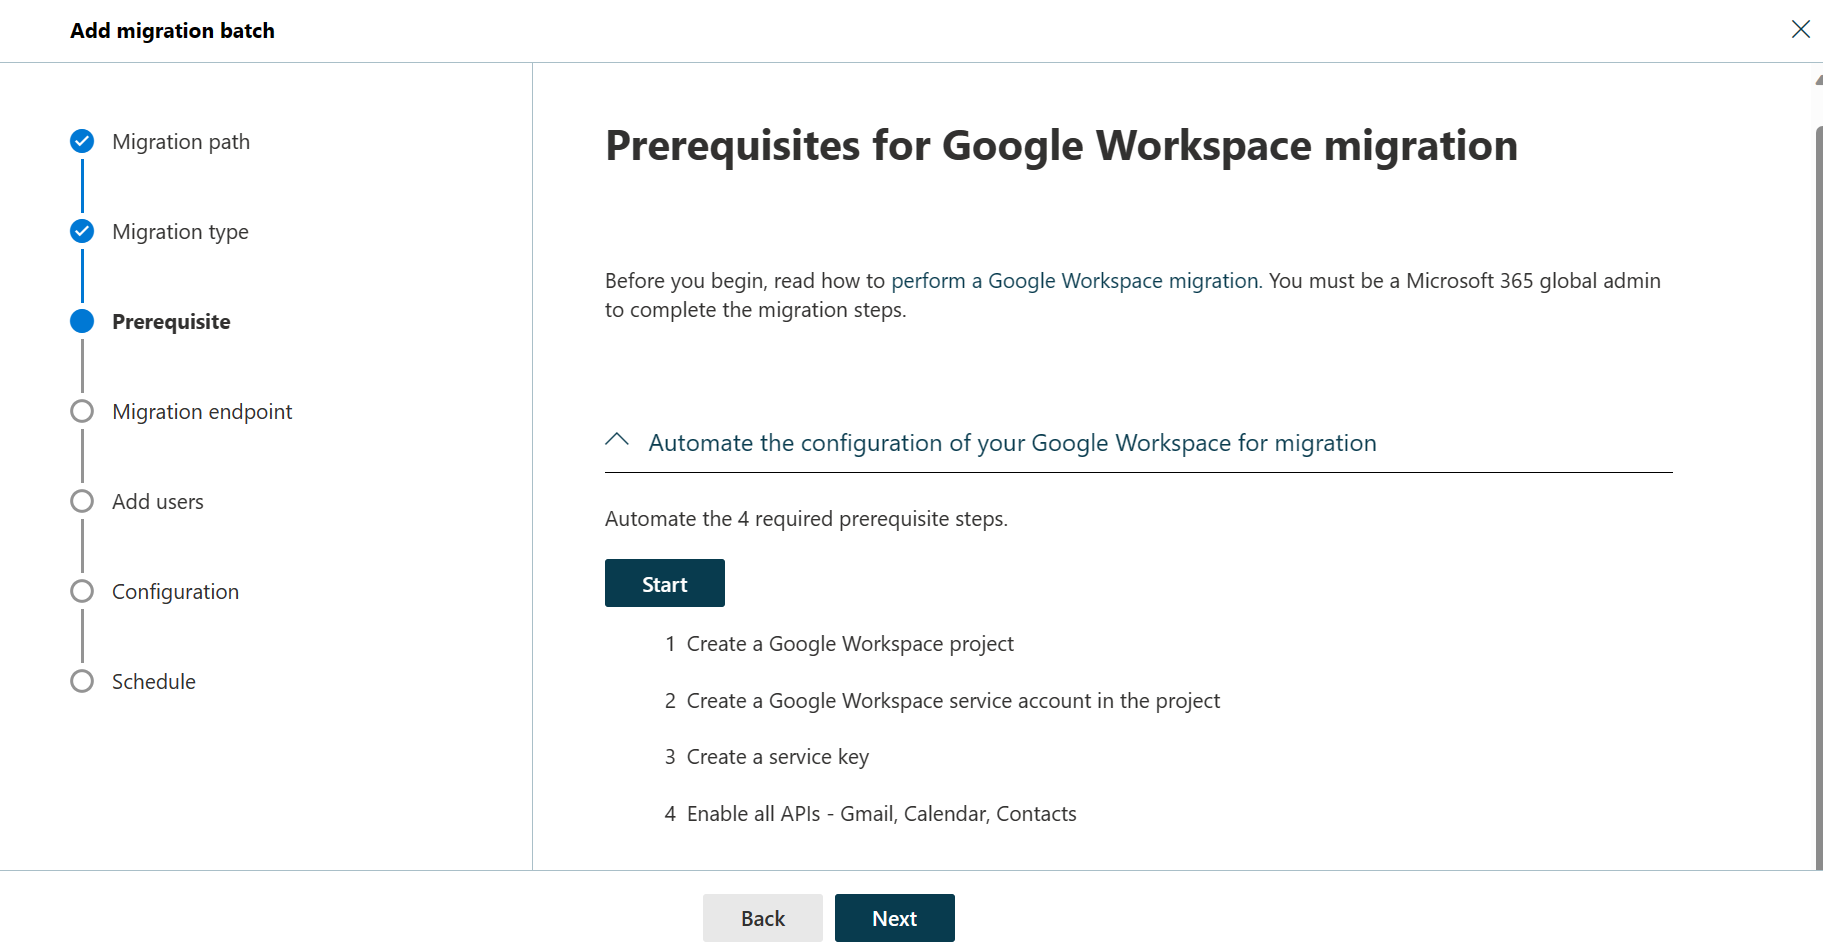
The Prerequisites for Google Workspace migration page appears.
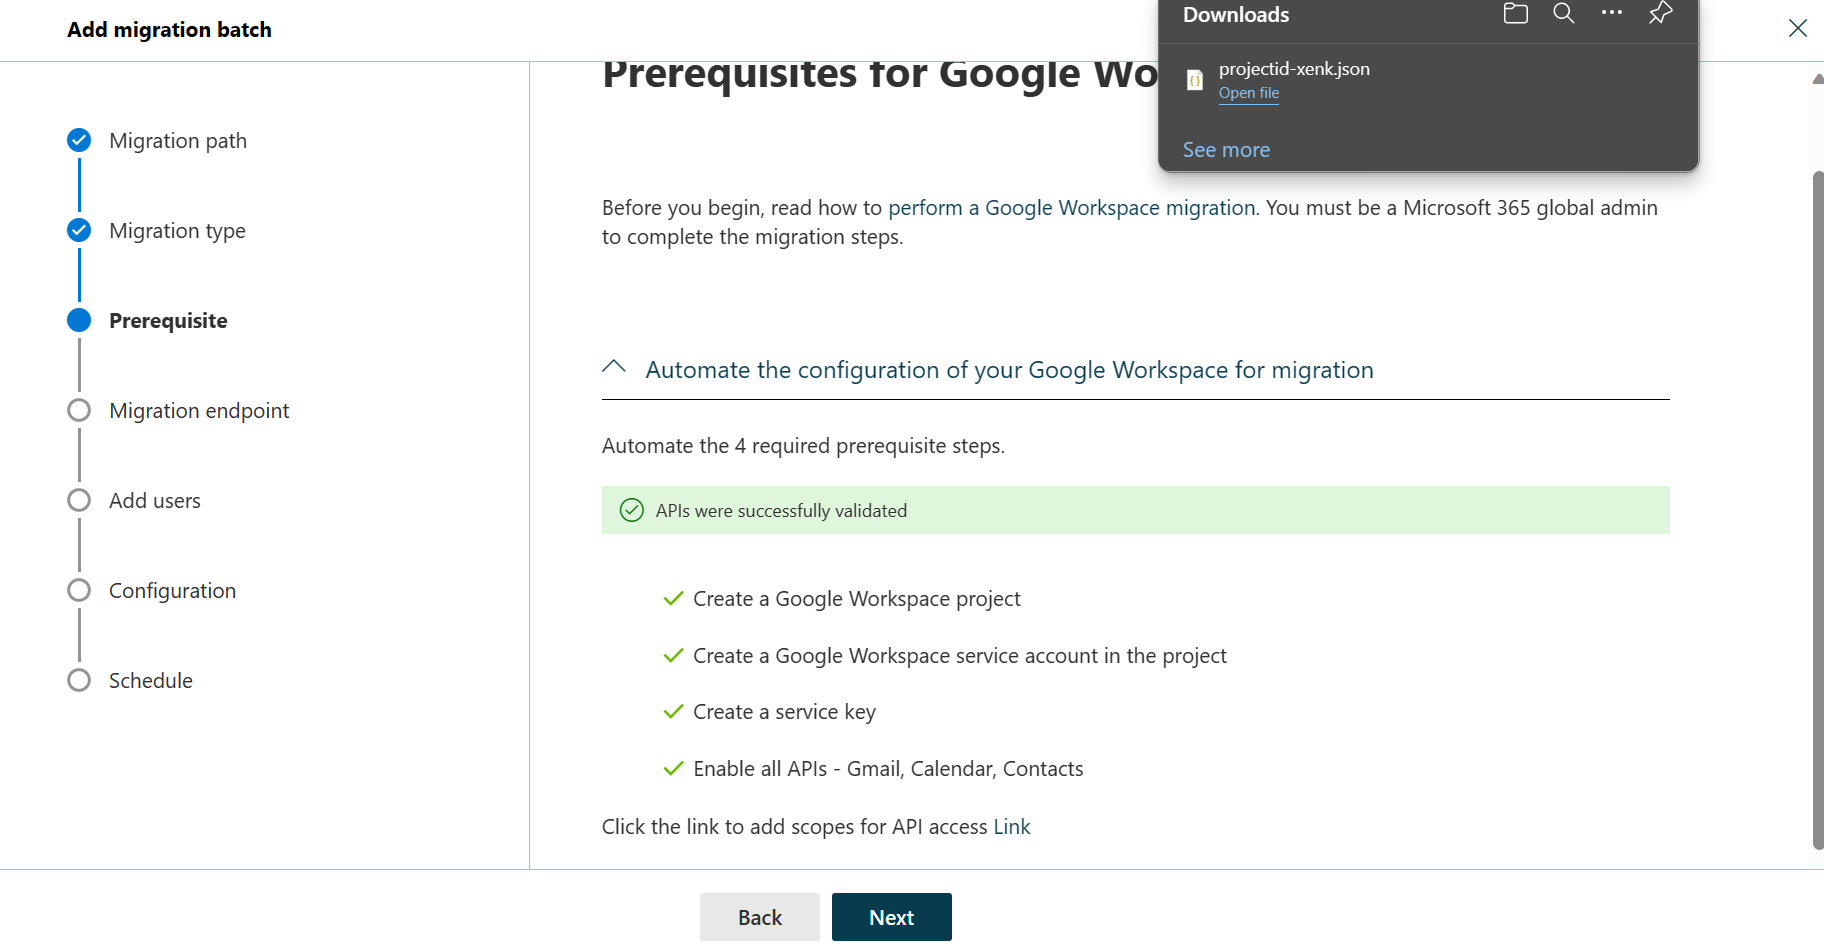
Verify that the Automate the configuration of your Google Workspace for migration section is expanded, and then select Start in that section to automate the four required prerequisite steps.
In the Google sign-in page that appears, sign in to your Google account to validate your APIs.
Once the APIs are successfully validated, the following things happen:
A JSON file (projectid-*.json) is downloaded to your local system.
The link to add the ClientID and the Scope is provided. The ClientID and Scope are also listed for your reference.
Select the API access link. You’ll be redirected to Google Admin API Controls page.
Select Add new. Copy the ClientID and Scope from the EAC, paste it here, and then select Authorize.
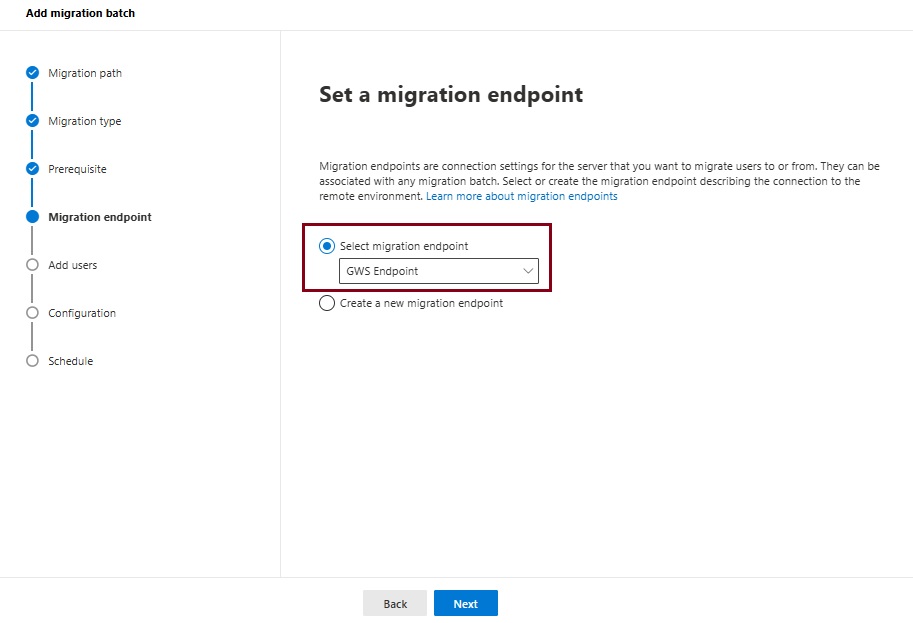
Once the four prerequisites-related steps are completed, select Next. The Set a migration endpoint page appears.
Select one of the following options:
Select the migration endpoint: Select an existing migration endpoint from the drop-down list.
Create a new migration endpoint: Select this option if you’re a first-time user.
Note To migrate Gmail mailboxes successfully, Microsoft 365 or Office 365 needs to connect and communicate with Gmail. To do this connection-communication, Microsoft 365 or Office 365 uses a migration endpoint. Migration endpoint is a technical term that describes the settings that are used to create the connection so you can migrate the mailboxes.
If you’ve selected Create a new migration endpoint, do the following steps:
On the General Information page, configure the following settings:
Migration Endpoint Name: Enter a value.
Maximum concurrent migrations: Leave the default value 20 or change the value as required.
Maximum concurrent incremental syncs: Leave the default value 10 or change the value as required. When you’re finished, select Next.
On the Gmail migration configuration page, configure the following settings:
Email address: Enter the email address that you use to sign in to the Google Workspace.
JSON key: Select Import JSON. In the dialog box that appears, find and select the downloaded JSON file, and then select Open. Once the endpoint is successfully created, it will be listed in the Select migration endpoint drop-down list.
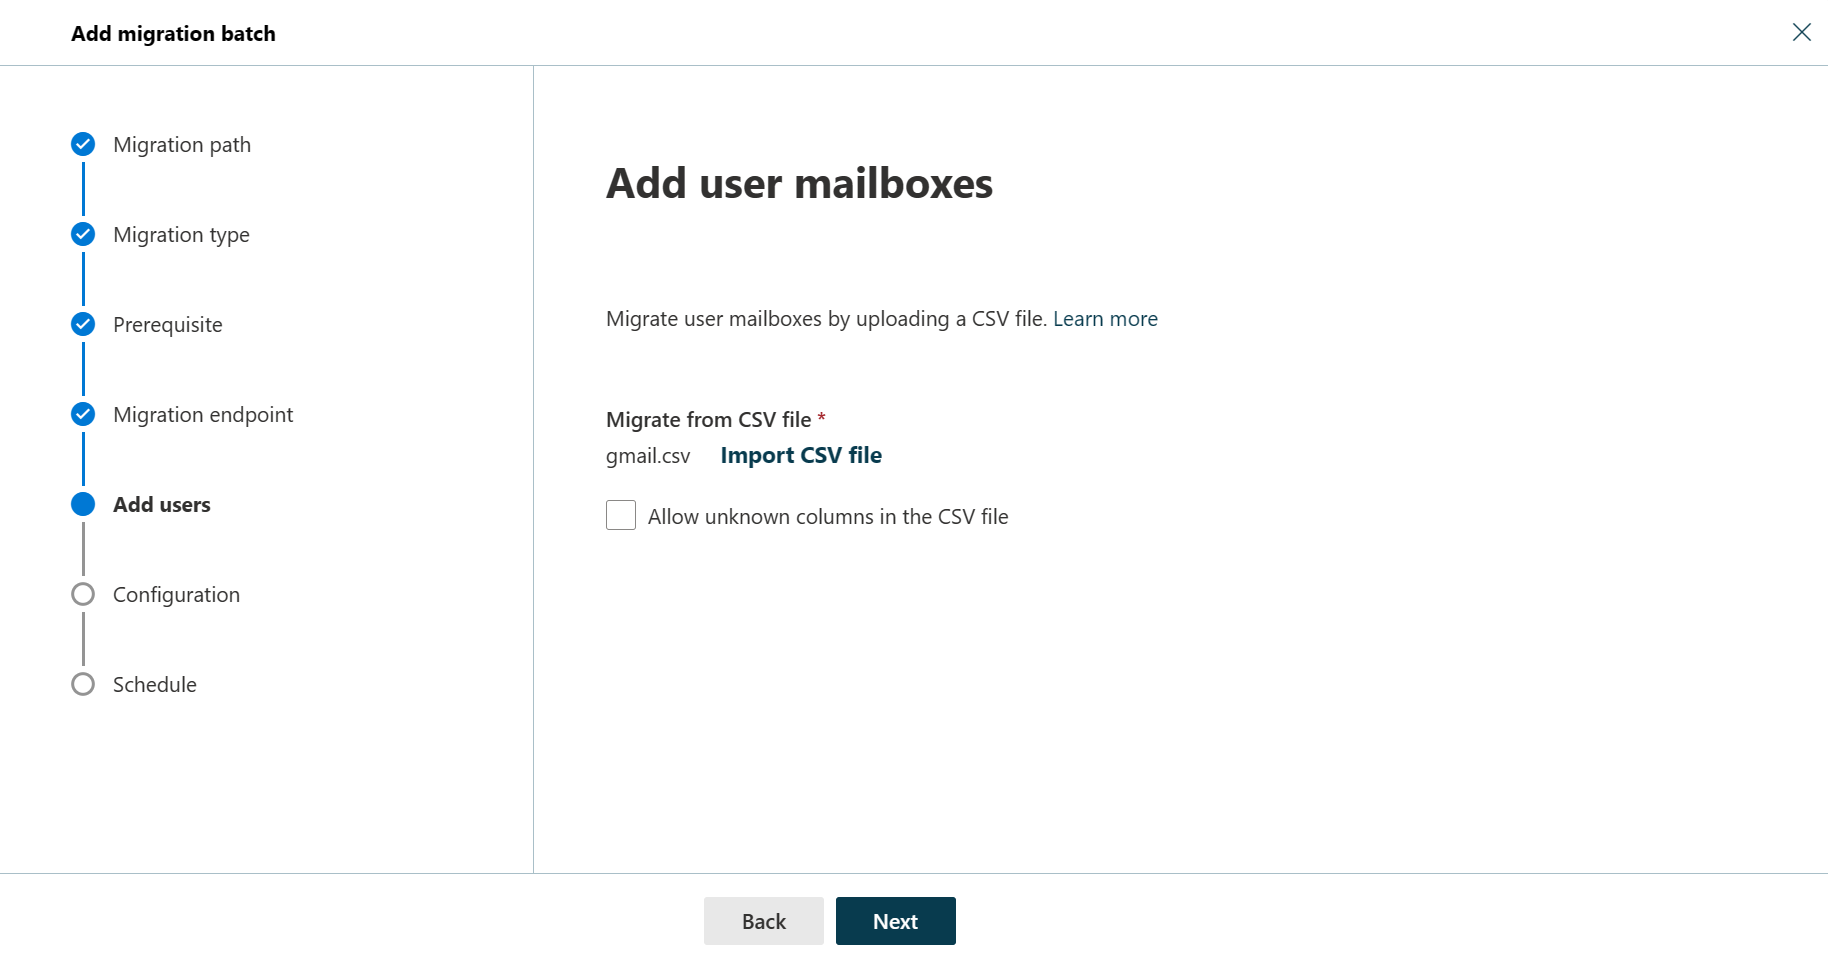
Select the endpoint from the drop-down list, and select Next. The Add user mailboxes page appears.
Select Import CSV file and navigate to the folder where you’ve saved the CSV file.
If you haven’t already saved or created the CSV file, create a CSV file containing the set of names of the users you want to migrate. You’ll need its filename below. The allowed headers are:
EmailAddress (required): Contains the primary email address for an existing Microsoft 365 or Office 365 mailbox.
Username (optional). Contains the Gmail primary email address, if it differs from EmailAddress.
CSV Format
EmailAddress will@domain.com user123@domain.com
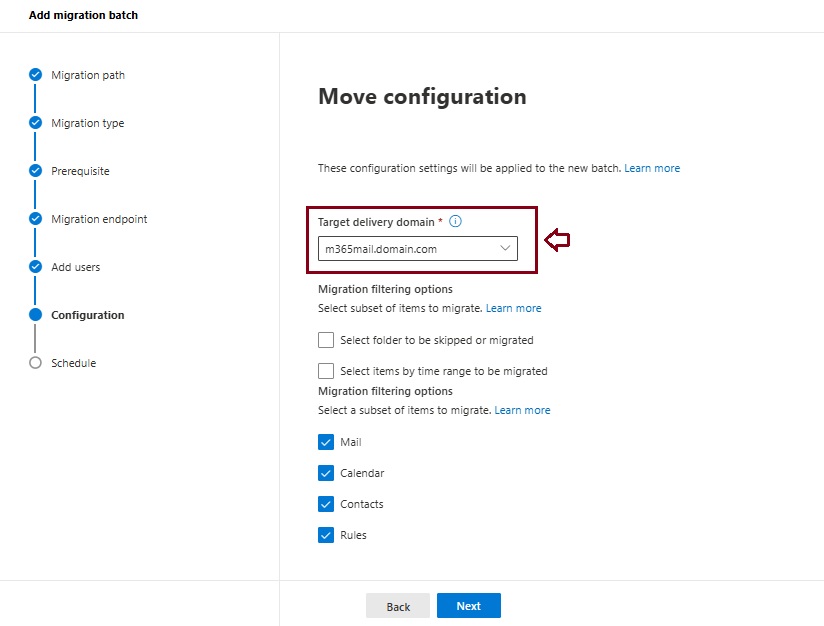
When you’re finished, click Next. The Move configuration page appears.
From the Target delivery domain drop-down list, select the target delivery domain (the subdomain) that was created as part of fulfilling the Google Workspace migration prerequisites in Exchange Online, and click Next.
Note The target delivery domain (the subdomain) you select in this step can be either an existing one or the one that you’ve created in Google Workspace migration prerequisites in Exchange Online (eg. M365mail.domain.com).
If you don’t see the target delivery domain that you want to select in the Target delivery domain drop-down list, you can manually enter the name of the target delivery domain in the text box.
The text box in which you manually enter the name of the target delivery domain is Target delivery domain. That is, the text box is effectively the Target delivery domain drop-down list, which is taking the role of a text box when you manually enter text into it.
Filtering options have been introduced for the migration of Google Workspace to Microsoft 365 or Office 365. For more information on these filtering options.
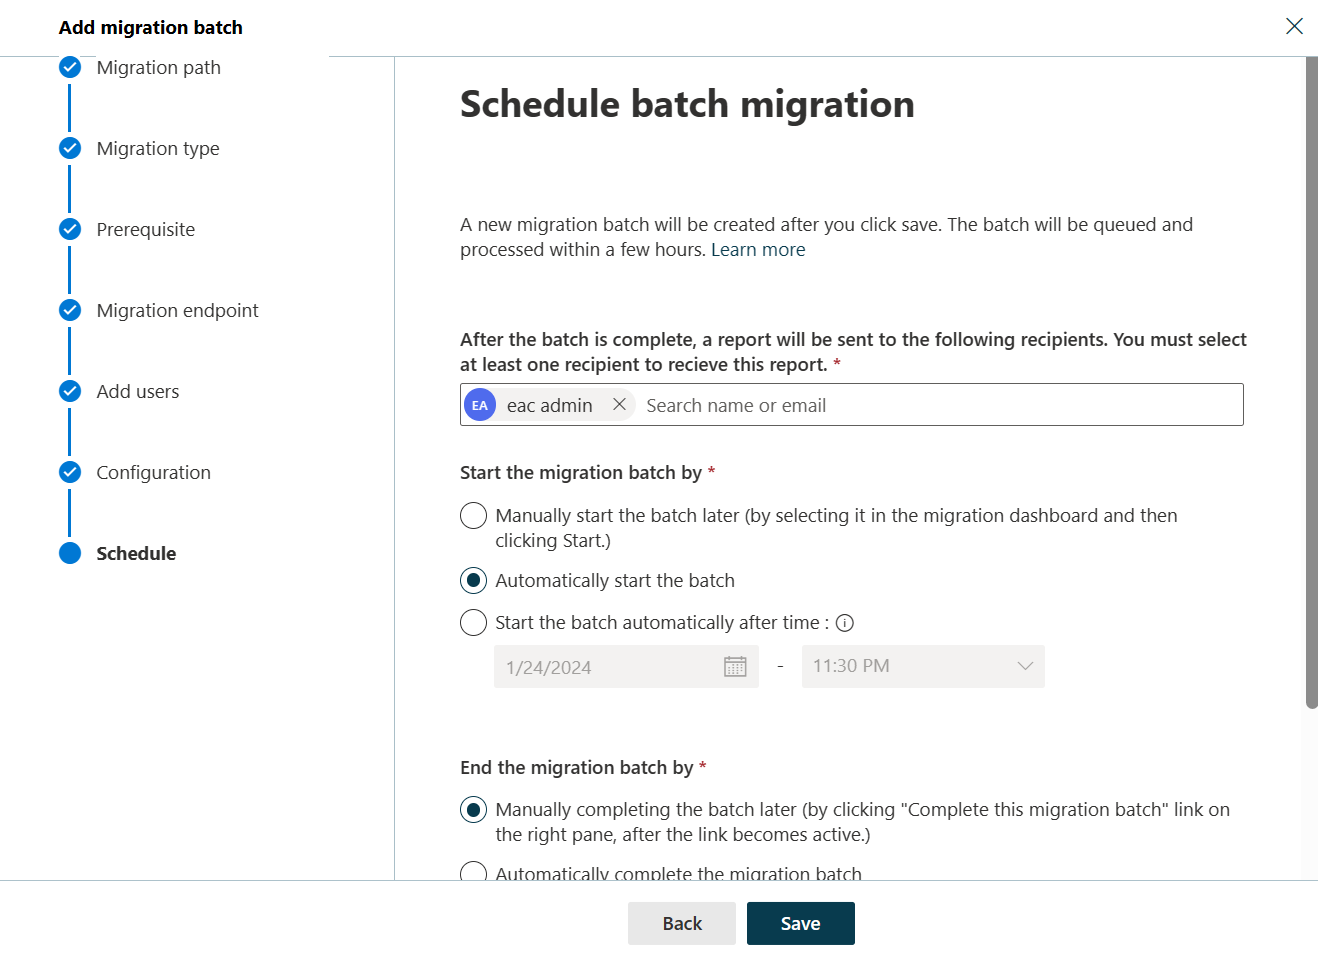
On the Schedule batch migration page, verify all the details, click Save, and then click Done.
Once the batch status changes from Syncing to Synced, you need to complete the batch.
In Part II we will describe how to handle the large mailboxes (>100 GB) and the challenges we will face. Stay tuned 😊
It is important to provide mechanisms for users to help them identify potential phishing emails. One way to do this is by giving users a way to distinguish emails from senders outside the organisation. Typically, this is accomplished by using a Exchange transport rules to prepend subject line or insert the message body to show the email is from external senders. This can cause several issues, including multiple tags in the subject, broken conversation threads, lack of localisation, and the handling of S/MIME-encrypted or ‑signed emails. Instead, Exchange Online can tag emails from external senders so that the Outlook client will display the [External] tag in the message list and a warning in the info bar when reading a message.
To set this up
Exchange Online tenant admin will need to run the cmdlet Set-ExternalInOutlook to enable the new user interface for the whole tenant (this is available now); adding certain emails and domains to the allow list via the cmdlet is also possible.
Outlook on the web already supports this. Outlook Mobile (iOS & Android) and Outlook for Mac are rolling out this feature. Specific versions:
Outlook on the web: available now
Outlook for Windows: Update 10/6/23: This feature is now available in Semi-Annual Enterprise Channel (Preview) too. External Tag view in Outlook for Windows (matching other clients) released to production for Current Channel and Monthly Enterprise Channel in Version 2211 for builds 15831.20190 and higher. We anticipate the External tag to reach Semi-Annual Preview Channel with Version 2308 on the September 12th 2023 public update and reach Semi-Annual Enterprise Channel with Version 2308 with the January 9th 2024 public update. If any of the versions or dates change we will update this topic. See Update history for Microsoft 365 Apps (listed by date) to see release status of versions.
Outlook mobile (iOS & Android): version 4.2111.0 and higher
New Outlook for Mac: version 16.47 and higher
If you are using the prepend subject line transport rules currently to add an [EXTERNAL] tag in external email subject line: the new Outlook native callouts are adding a new MAPI property called IsExternalSender to the email item. Once all the (above listed) client versions you require have this functionality, to avoid emails being marked ‘External’ twice (once by new native functionality and once by the transport rule), please turn off the transport rule first before turning on Outlook native external sender callouts.
Microsoft tracked this feature in Microsoft 365 Roadmap ID 70595. This feature can be enabled on the tenant level now.
Enable tagging of emails from external senders by running the follow command:
# Connect to Exchange Online Connect-ExchangeOnline
# Use the Set-ExternalInOutlook cmdlet to modify the configuration of external sender identification Set-ExternalInOutlook -Enabled $true
# This example prevents the specified email addresses from receiving the External icon in the area of the subject line in supported versions of Outlook. Set-ExternalInOutlook -AllowList admin@fabrikam.com,admin@fourthcoffee.com
# This example adds and removes the specified email addresses from the exception list without affecting other existing entries. Set-ExternalInOutlook -AllowList @{Add=“admin@cohovineyard.com”;Remove=“admin@fourthcoffee.com”}
Outlook Desktop
Outlook Mobile
Once this feature is enabled via PowerShell, it might take 24-48 hours for your users to start seeing the External sender tag in email messages received from external sources (outside of your organization), providing their Outlook version supports it. If enabling this, you might want to notify your users about the new feature and update your training and documentation, as appropriate.
Today, I manage to complete the bellow script, in order to automate exporting user list from Office 365 and also with a second script to enable mailbox archive for specific users
Let’s take a closer look and see how it works
What do you need to know before you begin?
Make sure you have already installed Windows Azure AD PowerShell
You must check and be sure your server or your computer has access to the internet
Let’s have a quick look how to execute the script ExportO365UserList_v2.0 and Import_UserList_For_Archive_Mailbox.ps1 on Windows PowerShell and what this script do for us.
Login to your computer with Administrator credentials
Start Windows Azure AD PowerShell “As Administrator”
3. Next step, copy the scripts ExportO365UserList_v2.0 and Import_UserList_For_Archive_Mailbox.ps1 on (C:\) drive
4. Let’s start by running the script from Windows Azure AD PowerShell itself. In case you get weird error messages when you try to run a script, the reason is only one, security settings built into Windows PowerShell include something called the “execution policy” the execution policy determines how (or if) PowerShell runs scripts. By default, PowerShell’s execution policy is set to Restricted that means that scripts – including those you write yourself – won’t run. Navigate back to Windows PowerShell and set the Execution policy to unrestricted in order to be able to run the script, in that case, use this command to set your execution policy to RemoteSigned or Unrestricted
Note: The Set-ExecutionPolicy cmdlet enables you to determine which Windows PowerShell scripts (if any) will be allowed to run on your computer.
Windows PowerShell has four different execution policies:
Restricted – No scripts can be run. Windows PowerShell can be used only in interactive mode.
AllSigned – Only scripts signed by a trusted publisher can be run.
RemoteSigned – Downloaded scripts must be signed by a trusted publisher before they can be run.
Unrestricted – No restrictions; all Windows PowerShell scripts can be run.
The most common (default) way to run a script is by calling it:
PS C:\> & “C:\Admin\My first Script.ps1”
If the path does not contain any spaces, then you can omit the quotes and the ‘&’ operator
PS C:\> C:\Admin\Myscript.ps1
If the script is in the current directory, you must indicate this using .\ (or ./ will also work)
PS C:\> .\Myscript.ps1
In our case scenario we run the script in the current directory “C:\” so, we must indicate this using .\ and we click Enter
5. Type your Global Admin credentials, Username and Password in order to login and the script automatically will export the Office 365 User List on C:\
6. Go to C:\ drive and check the list which is exported there, with the name O365UserList.csv
7. Next step, is to open the exported list with the excel file, on the list we can see all licensed users, SMTP addresses and display name
Now we will filter this list and we’ll select only the users that we want to enable mailbox archive
8. I will copy on notepad only the SMTP addresses (UserPrincipalName) and paste them on the notepad as follow
Note: on the top of the file type Identity
Save the file on C:\ drive as UserListForMailboxArchive.csv
9. Navigate to Windows Azure Active Directory Module for Windows PowerShell and run the Import_UserList_For_Archive_Mailbox.ps1 script
As we can see Mailbox Archive was enabled for those users
You can download the scripts from TechNet Gallery, click here