Microsoft is rolling out two new Microsoft Graph APIs that make it much easier for administrators to discover, monitor, and manage Copilot agents and apps across their organization.
Instead of relying on manual checks through the admin UI, these new APIs allow admins to programmatically access a complete inventory of agents and apps. This opens the door to richer reporting, automation, and seamless integration with existing tools and workflows.
General Availability (Worldwide): Deployment will start in mid‑April 2026 (previously end of March) and is expected to complete by early May 2026 (previously end of February).
How does this affect your organization?
Who is impacted?
This change is relevant for admins who manage Copilot agents and apps within Microsoft 365 environments.
What’s changing?
Microsoft is introducing new Graph API endpoints that provide visibility into all agents and apps in your tenant:
Retrieve all agents and appsGET graph.microsoft.com/copilot/admin/catalog/packages Returns a full inventory of Microsoft, External, Shared, and Custom agents and apps.
Retrieve details for a specific agent or appGET graph.microsoft.com/copilot/admin/catalog/packages/{id} Returns detailed metadata, including properties and manifest information.
These endpoints enable:
Automated reporting
Easier integrations with internal tools
Better visibility into what’s deployed across your organization
What’s not changing?
There are no changes to existing admin UI workflows
There are no changes to current policies
No additional licenses are required — the APIs are available with an existing Microsoft 365 license
Microsoft is rolling out a major update to the Data Security Posture Agent in Microsoft Purview, and it’s a big step forward for organizations looking to stay ahead of credential‑related risks.
The newest addition is a credential scanning capability designed to help you uncover exposed credentials, like Microsoft Entra ID details, private keys, API tokens, and other sensitive access points across your selected data locations. With this update, Purview doesn’t just spot the issues; it also gives you risk scores, AI‑generated insights, confidence levels, and credential categories so you can quickly understand what matters and what needs attention.
All findings are surfaced in one streamlined task board, making it easier than ever to review, confirm, and take action.
Public Preview: Starts late March 2026, expected to finish by early April 2026
General Availability (Worldwide): Starts late June 2026, wrapping up by early July 2026
What This Means for Your Organization
Who will notice the change?
Admins who manage Microsoft Purview and use the Data Security Posture Agent within Microsoft 365 tenants will see the new feature appear under the Explore Agent section.
What’s changing?
A brand‑new credential scanning experience is being introduced, including:
LLM-powered detection of exposed credentials across selected data locations
Automated identification of:
Microsoft Entra ID credentials
Private keys
API tokens
Additional sensitive credential types
Each detection comes with:
A risk score
AI-generated insights
A confidence rating
A credential category
And to help you stay organized, Purview provides a task board where you can follow up on findings, track progress, and take recommended actions, all in one place.
Today Microsoft is rolling out some major updates that truly reshape how AI shows up in everyday work. Here’s what’s new:
Wave 3 of Microsoft 365 Copilot
More model diversity, with Claude and next‑gen OpenAI models available starting today
Agent 365 becoming generally available on May 1 at $15 per user
Microsoft 365 E7: The Frontier Suite, also coming May 1, priced at $99 per user
Wave 3 is honestly the biggest shift I’ve seen in Copilot so far. It doesn’t feel like “AI that helps you write or summarize” anymore, it feels like Microsoft is moving Copilot into a true agent that can actually do work for you, not just respond to prompts. And this changes everything in how we’ll use Microsoft 365.
Frontier Transformation – What It Really Means
Microsoft is talking about “Frontier Transformation” but at its core, it’s actually simple: AI should help people achieve their highest goals — not just make processes a little faster.
Copilot Cowork – The game changer
The main highlight is Copilot Cowork, built together with Anthropic (the team behind Claude). What I love about it is that it can finally take on a whole piece of work, break it into steps, run those steps in Word, Excel, PowerPoint, Outlook, and keep you updated as it goes.
Not instantly, but over minutes or even hours. So instead of: “Write a one‑page summary” It becomes: “Prepare the full report, build the Excel analysis, create the PowerPoint, and draft the email to the team.” And it actually moves this work forward across the apps we already use daily.
Edit with Copilot – In-app agentic editing
Another thing I like is that “Agent Mode” is gone. It’s now simply called Edit with Copilot, and it works right inside the apps:
Word: turns your messy draft into something polished
Excel: actually builds formulas and charts (not just suggests)
PowerPoint: creates slides using your real templates and brand
Outlook: drafts or refines emails in the compose window
No more copy-paste. No more losing sensitivity labels. Everything stays governed and saved where it should be.
Work IQ – Copilot that “knows how you work”
Wave 3 also introduces Work IQ, which gives Copilot a deeper understanding of:
Your organization’s content
Your collaboration patterns
The apps and workflows you use
The context behind your requests
This is what helps Copilot choose the right model (Claude or OpenAI) depending on the task.
Multi‑model Copilot (Claude + OpenAI)
For the first time, Copilot becomes model-agnostic. You’ll be able to pick or automatically use:
Anthropic Claude (via the Frontier program)
OpenAI models
A model selector is coming to Copilot Chat so you can choose which model works best, depending on the task.
New licensing tier: Microsoft 365 E7 “The Frontier Suite”
Microsoft also launched a brand new enterprise tier — their first in 11 years: Microsoft 365 E7 (The Frontier Suite)
It bundles:
M365 E5
Copilot
Agent 365
Additional security + analytics tools
This shows how seriously Microsoft is betting on agentic AI becoming the new standard.
Rollout timeline
Wave 3 features are:
Already in research preview for selected customers
Expanding via the Frontier Program starting March 2026
With Wave 3, Agent 365, Work IQ, and the new E7 suite, AI is shifting from early experimentation to real, scalable, enterprise-wide value. Microsoft is not only imagining what AI could be it’s giving organizations the tools to build that future right now.
You can read more in the official Microsoft article here.
Microsoft is introducing a new soft purge action in Data Security Investigations (DSI), giving admins a quick and safe way to remove sensitive or overshared files during an investigation. With soft purge, items can be deleted immediately but still recovered later as long as they’re within their deleted‑item retention period, so admins get speed without risking permanent data loss.
This builds on DSI’s growing set of AI‑powered tools like intelligent categorization, AI search, and automated risk insights making it easier than ever for organizations to spot issues and take action fast.
New update coming to Microsoft 365 Roadmap ID 558109. A soft purge action will soon be available in Data Security Investigations (DSI), giving admins a safer and more flexible way to remove sensitive or overshared content during an investigation.
When it’s rolling out
General Availability (Worldwide): Begins early April 2026
Expected completion:late May 2026
What this means for your organization
Who is affected?
Admins who use Data Security Investigations (DSI) in the Microsoft Purview compliance portal.
What’s changing
A new soft purge option will appear in DSI. With this action, admins can:
Remove items that match an investigation query
Keep those items recoverable until the retention period expires
Act quickly without risking accidental permanent deletion
And the best part:
The feature is on by default
No configuration needed
No changes to existing DLP, labeling, or retention policies
End users will not see any changes in their workflows
Once the rollout finishes, the feature simply appears for eligible tenants.
How to prepare
There is nothing you need to do in advance. If you want to get ahead, you may consider:
Reviewing how soft purge works in DSI
Updating any internal guidance on investigation processes
Informing your security or compliance teams about the new action
Overall, this update gives organizations a safer and more controlled way to remove sensitive content during investigations—without adding extra steps or complexity.
Microsoft Purview is rolling out a great new capability for SharePoint and OneDrive: automatic actions for sensitivity labels.
Until now, if someone manually applied the wrong label to a file, admins had limited options—especially when large volumes of content were involved. With this update, Purview can now automatically override or remove manually applied sensitivity labels when they don’t match your organization’s policies.
In simple terms: Your data stays correctly classified, even when humans make mistakes.
Rollout begins mid‑April 2026, and the feature will be off by default, giving administrators full control over when and how they want to enable it. It’s another step toward stronger, more accurate data governance across Microsoft 365.
Microsoft Purview is getting a meaningful upgrade as part of its ongoing integration with Microsoft Defender for Cloud Apps. The latest improvement brings new auto‑labeling actions to SharePoint and OneDrive, giving organizations more control over how sensitive information is classified across their environment.
What’s new? Admins can now automatically override sensitivity labels that were applied manually or remove labels entirely when a file no longer meets the criteria for that classification. This means large volumes of content can stay properly labeled—even as information changes—without relying on users to update labels themselves.
Microsoft Purview is rolling out a series of improvements designed to make AI analysis in Data Security Investigations (DSI) faster, smoother, and easier for analysts to use.
With these updates, items added to an investigation will now be automatically prepared for AI analysis—removing a repetitive manual step and helping analysts get to insights sooner. Purview is also introducing a new standard categorization option, giving organizations a quicker and more cost‑efficient way to group and review investigation items. For deeper insights, advanced categorization, including AI‑generated topics, will continue to be available.
Updated February 13, 2026: The roll-out timeline has been updated!!
Microsoft 365 Office for the web will support applying sensitivity labels with user-defined permissions in Word, Excel, and PowerPoint starting mid-March 2026. This aligns with desktop app permissions dialogs, requires no admin changes, and enhances document access control without compliance impacts.
Office for the web now supports sensitivity labels with user‑defined permissions
Microsoft 365 Office for the web (Word, Excel, and PowerPoint) now includes the ability to apply sensitivity labels with user‑defined permissions, giving organizations greater flexibility and control over document access directly in the browser. This update aligns the web experience with the modern permissions dialog available in the desktop apps.
Roadmap ID: 468888
Rollout timeline
General Availability
Worldwide & GCC: Rollout begins mid‑March 2026 (previously mid‑February) and is expected to complete by early April 2026 (previously early March).
GCCH & DoD: Rollout begins mid‑March 2026 (previously mid‑February) and is expected to complete by early May 2026 (previously early April).
Who is affected
Compliance considerations
No new compliance impacts have been identified. Organisations may review the change as needed.
Migrating from Google Workspace to Microsoft 365 can be a daunting task, especially when dealing with mailboxes over 100 GB. This guide provides an in-depth look at the challenges and solutions for a successful migration, catering to both normal and large mailboxes.
Assessment and Planning
Before initiating the migration, it’s crucial to carry out a thorough assessment of your current Google Workspace environment. Identify the number of users, mailbox sizes, and any potential issues that might arise. Planning should include:
Identifying key stakeholders
Defining the migration timeline
Determining the migration method
Allocating resources and roles
You can migrate the following functionalities from Google Workspace to Microsoft 365 or Office 365:
Mail & Rules Calendar Contacts
You can migrate batches of users from Google Workspace to Microsoft 365 or Office 365, allowing a migration project to be done in stages. This migration requires that you provision all of your users who will be migrated as mail-enabled users outside of the migration process. You must specify a list of users to migrate for each batch.
All procedures in this article assume that your Microsoft 365 or Office 365 domain is verified and that your TXT records have been set up. For more information, see Set up your domain (host-specific instructions).
Select your method of migration
You can migrate from Google Workspace using any of the following methods:
Automated – through the Exchange admin center
Manual – through the Exchange admin center
PowerShell
Migration limitations
Important Microsoft’s data migration tool is currently unaware of tools enforcing messaging records management (MRM) or archival policies. Because of this, any messages that are deleted or moved to archive by these policies will result in the migration process flagging these items as “missing”. The result is perceived data loss rather than actual data loss, which makes it much harder to identify actual data loss during any content verification checks. Therefore, Microsoft strongly recommends disabling all MRM and archival policies before attempting any data migration to mailboxes.
Note The largest single email message that can be migrated is based on the transport configuration for your configuration. The default limit is 35 MB. To increase this limit, see Office 365 now supports larger email messages.
Throughput limitations for contacts and calendars completely depend on the quota restrictions for your tenant’s service account on the Google Workspace side.
Other migration limitations are described in the following table:
Data type
Limitations
Mail
Vacation settings, Automatic reply settings
Meeting rooms
Room bookings won’t be migrated
Calendar
Shared calendars and event colors won’t be migrated
Contacts
A maximum of three email addresses per contact are migrated over
Contacts
Gmail tags, contact URLs, and custom tags won’t be migrated
Google Workspace migration prerequisites in Exchange Online
The following procedures must be performed (in the order mentioned) before you start the process of Google Workspace migration:
Create a subdomain for mail routing to Microsoft 365 or Office 365
Create a subdomain for mail routing to your Google Workspace domain
Provision users in Microsoft 365 or Office 365
Create a subdomain for mail routing to Microsoft 365
Note The option Add a domain won’t be available if using the legacy free edition of G Suite.
Enter the domain that you’ll use for routing mails to Microsoft 365 or Office 365, select User alias domain, and then select ADD DOMAIN & START VERIFICATION. A subdomain of your primary domain is recommended (for example, “m365mail.domain.com”, when “domain.com” is your primary domain) so that it will be automatically verified. If another domain (such as “domain.onmicrosoft.com”) is set, Google will send emails to each individual address with a link to verify the permission to route mail. Migration won’t complete until the verification is completed.
Note If you see an error GmailForwardingAddressRequiresVerificationException has occurred during the batch, skip this step of creating a subdomain for forwarding emails from the gmail side.
Follow any subsequent steps that are then required to verify your domain till the status is shown as Active. If you chose a subdomain of your primary domain (created in step 3), your new domain may have been verified automatically.
Sign in to your DNS provider and update your DNS records so that you have an MX record at the domain you created (in step 3), pointing to Microsoft 365 or Office 365. Ensure that this domain (created in step 3) is an accepted domain in Microsoft 365 or Office 365. Follow the instructions in Add a domain to Microsoft 365 to add the Microsoft 365 or Office 365 routing domain (“m365mail.domain.com”) to your organization and to configure DNS to route mail to Microsoft 365 or Office 365.
Note The migration process won’t be able to complete if an unverified routing domain is used. Choosing the built-in “tenantname.onmicrosoft.com” domain for routing mail to Office 365 instead of a subdomain of the primary Google Workspace domain occasionally causes issues that Microsoft is not able to assist with, besides causing Microsoft to recommend that the user manually verify the forwarding address or contact Google support.
Create a subdomain for mail routing to your Google Workspace domain
Enter the domain that you’ll use for routing mails to Google Workspace, select User alias domain, and then select ADD DOMAIN & START VERIFICATION. A subdomain of your primary domain is recommended (for example, “gsuite.domain.com”, when “domain.com” is your primary domain) so that it will be automatically verified.
Follow any subsequent steps that are then required to verify your domain till your domain’s status is shown as Active. If you chose a subdomain of your primary domain (created in step 3), your new domain may have been verified automatically.
Note It may take up to 24 hours for Google to propagate this setting to all the users in your organization.
Important If you are using non-default Transport settings in your Microsoft 365 or Office 365 organization, you should check whether the mail flow will work from Office 365 to Google Workspace. Ensure that either your default Remote Domain (“*”) has Automatic Forwarding enabled, or that there is a new Remote Domain for your Google Workspace routing domain (for example, “gsuite.domain.com“) that has Automatic Forwarding enabled.
Check Google Cloud platform permissions
An automated scenario requires the Google Migration administrator to be able to perform the following steps in the Google admin console:
Create a Google Workspace project.
Create a Google Workspace service account in the project.
Create a service key.
Enable all APIs – Gmail, Calendar, and Contacts.
The Google Migration administrator needs the following permissions to complete these steps:
resourcemanager.projects.create
iam.ServiceAccounts.create
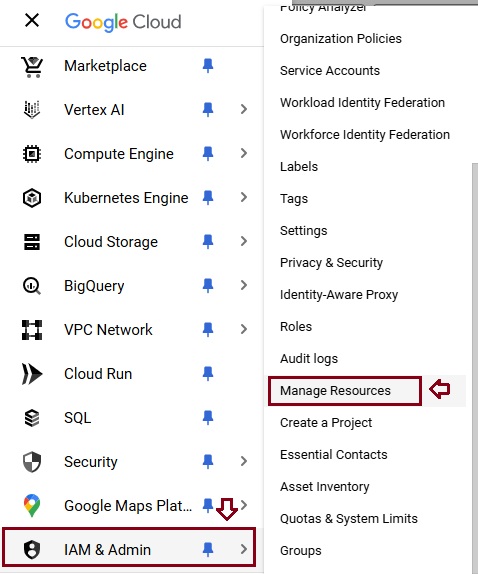
The most secure way to achieve completion of these four steps is to assign the following roles to the Google Migration administrator:
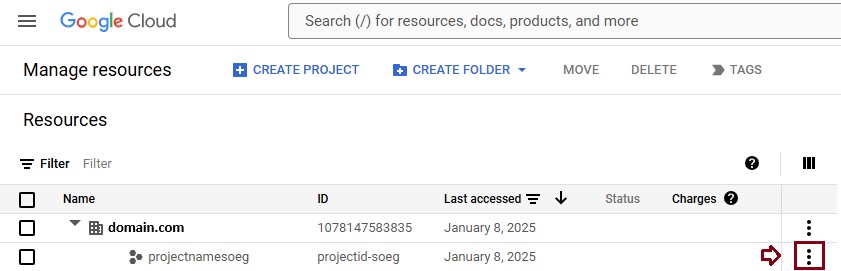
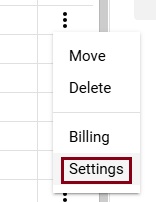
Select the appropriate resource and in the right-hand pane under the Permissions tab, select Add Principal.
Enter your Google Migration administrator credentials, enter Project Creator in the filter, and select Project Creator. Select Add Another Role, enter Create Service Accounts in the filter, and select Create Service Accounts. Select Save.
Note It might take up to 15 minutes to propagate role assignment changes across the globe.
Provision users in Microsoft 365. Once your Google Workspace environment has been properly configured, you can complete your migration in the Exchange admin center or through the Exchange Online PowerShell. Before proceeding with either method, ensure that Mail Users have been provisioned for every user in the organization who will be migrated (either now or eventually). If any users aren’t provisioned, provision them using the instructions in Manage mail users.
Very Important Note Microsoft recommend that the Default MRM Policy and Archive policies be disabled for these users until their migration has been completed. When such features remain enabled during migration, there is a chance that some messages will end up being considered “missing” during the content verification process.
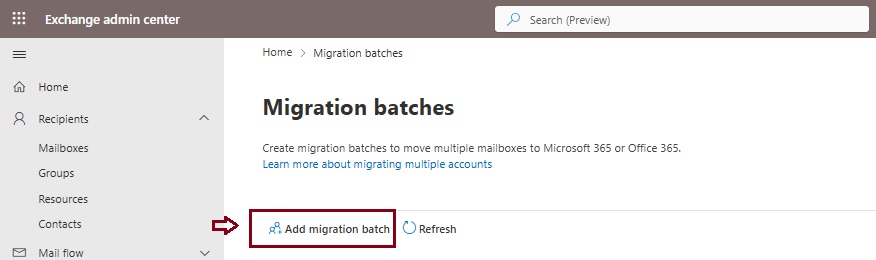
Start an automated Google Workspace migration batch in EAC
Give migration batch a unique name: Enter a unique name.
Select the mailbox migration path: Verify that Migration to Exchange Online is selected.
When you’re finished, click Next.
On the Select the migration type page, select Google Workspace (Gmail) migration as migration type, and click Next.
The Prerequisites for Google Workspace migration page appears.
Verify that the Automate the configuration of your Google Workspace for migration section is expanded, and then select Start in that section to automate the four required prerequisite steps.
In the Google sign-in page that appears, sign in to your Google account to validate your APIs.
Once the APIs are successfully validated, the following things happen:
A JSON file (projectid-*.json) is downloaded to your local system.
The link to add the ClientID and the Scope is provided. The ClientID and Scope are also listed for your reference.
Select the API access link. You’ll be redirected to Google Admin API Controls page.
Select Add new. Copy the ClientID and Scope from the EAC, paste it here, and then select Authorize.
Once the four prerequisites-related steps are completed, select Next. The Set a migration endpoint page appears.
Select one of the following options:
Select the migration endpoint: Select an existing migration endpoint from the drop-down list.
Create a new migration endpoint: Select this option if you’re a first-time user.
Note To migrate Gmail mailboxes successfully, Microsoft 365 or Office 365 needs to connect and communicate with Gmail. To do this connection-communication, Microsoft 365 or Office 365 uses a migration endpoint. Migration endpoint is a technical term that describes the settings that are used to create the connection so you can migrate the mailboxes.
If you’ve selected Create a new migration endpoint, do the following steps:
On the General Information page, configure the following settings:
Migration Endpoint Name: Enter a value.
Maximum concurrent migrations: Leave the default value 20 or change the value as required.
Maximum concurrent incremental syncs: Leave the default value 10 or change the value as required. When you’re finished, select Next.
On the Gmail migration configuration page, configure the following settings:
Email address: Enter the email address that you use to sign in to the Google Workspace.
JSON key: Select Import JSON. In the dialog box that appears, find and select the downloaded JSON file, and then select Open. Once the endpoint is successfully created, it will be listed in the Select migration endpoint drop-down list.
Select the endpoint from the drop-down list, and select Next. The Add user mailboxes page appears.
Select Import CSV file and navigate to the folder where you’ve saved the CSV file.
If you haven’t already saved or created the CSV file, create a CSV file containing the set of names of the users you want to migrate. You’ll need its filename below. The allowed headers are:
EmailAddress (required): Contains the primary email address for an existing Microsoft 365 or Office 365 mailbox.
Username (optional). Contains the Gmail primary email address, if it differs from EmailAddress.
CSV Format
EmailAddress will@domain.com user123@domain.com
When you’re finished, click Next. The Move configuration page appears.
From the Target delivery domain drop-down list, select the target delivery domain (the subdomain) that was created as part of fulfilling the Google Workspace migration prerequisites in Exchange Online, and click Next.
Note The target delivery domain (the subdomain) you select in this step can be either an existing one or the one that you’ve created in Google Workspace migration prerequisites in Exchange Online (eg. M365mail.domain.com).
If you don’t see the target delivery domain that you want to select in the Target delivery domain drop-down list, you can manually enter the name of the target delivery domain in the text box.
The text box in which you manually enter the name of the target delivery domain is Target delivery domain. That is, the text box is effectively the Target delivery domain drop-down list, which is taking the role of a text box when you manually enter text into it.
Filtering options have been introduced for the migration of Google Workspace to Microsoft 365 or Office 365. For more information on these filtering options.
On the Schedule batch migration page, verify all the details, click Save, and then click Done.
Once the batch status changes from Syncing to Synced, you need to complete the batch.
In Part II we will describe how to handle the large mailboxes (>100 GB) and the challenges we will face. Stay tuned 😊
As Microsoft cloud services have grown over the years, the domain space they live on has grown as well – into the hundreds. Over time, this fragmentation has created increasing challenges for end user navigation, administrative simplicity, and the development of cross-app experiences. Microsoft’s announcement, “cloud.microsoft is the new unified domain for Microsoft 365 apps and services.” It promises greater security and unified experience.
Why cloud.microsoft?
‘Dot brand’ top-level domains like .microsoft are an established method for enhancing the security, trustworthiness, and integrity of an organization’s web offerings. Similar to how the US government has exclusive rights to the .gov top-level domain (TLD), Microsoft has exclusive rights to the .microsoft TLD. Exclusive ownership enables enhanced security protocols and governance controls, and the value of security investments done at the top-level domain seamlessly accrue to the apps. And all experiences hosted on the .microsoft domain can be assumed to be legitimate and authentic: anyone attempting domain spoofing would have to go through Microsoft itself, as we are both the registry operator and sole registrant for this exclusive, trusted namespace. A common term before the “dot” is also necessary in order to realize the full benefits of a unified domain. “Cloud” was selected as a durable, extensible, neutral term with a meaningful relationship to the wide range of services that will come under its umbrella, starting with Microsoft 365.
Microsoft will be retiring the Send password in email feature from Microsoft 365 admin center starting August 30, 2024. Instead, Microsoft recommend using the new Printoption in the Microsoft admin center to save the user account details and share them in a secure manner with your users.
Admins will no longer be able to receive usernames and passwords in email after this change is implemented. This change will happen automatically by the specified date. No admin action is required.